7/19/2016 Update – The steps below describe a deployment in Azure “Classic”. If you are deploying a SQL Cluster in Azure Resource Manager (ARM) then you should see my aerticle here. https://clusteringformeremortals.com/2016/04/23/deploying-microsoft-sql-server-2014-failover-clusters-in-azure-resource-manager-arm/
Before we begin, we are going to make some assumptions that you are at least slightly familiar with failover clustering and Microsoft Azure and have already signed up for an Azure account. Throughout this Step-by-Step guide we will refer to additional resources for additional reading. Included in this guide are screen shots and code examples. Azure is a rapidly developing product, so your experience may be different than that described, but you should be able to adapt and adjust as needed. I will attempt to keep this article up to date my adding additional comments as time progresses. The new Azure Portal is still in the Preview stage as of the writing of this article, so we will use the currently supported portal along with PowerShell in all of our examples.
At a high level, these are the following steps that need to be taken in order to create a highly available SQL Server deployment on Azure IaaS. If you already have a functioning domain in Azure IaaS you can skip items 1-3.
- Create your Virtual Network
- Create a Cloud Service
- Create Storage Account
- Create your Azure VMs and Storage
- Configure Active Directory
- Create a Cluster
- Create Replicated Cluster Volume Resources
- Install SQL into the Cluster
- Create an Internal Load Balancer
- Update the Client Listener
We will take a closer look at each of these steps below.
Overview
These instructions assume you want to create a highly available SQL Server deployment entirely within one Azure region. It is entirely possible to configure SQL Server clusters that span different geographic regions within Azure, or even Hybrid Cloud configurations that span from on premise to the Azure Cloud or visa-versa. It is not my intent to cover those types of configurations in this document. Instead, the configuration I will focus on the configuration is illustrated in in Figure 1.
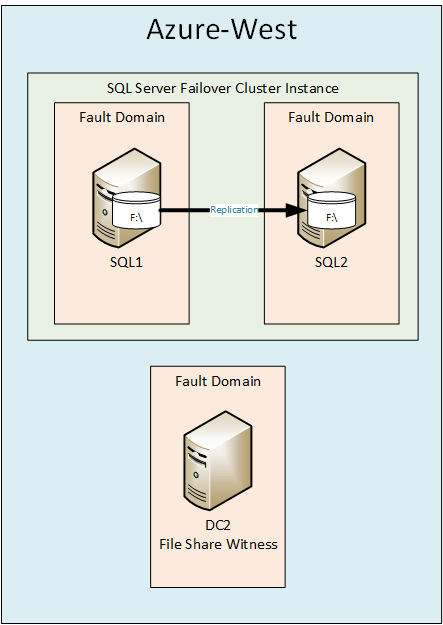
Figure 1 – SQL Server Failover Cluster in Azure
This article will describe how to create a cluster that spans two different Fault Domains and Update Domains within an Azure region. Spanning different Fault Domains eliminates downtime associated with Unplanned Downtime. Spanning different Update Domains eliminates failures associated with Planned Downtime.
For additional overview information, you may want to watch the webinar I did on SQLTIPS that discusses this topic in detail. It can be viewed at http://www.mssqltips.com/sql-server-video/360/highly-available-sql-server-cluster-deployments-in-azure-iaas/
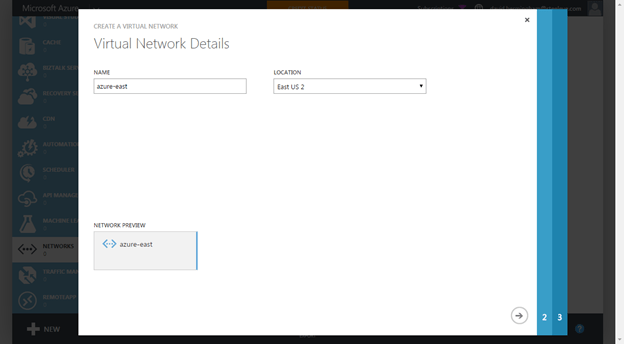
Create your Virtual Network
In order for this to work, you will need to have all of your VMs within a Virtual Network. Creating a Virtual Network is pretty straight forward. The screen shots below should help guide you through the process.

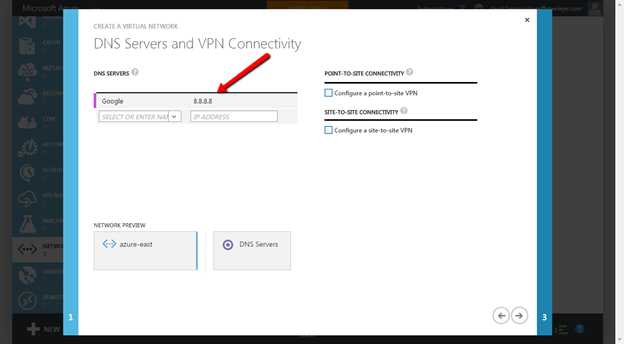
At this point I like to add the Google DNS Server address of 8.8.8.8. I have experienced weird connectivity issues when trying to download updates from Microsoft when using their default DNS servers. After we have downloaded all of the updates that these servers need we will come back and replace the DNS server IP address with the IP address of our AD controller. But for now, add 8.8.8.8 and all of your VMs provisioned in this Virtual Network will receive this as a DNS server via the DHCP service. This forum post describes the problem I have experienced without adding this DNS server entry. Before adding all of your servers to the domain I have found that you need to delete this 8.8.8.8 address and replace it with the IP address of the first domain controller that you create.
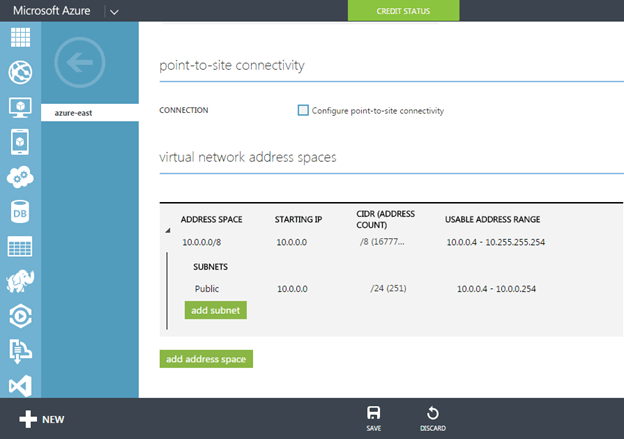
You will see that I created one subnet in this Virtual Network and labeled it Public. Later on when we create our VMs we will use the Public network. While Azure recently added support for multiple NICs per VM, I have found that adding multiple subnets and NICs to an Azure VM can be problematic. The main problem is that each NIC is automatically assigned a Gateway address, which can causes routing problems due to multiple Gateways being defined on the same server.
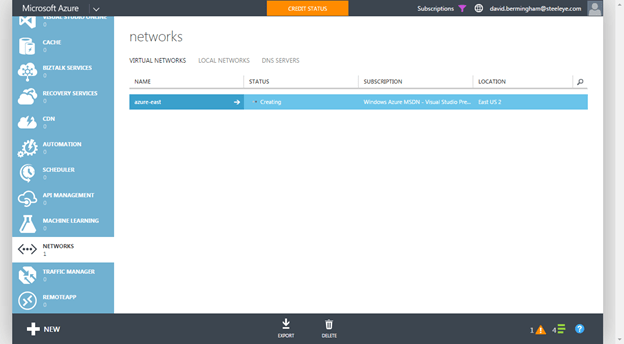
It will take a few minutes for your Virtual Network to be created.
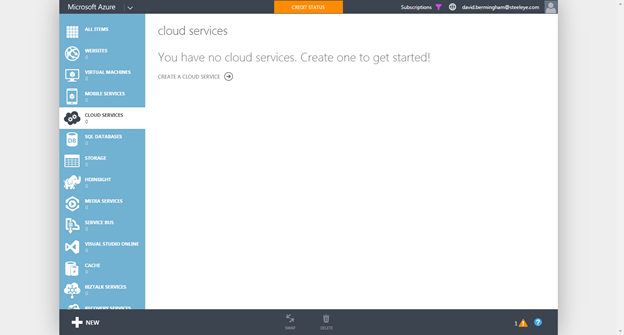
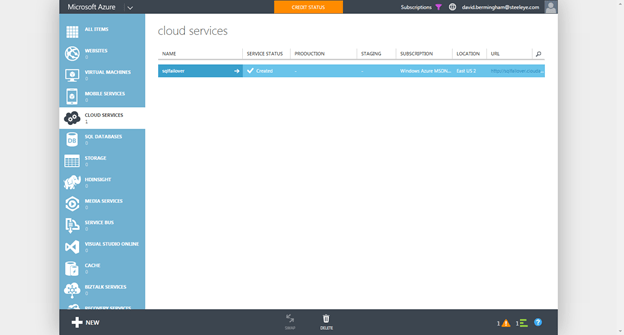
Create a Cloud Service
Your VMs will all reside in the same “Cloud Service”. Good luck finding the definition of an Azure “Cloud Service”, since Azure overall is a “Cloud Service”. However, this is a very specific think specific to Azure IaaS that you need to create before you start deploying VMs. The screen shots below will walk you through the process.
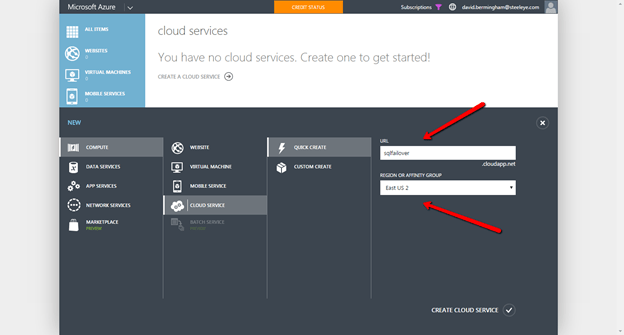
Make sure you put the Cloud Service in the same Region as your Virtual Network.

Create a Storage Account
Before you begin provisioning VMs you must create a Storage Account. Follow the steps below to create a storage account.
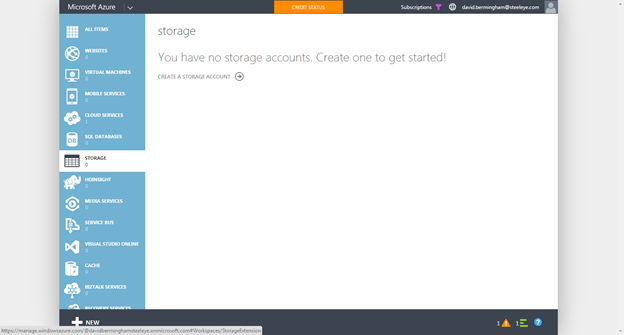

Make sure you create a Storage Account in the same Location as your Virtual Network
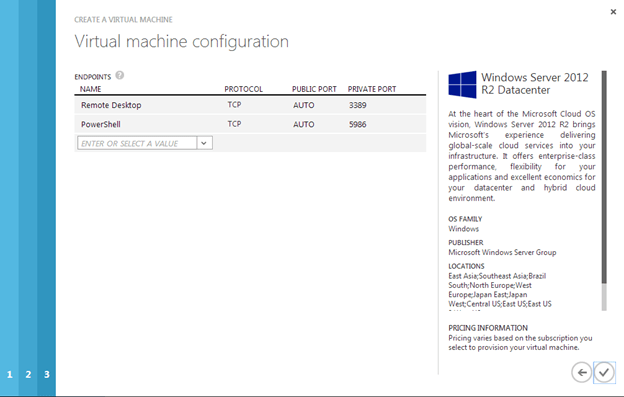
Create your Azure VMs and Storage
If you have not downloaded and installed Azure PowerShell yet, do that now. Also, make sure you set your default subscription and CurrentStorageAccountName.
We will start with provisioning the first VM which will become the Domain Controller (DC). In our example, we will also use the DC as a file share witness, so we will create an Availability Set that will include the Domain Controller and the two nodes in the cluster. The following is an example script which will create the VM and assign it a “Static Address”.
$AVSet=”SQLHA”
$InstanceSize=”Large”
$VMName=”DC1″
$AdminName=” myadminaccount”
$AdminPassword=”mypassword”
$PrimarySubnet=”Public”
$PrimaryIP=”10.0.0.100″
$CloudService=”SQLFailover”
$VirtualNetwork=”Azure-East”
$ImageName=”a699494373c04fc0bc8f2bb1389d6106__Windows-Server-2012-R2-201412.01-en.us-127GB.vhd”
$image = Get-AzureVMImage -ImageName $ImageName
$vm = New-AzureVMConfig -Name $VMName -InstanceSize $InstanceSize -Image $image.ImageName –AvailabilitySetName $AVSet
Add-AzureProvisioningConfig –VM $vm -Windows -AdminUserName $AdminName -Password $AdminPassword
Set-AzureSubnet -SubnetNames $PrimarySubnet -VM $vm
Set-AzureStaticVNetIP -IPAddress $PrimaryIP -VM $vm
New-AzureVM -ServiceName $CloudService –VNetName $VirtualNetwork –VM $vm
Tech Note – I say “Static IP Address”, but it really just creates a DHCP “Request”. I call it a DHCP “Request” and not “Reservation” because it really is only a best effort request. If this server is offline and someone starts a new server, the DHCP server could hand out this address to someone else, making it unavailable when this server is turned on.
Once you create your 1st VM you are ready to create the two SQL VMs used in the cluster. You will see that I tried to make the script easy to use by allowing you to specify the different variables. I highlighted the variables you need to change for each VM.
$AVSet=”SQLHA”
$InstanceSize=”Large”
$VMName=”SQL1″
$AdminName=”myadminaccount”
$AdminPassword=”P@55w0rd”
$PrimarySubnet=”Public”
$PrimaryIP=”10.0.0.101″
$CloudService=”SQLFailover”
$VirtualNetwork=”Azure-East”
$ImageName=”a699494373c04fc0bc8f2bb1389d6106__Windows-Server-2012-R2-201412.01-en.us-127GB.vhd”
$image = Get-AzureVMImage -ImageName $ImageName
$vm = New-AzureVMConfig -Name $VMName -InstanceSize $InstanceSize -Image $image.ImageName –AvailabilitySetName $AVSet
Add-AzureProvisioningConfig –VM $vm -Windows -AdminUserName $AdminName -Password $AdminPassword
Set-AzureSubnet -SubnetNames $PrimarySubnet -VM $vm
Set-AzureStaticVNetIP -IPAddress $PrimaryIP -VM $vm
New-AzureVM -ServiceName $CloudService –VNetName $VirtualNetwork –VM $vm
Run the script once again to provision the 2nd cluster node
$AVSet=”SQLHA”
$InstanceSize=”Large”
$VMName=”SQL2″
$AdminName=” myadminaccount”
$AdminPassword=”mypassword”
$PrimarySubnet=”Public”
$PrimaryIP=”10.0.0.102″
$CloudService=”SQLFailover”
$VirtualNetwork=”Azure-East”
$ImageName=”a699494373c04fc0bc8f2bb1389d6106__Windows-Server-2012-R2-201412.01-en.us-127GB.vhd”
$image = Get-AzureVMImage -ImageName $ImageName
$vm = New-AzureVMConfig -Name $VMName -InstanceSize $InstanceSize -Image $image.ImageName –AvailabilitySetName $AVSet
Add-AzureProvisioningConfig –VM $vm -Windows -AdminUserName $AdminName -Password $AdminPassword
Set-AzureSubnet -SubnetNames $PrimarySubnet -VM $vm
Set-AzureStaticVNetIP -IPAddress $PrimaryIP -VM $vm
New-AzureVM -ServiceName $CloudService –VNetName $VirtualNetwork –VM $vm
You see that each of these VMs are all placed in the same Availability Set, which I called “SQLHA”. By placing the VMs in the same Availability Set you take advantage of Fault Domains and Update Domains as described here. http://blogs.technet.com/b/yungchou/archive/2011/05/16/window-azure-fault-domain-and-update-domain-explained-for-it-pros.aspx
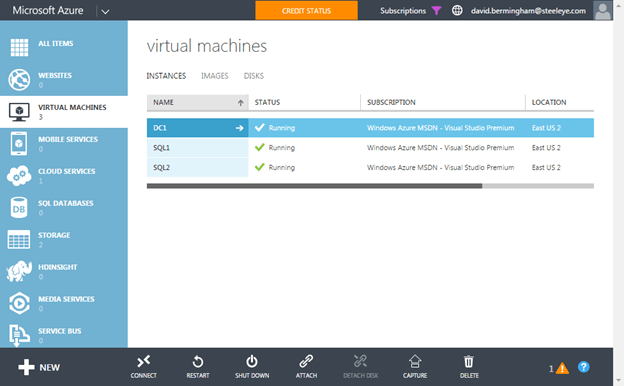
Once you have created your VMs your Azure Portal should look like this.
Words of Wisdom about Fault Domains
Fault Domains are a great concept; however Microsoft dropped the ball by not guaranteeing (As of Jan 2015) that you will always get three fault domains per Availability Set. In fact, most of the time I only get two Fault Domains. If you wind up with just two Fault Domains you will want to consider putting your File Share Witness in a different region just to be 100% sure that you don’t have a majority of your cluster votes sitting in the same rack. Once Windows Server 10 is GA this will no longer be a problem as you will be able to use a Cloud Witness instead of a File Share Witness. If you would like to see three Fault Domains be the standard, follow this link and VOTE for that idea on Azure idea website.
Configure Active Directory
First we will connect to DC1 via RDP and enable active directory. Use the “Connect” button to download the RDP connection to DC1. Use the username and password that you specified when you created your Azure VM. Promote DC1 to a Domain Controller.
Insider Tip – I have also found that DNS resolution works best if you remove all DNS forwarders on the DNS server and just use root hints. Azure can sometime have problem resolving Microsoft web properties if you use their DNS servers are forwarders.
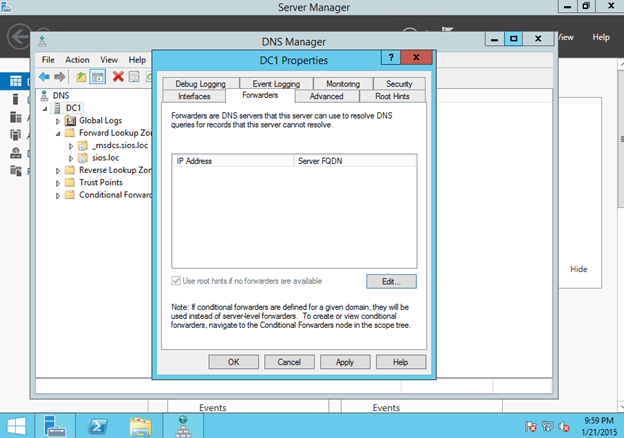
Figure 2 – Remove all forwarders for reliable name resolution
Create a Cluster
Once you have configured DC1 as a Domain Controller, you will connect to SQL1 and SQL2 and add them to the domain. However, before you do that, you will need to change the DNS Server of the Virtual Network to that of the DC1 Server (10.0.0.100) and reboot both SQL1 and SQL2. Once SQL1 and SQL2 have 100.0.0.100 as their DNS Server you will be able to join the domain.
Once you are joined to the domain you will have to complete steps illustrated below to create a SQL Server Failover Cluster Instance (FCI).
First, enable .Net 3.5 Framework on each node.
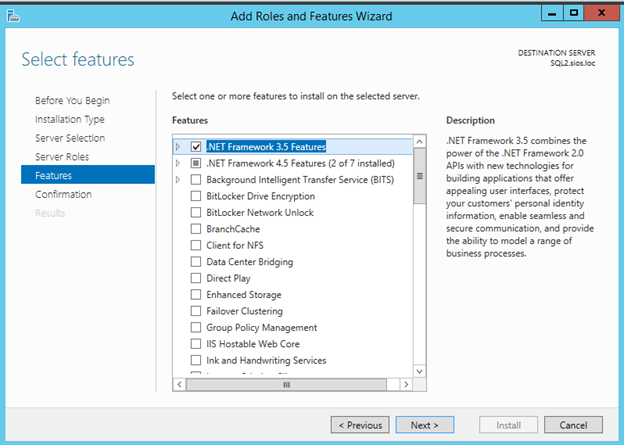
If you find that .Net Framework cannot be installed, refer to my tip about DNS.
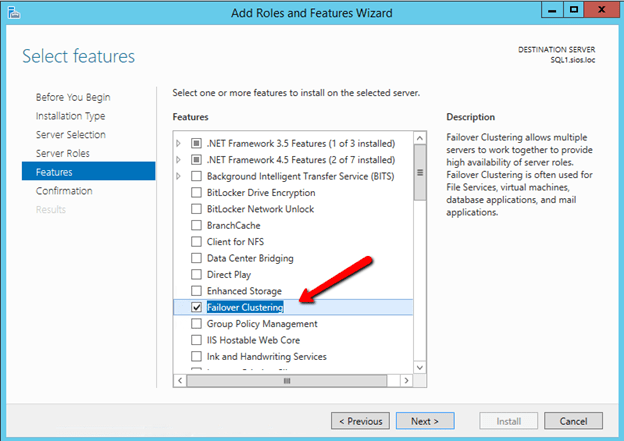
Enable Failover Cluster
Now that .Net 3.5 is enabled, you will then need to enable the Failover Cluster Feature on both SQL1 and SQL2.
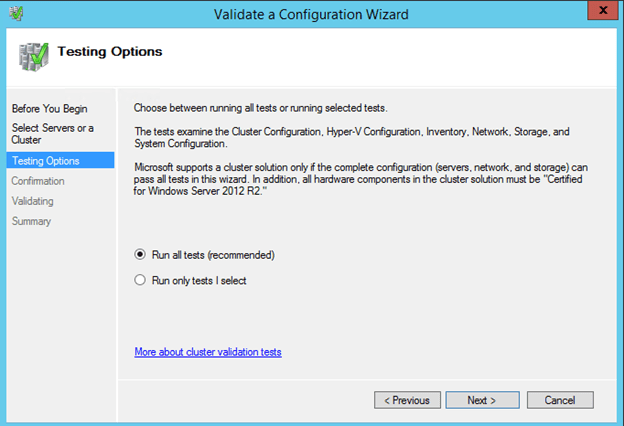
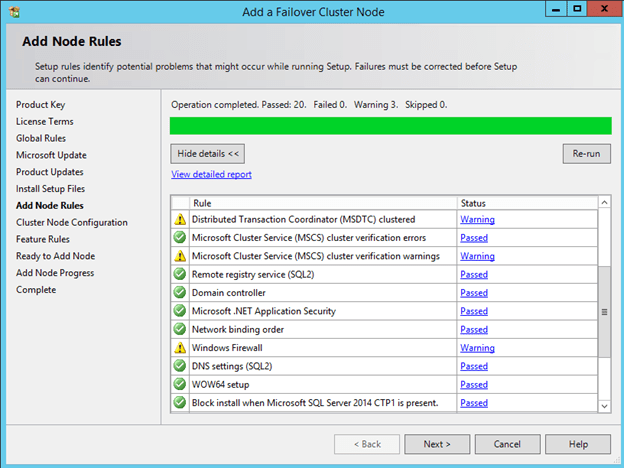
Validation
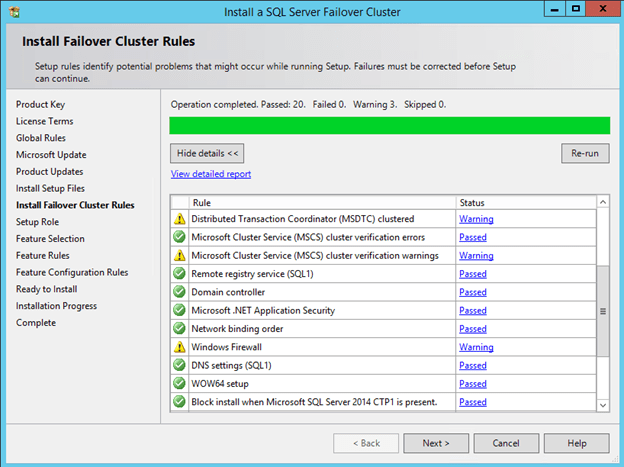
Once the cluster feature is enabled, you will need to create the cluster. The first step is to run cluster Validation. I am assuming you are familiar with clustering, so I will just post a few of the screen shots and make note of things you need to consider.
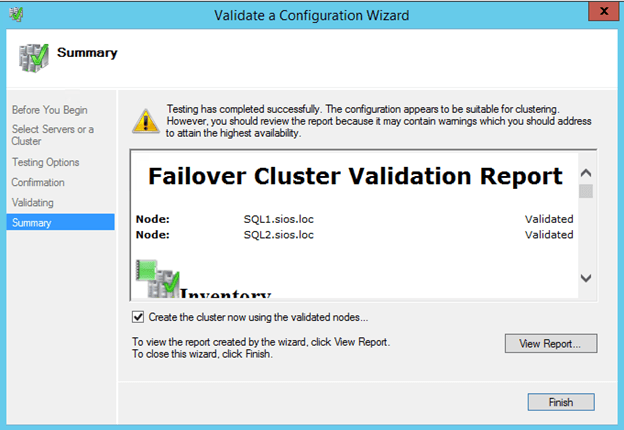
The Validation will complete, but there will be some warnings. Most of the warnings will be around storage. You can ignore those as we will be using replicated storage rather than a shared disk. Also, you may get a warning about the network. You can also ignore that warning as we know that Azure has network redundancy built in at the physical layer.
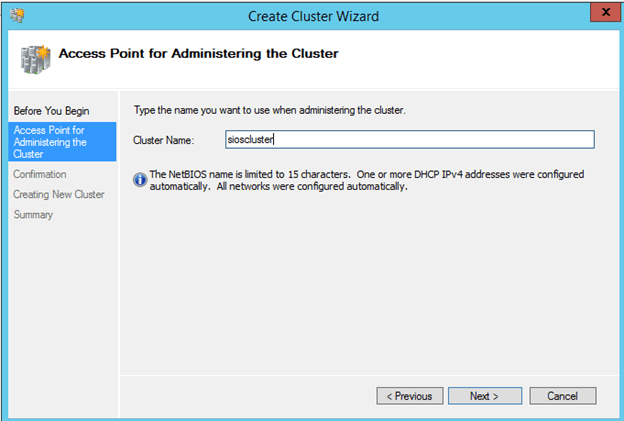
Create Cluster Access Point
11/24/2015 UPDATE – I have found that creating a cluster via Powershell avoids all this issues described in the GUI steps show below because you can specify the IP Address of the Cluster as part of the creation process. The two PowerShell commands below replace all the steps show in the GUI screen shots that follow in this section. Make sure the StaticIaddress parameter
Test-Cluster –Node Server1, Server2
New-Cluster –Name MyCluster –Node Server1, Server2 –StaticAddress 10.0.0.200
If you ran the Powershell Script above then you can skip the rest of this section and jump right to the next section on creating the file share witness.
I would advise creating the Click Finish to start the cluster creation process. First choose a name for the cluster.
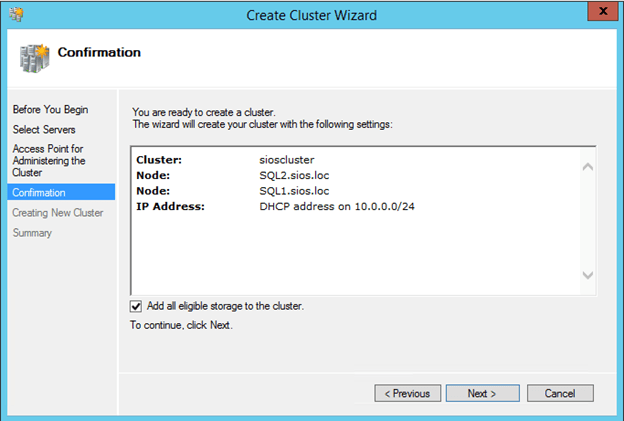
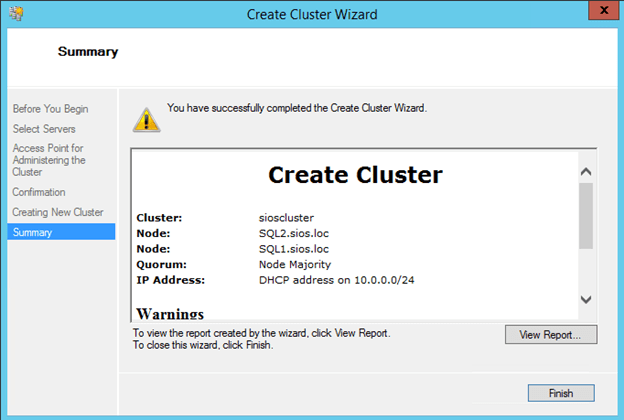
You will see that there are some warnings if you click View Report. You can ignore the warning as we will be creating a File Share Witness.
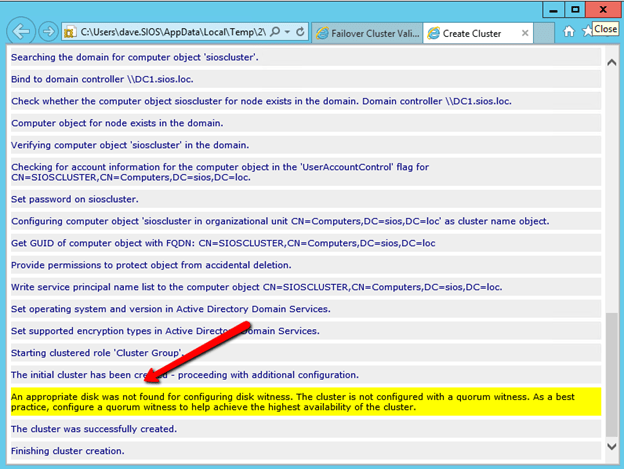
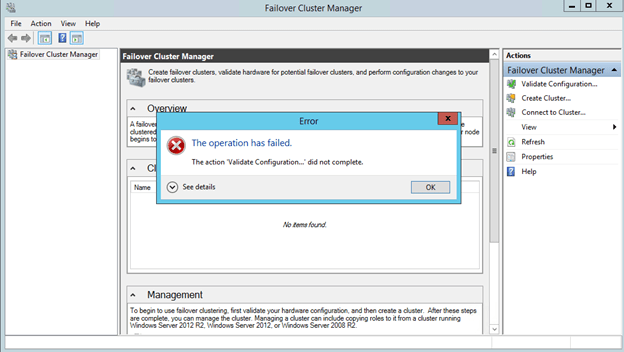
You may get the following message after the cluster creates. “The action ‘Validate Configuration…’ did not complete.
Fix Cluster Access Point IP Address
The underlying issue here is that the cluster is not resolving the cluster name properly due to an IP address conflict. What you will find is that Azure DHCP actually gives out a duplicate IP address to the cluster computer object that you just created. This is just one of the weird Azure idiosyncrasies that you will have to deal with as shown below.

You may need to open the Failover Cluster GUI on SQL2 in order to connect. Once you are able to connect to the cluster you will see that the cluster grabbed the same IP address as one of the cluster nodes. This of course causes IP address conflicts.
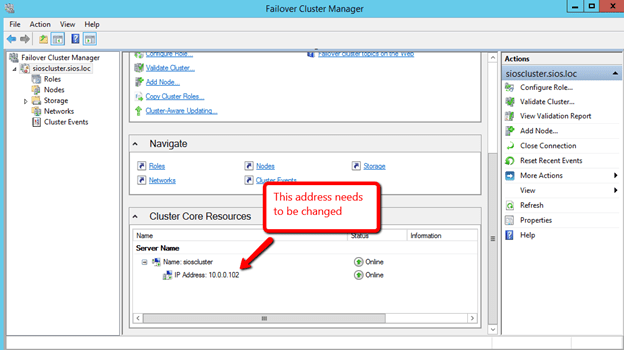
What we need to do is change the 10.0.0.102 IP address to another IP address not used in this subnet.
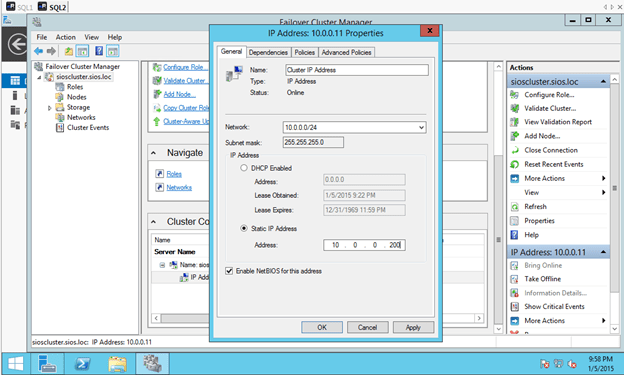
You will see I picked 10.0.0.200 as my address. This address is NOT reserved in the DHCP scope as there is currently no way to control the DHCP scope or add reservations. I just pick an address at the upper end of the DHCP scope and make sure that I don’t provision enough VMs within this subnet to ever reach that IP address.
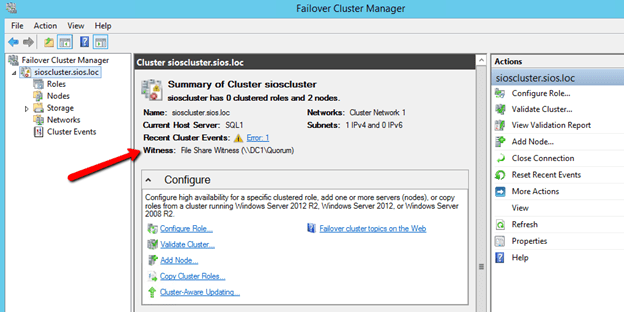
Now that the Cluster IP address is fixed you will be able to connect to the cluster using Failover Cluster Manager from either node.
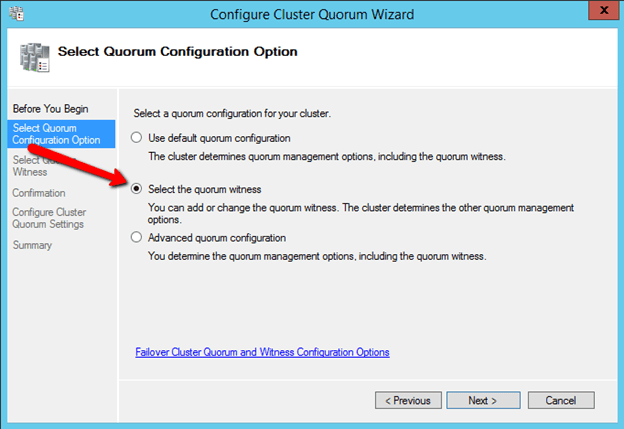
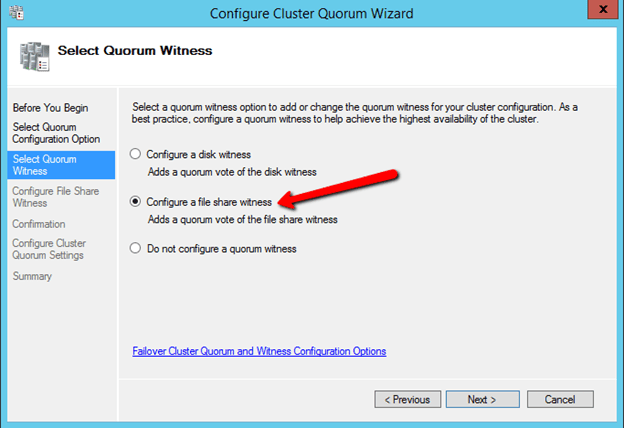
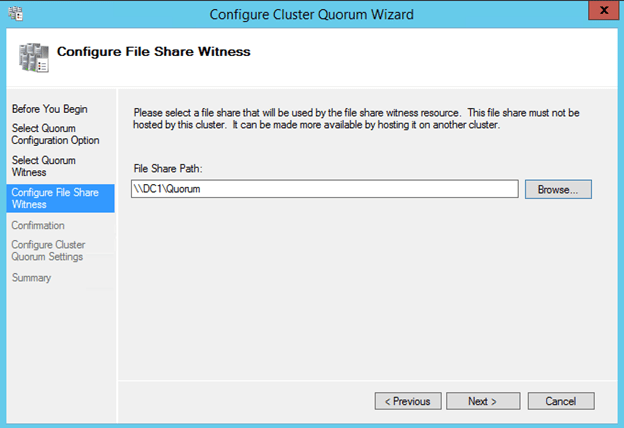
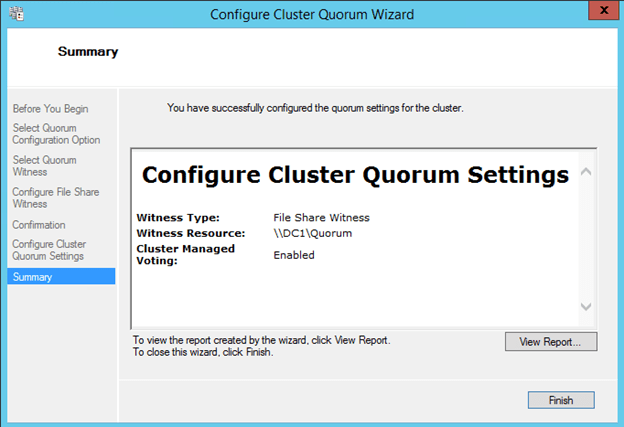
Create File Share Witness
Next we will create a File Share Witness for the cluster quorum. For a complete description of cluster quorums read my blog post on MSDN press, http://blogs.msdn.com/b/microsoft_press/archive/2014/04/28/from-the-mvps-understanding-the-windows-server-failover-cluster-quorum-in-windows-server-2012-r2.aspx
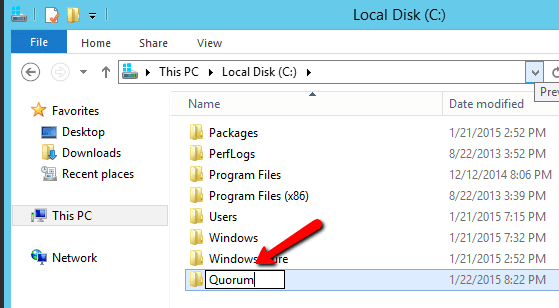
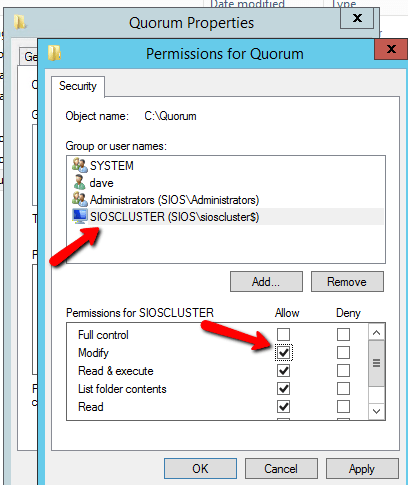
The file share witness will be created on the Domain Controller. Essentially you need to create a file share on DC1 and give read/write permissions to the cluster computer account “sioscluster”. Make sure to make these changes to both the Share and Security permissions as shown below.
The following steps are done on DC1.
Create a new folder.
Make sure you search for Computer objects and pick the cluster computer object name, in our case, SIOSCLUSTER

Make sure you give it Change permissions.

You also need to change the Security to allow the cluster computer object Modify permissions on the folder.
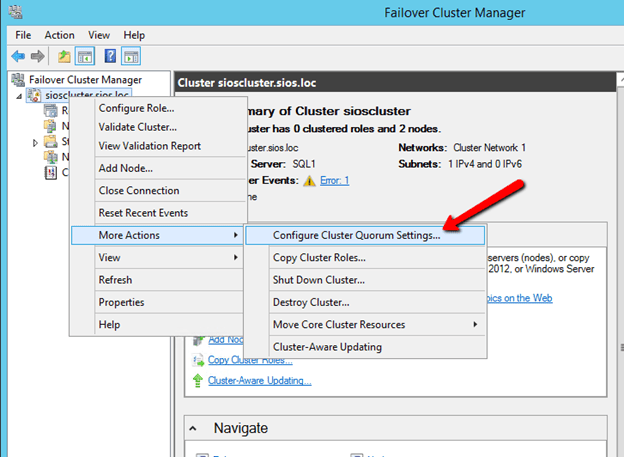
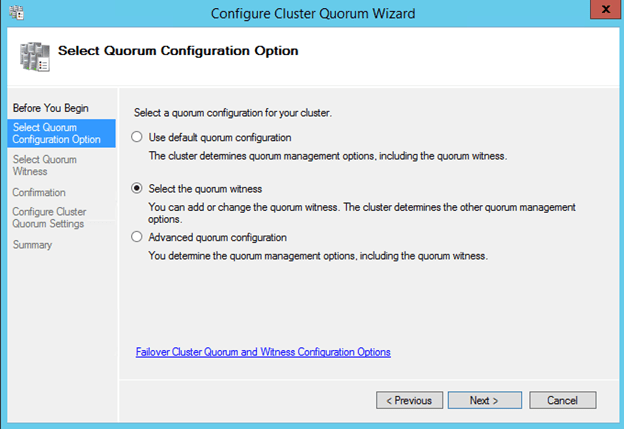
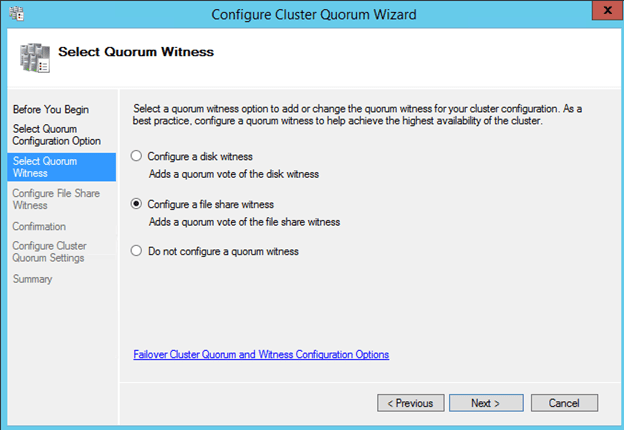
Once you create the shared folder, you will add the File Share Witness using the Windows Server Failover Cluster interface on either of the nodes as shown below.
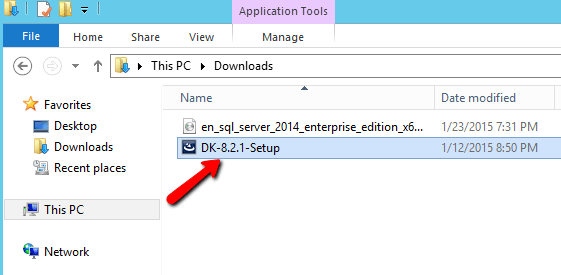
Install DataKeeper
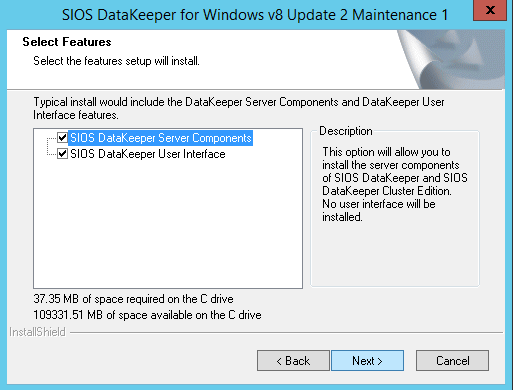
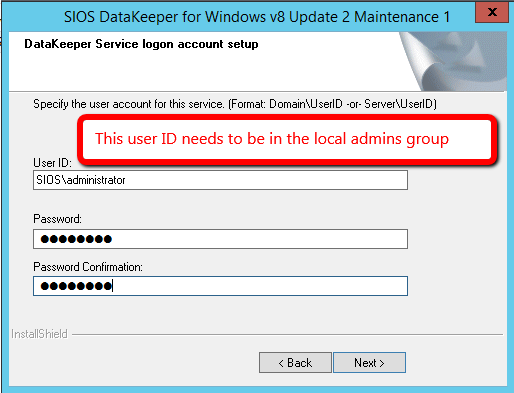
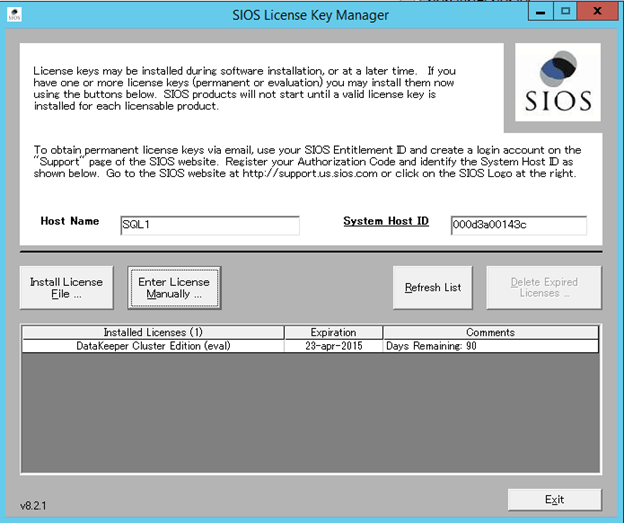
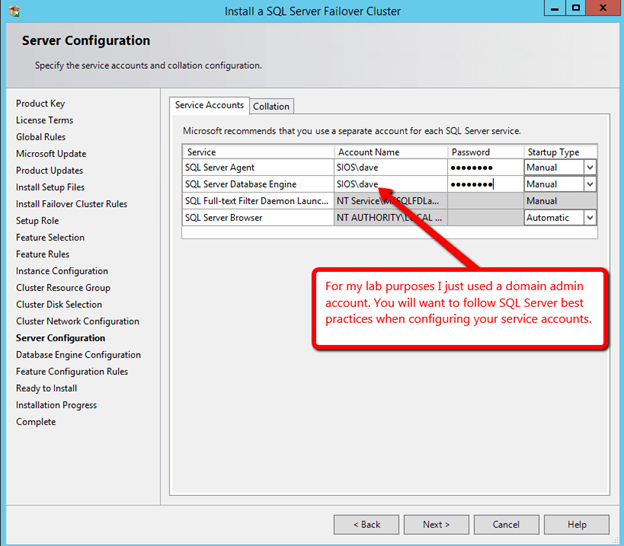
DataKeeper Cluster Edition from SIOS Technology is needed in order to provide the replication and cluster integration that will allow you to build a failover cluster instance without shared storage. First, you will install DataKeeper Cluster Edition on both of the nodes of your cluster. Run through the setup as shown below.
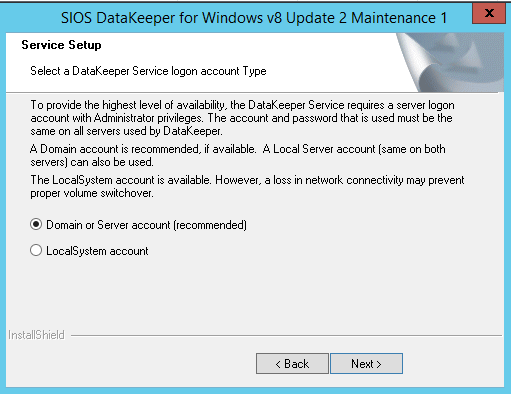
For demonstration purposes I used the domain administrator account. The only requirement is that the user account used is in the local administrator group in each server.
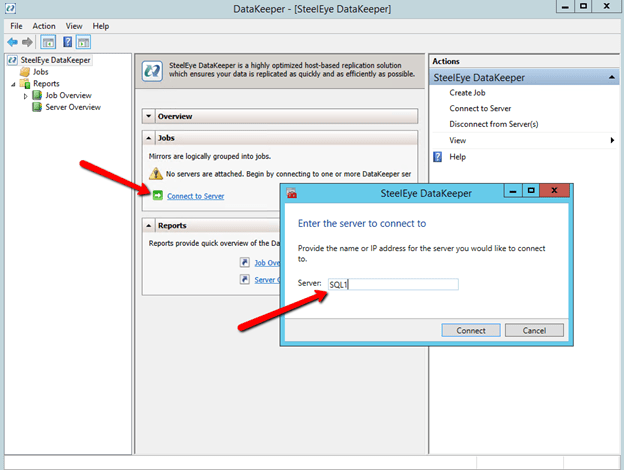
Create a DataKeeper Volume Resource
After you install the software on each cluster node (SQL1 and SQL2) you are ready to create you first replicated volume resource. Launch the DataKeeper GUI on either node and follow the steps below to create a DataKeeper Volume Resource.
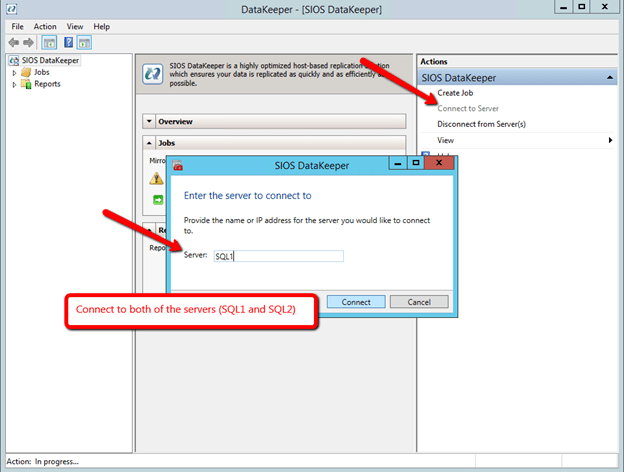
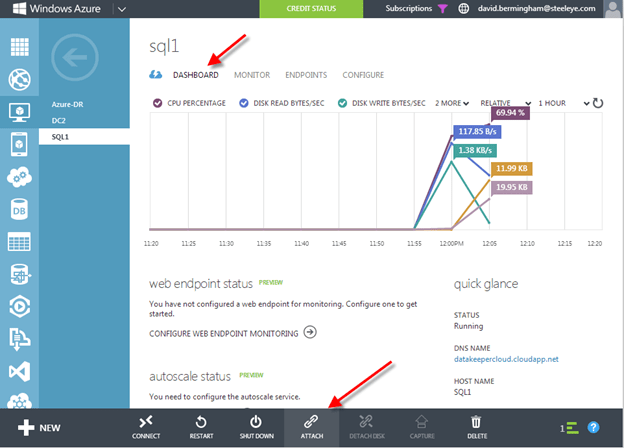
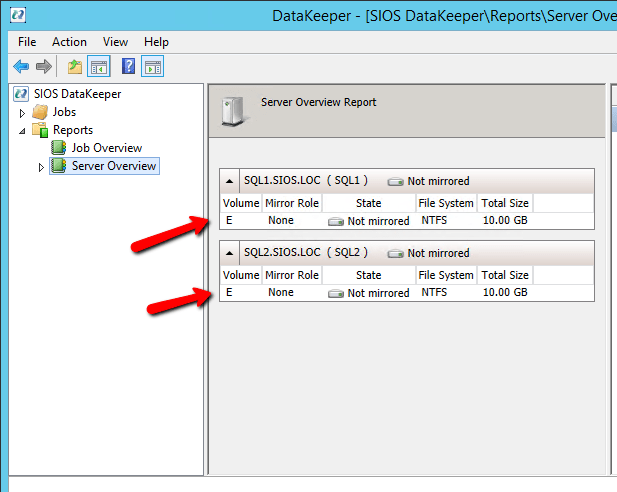
After you connect to both servers, click on the Server Overview Report. It should look like the following.

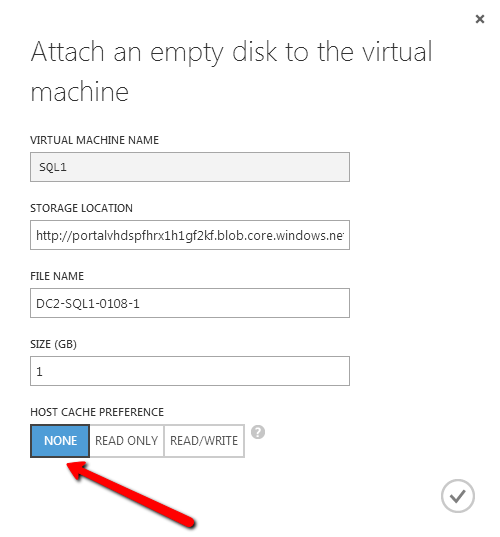
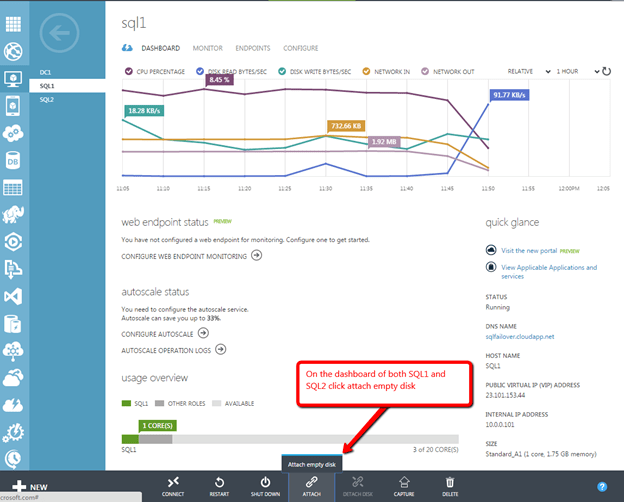
You’ll notice that you are connected to both servers, but there are no volumes listed. Next we will need to add additional storage to each cluster node. Do this through the Azure portal as shown below.
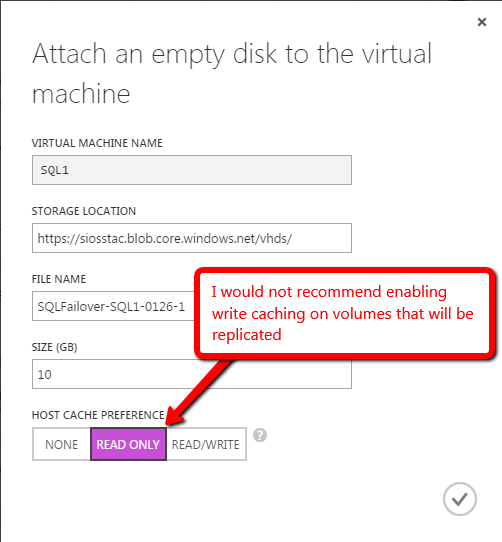
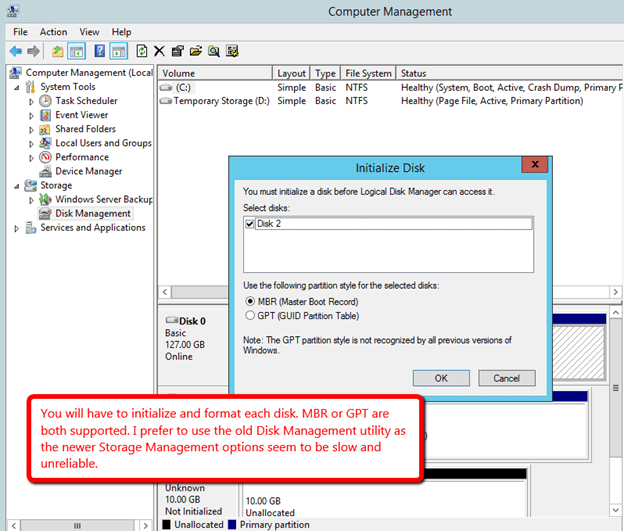
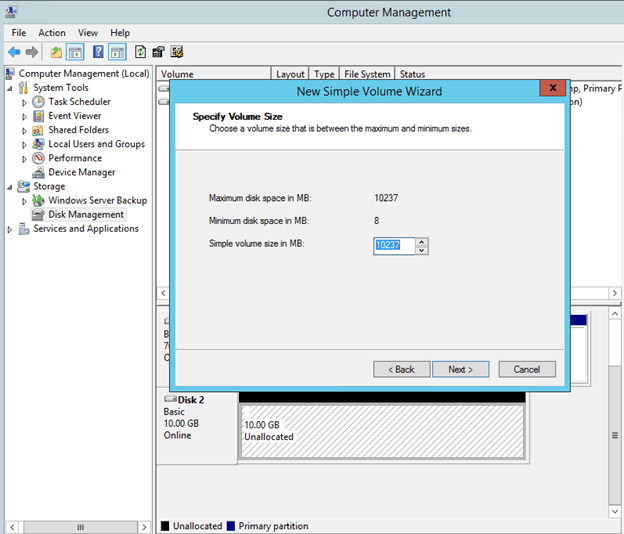
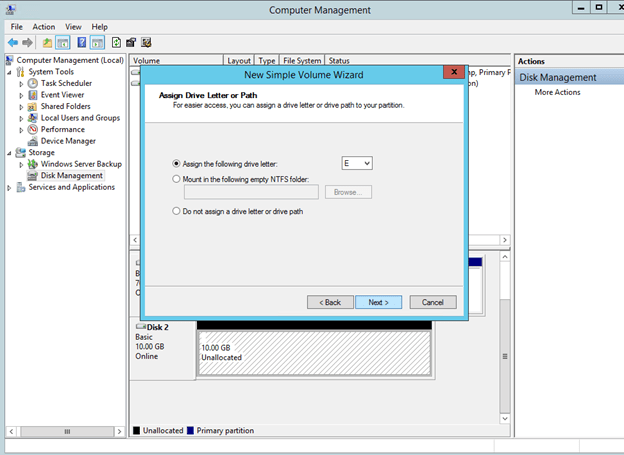
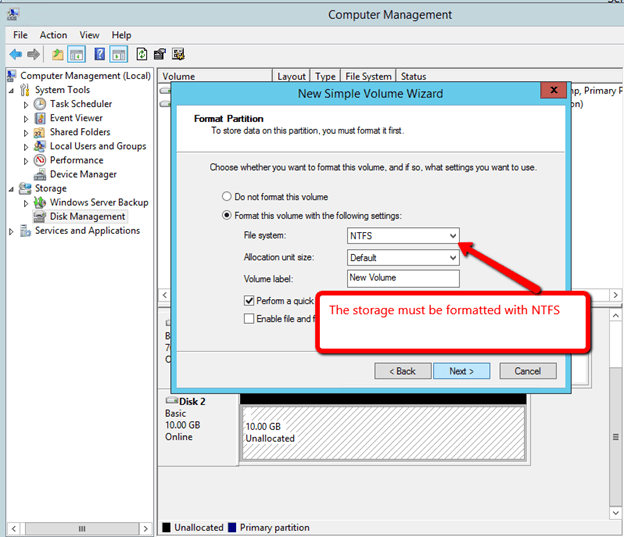
After you have added the additional volume to each VM and created a formatted partition, you DataKeeper GUI should look like this.
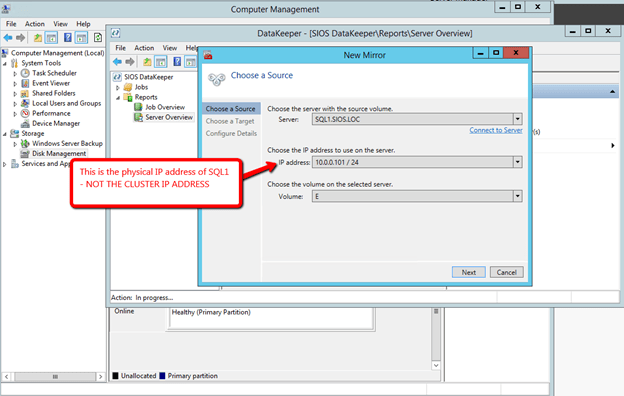
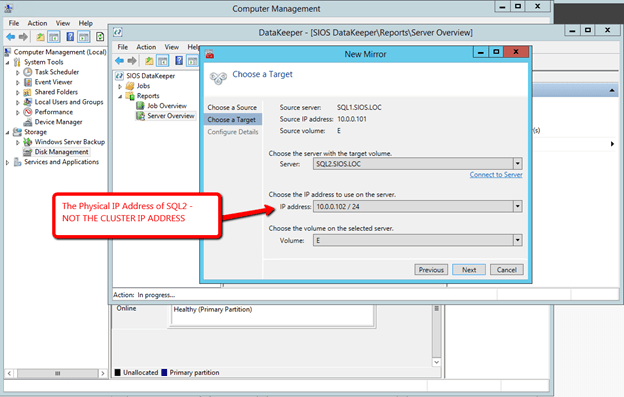
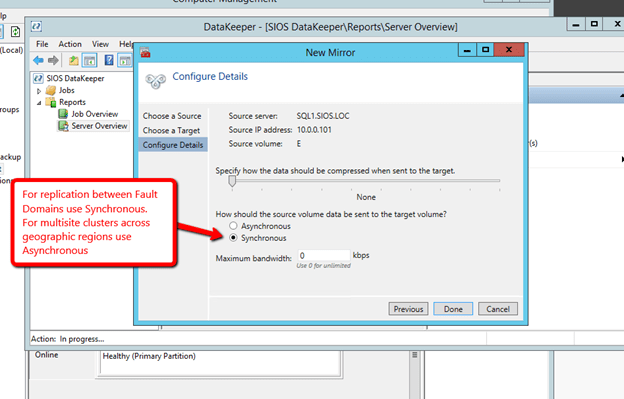
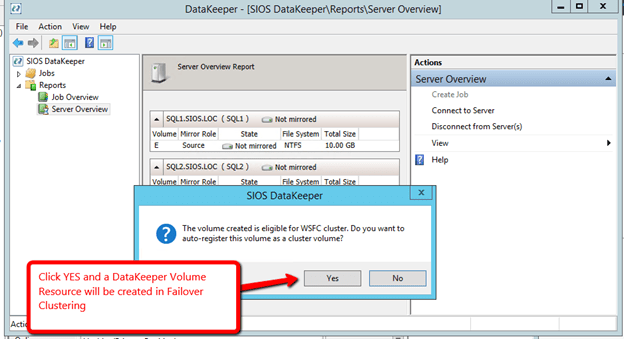
You are now ready to launch the Create a Job Wizard and create the DataKeeper Volume resource as shown below.
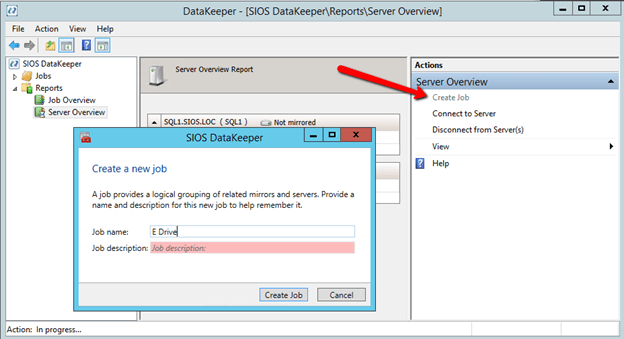
Create the job and give it a name and optional description.
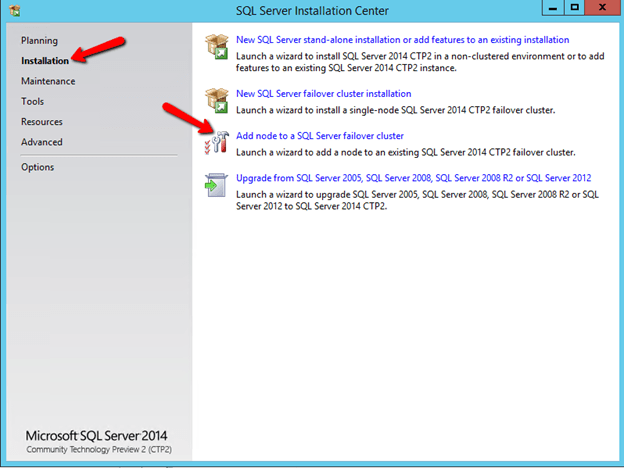
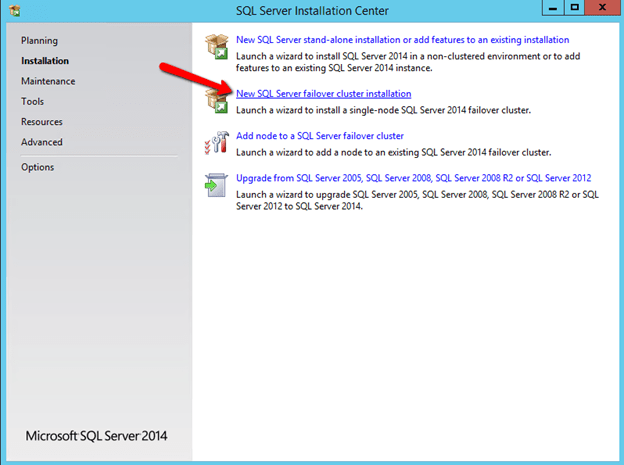
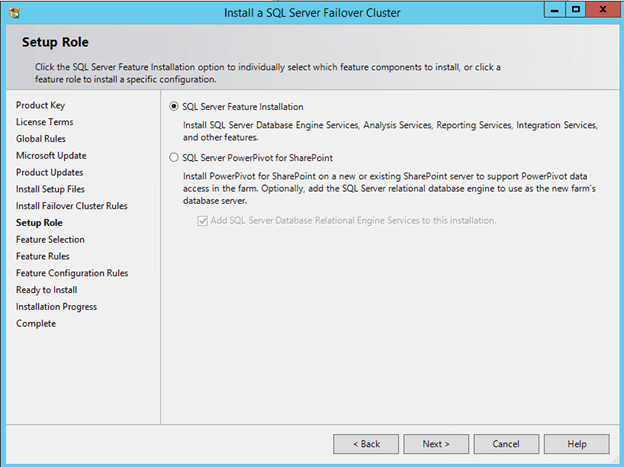
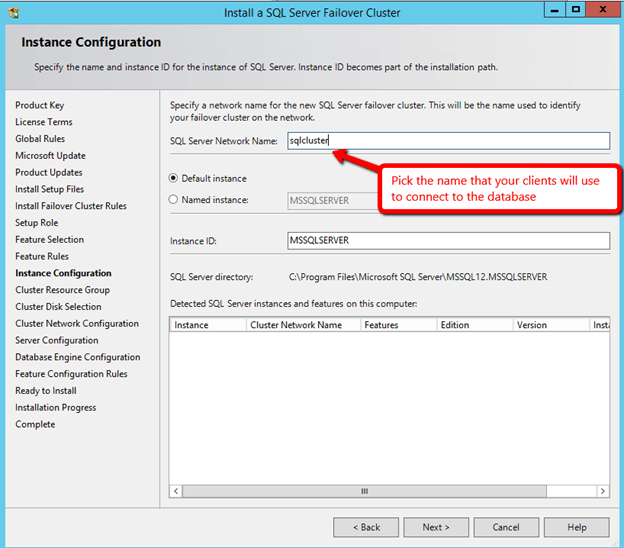
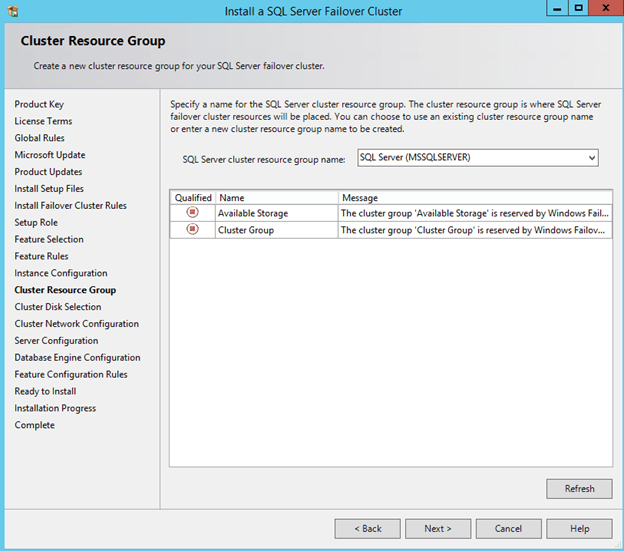
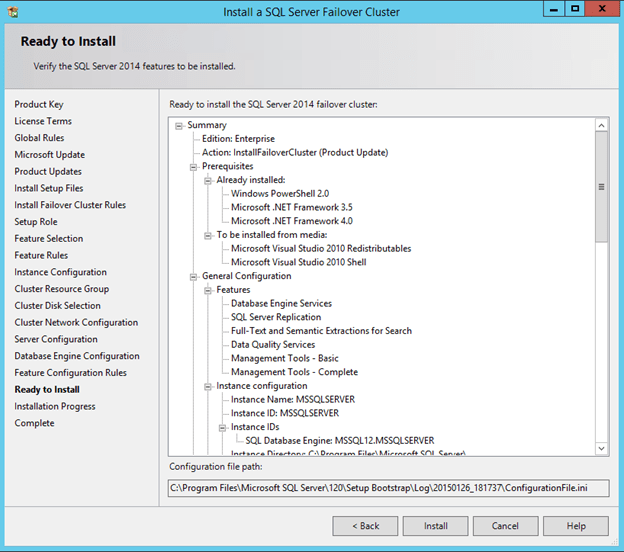
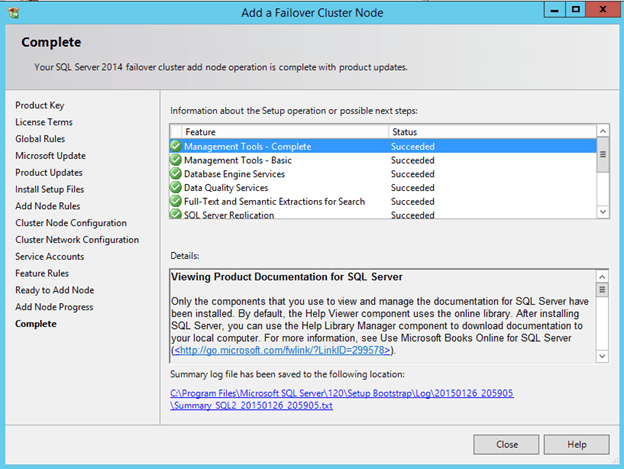
Install SQL into the Cluster
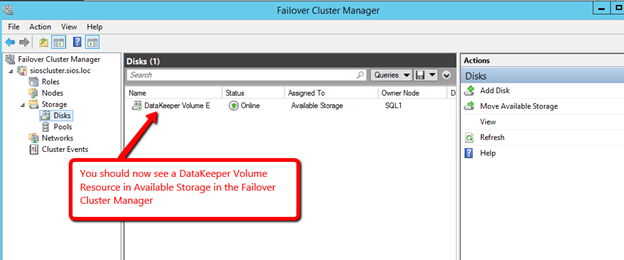
Now that you have the cluster configured and a DataKeeper Volume in Available Storage, you are ready to begin the SQL Server Cluster Installation. This process is exactly the same as if you were installing a SQL Server Failover Cluster Instance using shared storage. Since the DataKeeper Replicated Volume resource is a Storage Class resource, failover clustering treats it like a Physical Disk resource. Follow the steps pictured below to install SQL Server into the cluster.
You can use SQL Server 2014 Standard Edition to build a 2-node Failover Cluster. In this scenario DataKeeper can also replicate Data to a 3rd node, but that node cannot be part of the cluster. If you want to create a 3+ node cluster you will need to use SQL Server 2014 Enterprise Edition. Earlier versions of SQL work perfectly fine as well. I have tested SQL 2008 through SQL 2014.


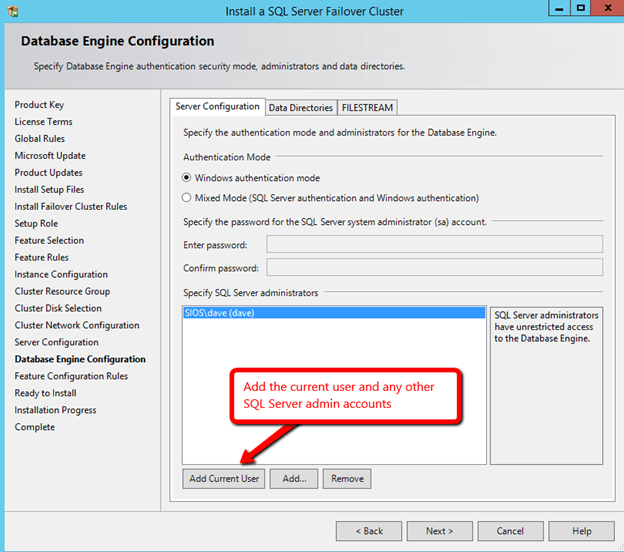
Before clicking Next, click on the Data Directories tab.

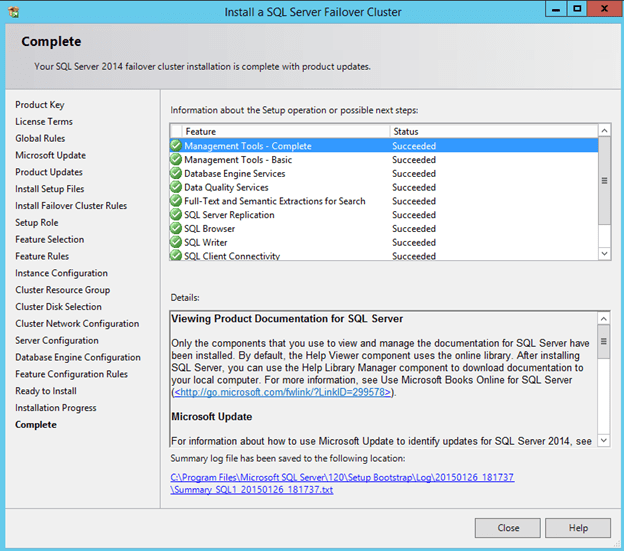
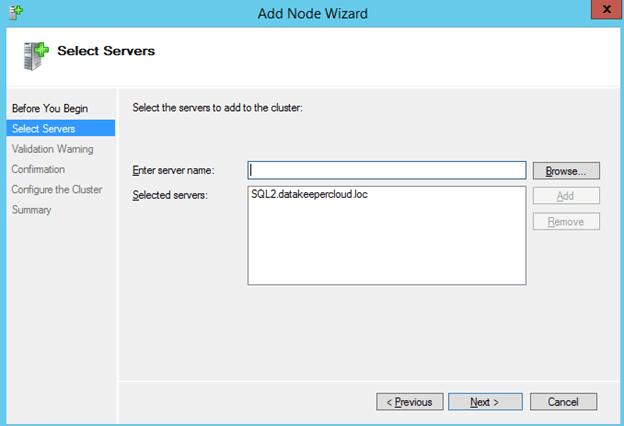
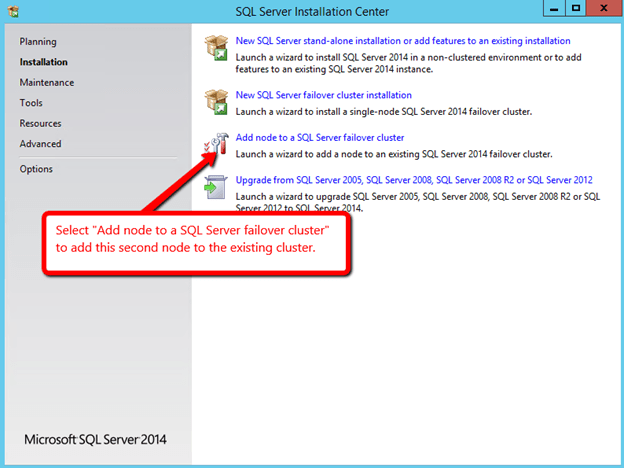
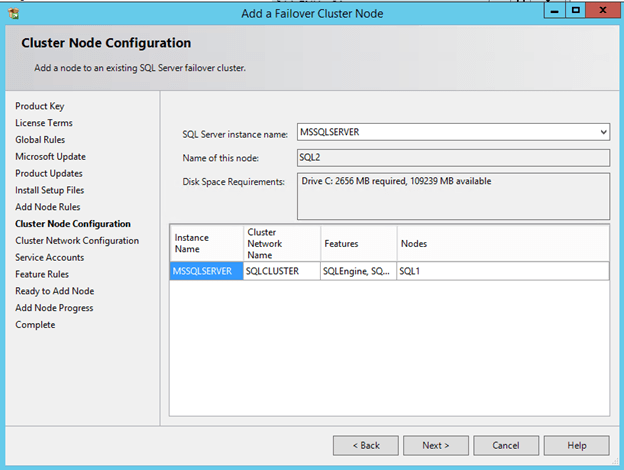
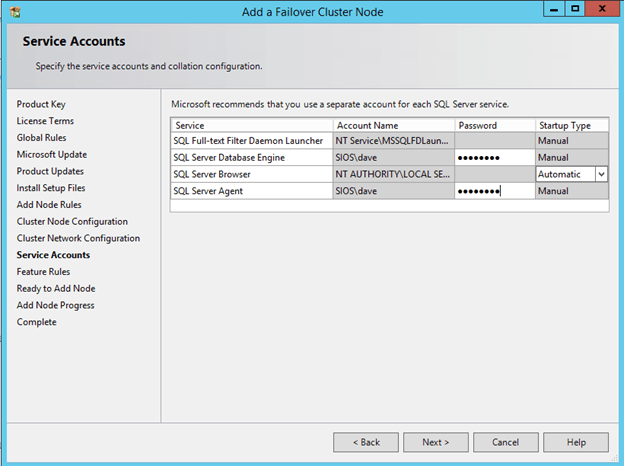
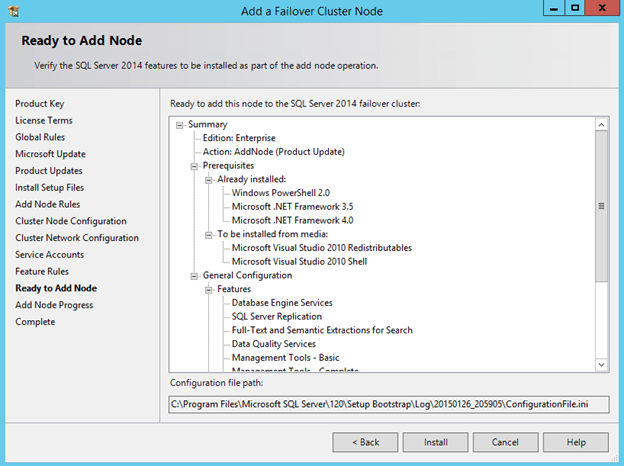
Once SQL is installed on the first node, you will then need to run the installation on the second node.

Create an Internal Load Balancer
Once the cluster is configured, you will need to create the internal load balancer(ILB) which will be used for all client access. Clients that connect to SQL Server will need to connect to the ILB instead of connecting directly to the cluster IP address. If you were to try to connect to the cluster directly at this point you would see that you cannot connect to the cluster from any remote system. Even SQL Server Management Studio will not be able to connect to the cluster directly at this point.
Run this Powershell Command from your local desktop to create your Internal Load Balancer (ILB).
# Define variables
$IP = “10.0.0.201” # IP address you want your Internal Load Balancer to use, this should be the same address as your SQL Server Cluster IP Address
$svc=”SQLFailover” # The name of your cloud service
$vmname1=”sql1″ #The name of the VM that is your first cluster node
$epname1=”sql1″ #This is the name you want to assign to the endpoint associated with first cluster node, use anything you like
$vmname2=”sql2″ #The name of the VM that is your second cluster node
$epname2=”sql2″ #This is the name you want to assign to the endpoint associated with second cluster node, use anything you like
$lbsetname=”ilbsetsqlha” #use whatever name you like, this name is insignificant
$prot=”tcp”
$locport=1433
$pubport=1433
$probeport=59999
$ilbname=”sqlcluster” #this is the name your clients connect to, it should coincide with you SQL cluster Name Resource
$subnetname=”Public” #the name of the Azure subnet where you want the internal load balancer to live
# Add Internal Load Balancer to the service
Add-AzureInternalLoadBalancer -InternalLoadBalancerName $ilbname -SubnetName $subnetname -ServiceName $svc –StaticVNetIPAddress $IP
# Add load balanced endpoint to the primary cluster node
Get-AzureVM -ServiceName $svc -Name $vmname1 | Add-AzureEndpoint -Name $epname1 -LBSetName $lbsetname -Protocol $prot -LocalPort $locport -PublicPort $pubport -ProbePort $probeport -ProbeProtocol tcp -ProbeIntervalInSeconds 10 –DirectServerReturn $true -InternalLoadBalancerName $ilbname | Update-AzureVM
# Add load balanced endpoint to the secondary cluster node
Get-AzureVM -ServiceName $svc -Name $vmname2 | Add-AzureEndpoint -Name $epname2 -LBSetName $lbsetname -Protocol $prot -LocalPort $locport -PublicPort $pubport -ProbePort $probeport -ProbeProtocol tcp -ProbeIntervalInSeconds 10 –DirectServerReturn $true -InternalLoadBalancerName $ilbname | Update-AzureVM
Assuming the script ran as planned, you should see the following output.

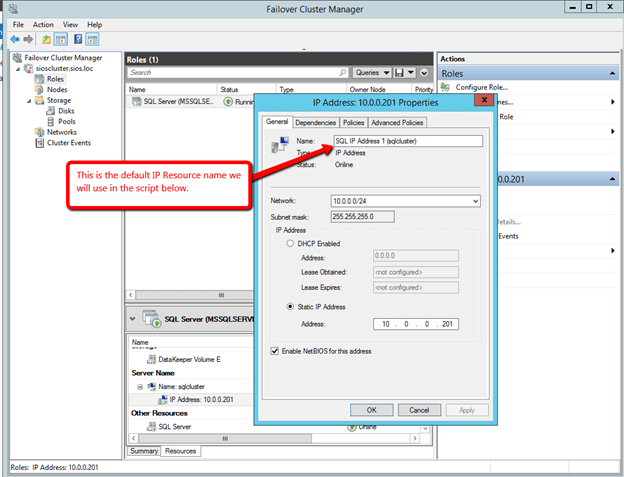
Update the Client Listener
Once the internal load balancer is created we will need to run a Powershell script on SQL1 to update the SQL Server Cluster IP address. The script references the Cluster Network name and the IP Resource Name. The pictures below show you were to find both of these names in Failover Cluster Manager.

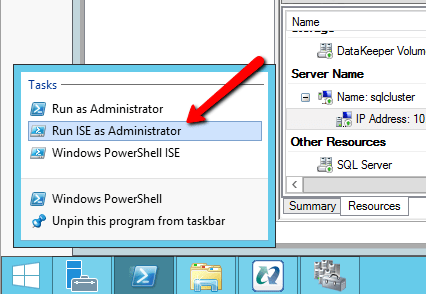
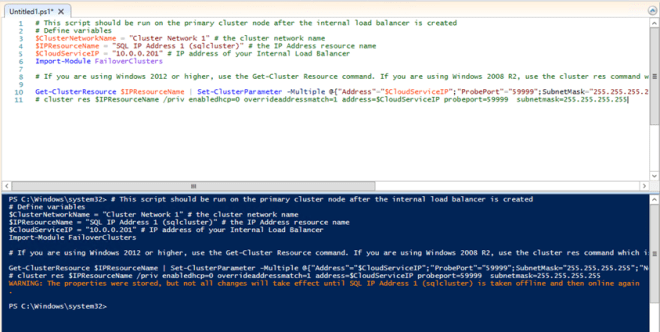
The script below should be run on one of the cluster nodes. Make sure to launch Powershell ISE using Run as Administrator.
# This script should be run on the primary cluster node after the internal load balancer is created
# Define variables
$ClusterNetworkName = “Cluster Network 1” # the cluster network name
$IPResourceName = “SQL IP Address 1 (sqlcluster)” # the IP Address resource name
$CloudServiceIP = “10.0.0.201” # IP address of your Internal Load Balancer
Import-Module FailoverClusters
# If you are using Windows 2012 or higher, use the Get-Cluster Resource command. If you are using Windows 2008 R2, use the cluster res command which is commented out.
Get-ClusterResource $IPResourceName | Set-ClusterParameter -Multiple @{“Address”=”$CloudServiceIP”;”ProbePort”=”59999″;SubnetMask=”255.255.255.255″;”Network”=”$ClusterNetworkName”;”OverrideAddressMatch”=1;”EnableDhcp”=0}
# cluster res $IPResourceName /priv enabledhcp=0 overrideaddressmatch=1 address=$CloudServiceIP probeport=59999 subnetmask=255.255.255.255
Assuming your script ran as expected, the output should look like below. You see that in order for the changes to be applied, you will need to bring your cluster resource offline once and then bring it online.
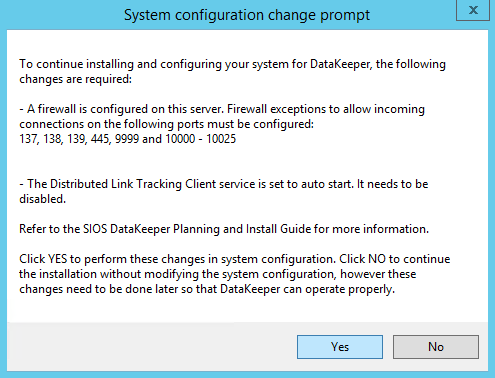
Firewall
Open TCP port 59999, 1433 and 1434 are open on the firewall of each server.
Summary
Now that the cluster is created you can connect to the SQL Failover Cluster Instance via the Internal Load Balancer, using the name sqlcluster or directly to 10.0.0.201.
If you have any questions at all, I will be glad to give you a helping hand. Tweet me @daveberm and I’ll be sure to get in touch with you.
For more information visit https://us.sios.com/solutions/cloud-high-availability/azure/