Email Alerts with SIOS DataKeeper

Over the past few weeks I wrote a 3-part series on how to configure email alerts based on Perfmon Counters, System Event Log Entries and a specific Windows Service Start or Stop Event. While these guides are relevant to any environment all of my examples were geared towards monitoring SIOS DataKeeper and included some specific customer requests including monitoring the SIOS DataKeeper Service as well as being alerted should the RPO exceed 5 seconds. I also included monitoring of the basic DataKeeper events that you would want to know about.

This video shows some of this alerting in action.

Email Alerts with SIOS DataKeeper

Step-by-Step: How to Trigger an Email Alert from Windows Performance Monitor

Windows Performance Counter Alerts can be configured to be triggered on any Performance Monitor (Perfmon) Counter through the use of a User Defined Data Collector Set. However, if you wish to be notified via email when an Alert is triggered you have have to use a combination of Perfmon, Task Scheduler and good ol’ Powershell. If you follow the steps below you will be on your way to email alert nirvana.

Step 1 – Write a Powershell Script

The first thing that you need to do is write a Powershell script that when run can send an email. While researching this I discovered many ways to accomplish this task, so what I’m about to show you is just one way, but feel free to experiment and use what is right for your environment.

In my lab I do not run my own SMTP server, so I had to write a script that could leverage my Gmail account. You will see in my Powershell script the password to the email account that authenticates to the SMTP server is in plain text. If you are concerned that someone may have access to your script and discover your password then you will want to encrypt your credentials. Gmail requires and SSL connection so your password should be safe on the wire, just like any other email client.

Here is an example of a Powershell script that when used in conjunction with Task Scheduler and Perfmon can send an email alert automatically when any user defined performance counter threshold condition is met. In my environment I said this to C:\Alerts\Alerts.ps1

$counter = $Args[0]
$dtandtime = $Args[1]
$ctr_value = $Args[2]
$threshold = $Args[3]
$value = $Args[4]
$FileName="$env:ComputerName"
$EmailFrom = "sios@medfordband.com"
$EmailTo = "dave@medfordband.com"
$Subject ="Alert From $FileName"
$Body = "Data and Time of Alert: $dtandtime`nPerfmon Counter: $ctr_value`nThreshold Value: $threshold `nCurrent Value: $value"
$SMTPServer = "smtp.gmail.com"
$SMTPClient = New-Object Net.Mail.SmtpClient($SmtpServer, 587)
$SMTPClient.EnableSsl = $true
$SMTPClient.Credentials = New-Object System.Net.NetworkCredential("sios@medfordband.com", "ChangeMe123");
$SMTPClient.Send($EmailFrom, $EmailTo, $Subject, $Body)

An example of an email generated from that Powershell script looks like this.

email2

You probably noticed that this Powershell script takes four arguments and assigns them to variables used in the output. It also saves the computer name to a variable which is also used as part of the output. By doing this the script can be used to send an email on any Perfmon Alerting Counter and on any server without additional customization.

Step 2 – Set Up a Scheduled Task

In Task Scheduler we are going to Create a new Task as show in the following screen shots.

Create Task

Give the Task a name, you will need to remember it for the next step.

Task1

Notice that there are no Triggers. This Task will actually be triggered through the Perfmon Counter Alert we will set up in Step 3.

Triggers

On the Action tab you want to define a new action. The action will be to Start a Program and use the following inputs, please adjust for your specific environment.

Program Script: C:\Windows\System32\WindowsPowerShell\v1.0\powershell.exe
Add Arguments: -File C:\Alerts\Alerts.ps1 $(Arg0)

Action 2

Actions

Task 3

Task 4

Step 3 – Create the Perfmon Counter Alert

Create a new Data Collector Set

Perfmon Counter 1

Alert 2

Alert 3

Add whichever Performance Counters you would like to monitor and set the Alerting threshold.

Alert 4

Data Collector 5

Once you have created the Data Collector Set go into the Properties of it and make sure the Alerting threshold and Sample Interval is set properly for each Performance Counter. Keep in mind, if you sample every 10 seconds then you should expect to receive an email every 10 seconds as long as the performance counter exceeds the threshold you set.

Collector Property 1

If you select the Log an entry in the application event log don’t expect to see any entries in the normal Application event log. It will be written to the Microsoft-Windows-Diagnosis-PLA/Operational log in the Application and Services log directory.

DataCollector 2

And then finally we have to set an Alert Task that will trigger the Scheduled Task (EmailAlert) that we created in Step 2. You see that we also pass some of the Task arguments which are used by the Powershell script to customize the email with the exact error condition associated with the Alert.

tast

Once the Data Collector is configured properly you will want to start it.

Start

If you configured everything correctly you should start seeing emails any time an alert threshold is met.

If it doesn’t seem to be working, check the following…

  • Run the Powershell script manually to make sure it works. You may need to manually set some of the variables for testing purposes. In my case it took a little tweaking to get the Powershell script to work properly, so start with that.
  • Check the Task History to make sure the Alert Counter is triggering the Task.
    Task History
  • Run the Task manually and see if it triggers the Powershell.

Step 4 – Set the Perfmon Counter to Run Automatically

You might think you were done, but you have one more step. Whenever you reboot a server the Perfmon Counter Alert will not start automatically. In order to survive a reboot you must run the following at a command prompt. Note “Alerts” referenced in the script below is the name of my user defined Data Collector Set.

schtasks /create /tn Alerts /sc onstart /tr "logman start Alerts" /ru system

There are a few edge cases where you might have to create another Trigger to start the Data Collector set. For example, SIOS DataKeeper Perfmon Counters only collects data from the Source of the mirror. If you try to start the Data Collection Set on the Target Server you will see that it fails to start. However, if your cluster fails over, the old target now becomes the source of the mirror, so you will want to start monitoring DataKeeper counters on that new Source. You could create a Cluster Generic Script Resource that starts the Data Collector Set upon failover, but that is a topic for another time.

The easier way ensure the counter is running on the new Source is to set up a Scheduled Task that is triggered by an EventID that indicates the the server is becoming the source of the mirror. In this case I set up trigger on both Systems so that each time EventID 23 occurs the Trigger runs Logman to start the Data Collector Set. Every time a failover occurs Event ID 23 is logged on the new system when it becomes the source, so the Data Collector Set will automatically begin.

Trigger 1Trigger 2

That’s it, you now can receive email Alerts directly from your server should any Perfmon counters you care about start getting out of hand.


Step-by-Step: How to Trigger an Email Alert from Windows Performance Monitor

Microsoft wants YOUR input on the next version of Windows Server

Windows Server has a new UserVoice page: http://windowsserver.uservoice.com/forums/295047-general-feedback with subsections:


This is where YOU get to provide Microsoft with your feedback directly.

Microsoft wants YOUR input on the next version of Windows Server

What every SQL Server DBA needs to know about Windows Server 10 #sqlpass

The guys over at the High Availability & Disaster Recovery Virtual Chapter of @SQLPASS invited me to present on Windows Server 10. I discussed Cloud Witness, Storage Replica and Rolling Cluster OS Upgrades. In case you missed it you can view the recording here.

https://attendee.gotowebinar.com/recording/8228215421492642561

What every SQL Server DBA needs to know about Windows Server 10 #sqlpass

Windows Server 10 New Cloud Witness

My favorite new cluster feature in Windows Server 10 is the Cloud Witness. The Cloud Witness is another option in addition to the traditional disk witness and file share witness which are used when configuring the quorum in a Windows Server Failover Cluster. For a complete history of cluster quorums and their options please read my article on the Microsoft Press blog…….

So what exactly is a Cloud Witness? A Cloud Witness utilizes a Windows Azure IaaS Storage Account to act as a vote in your cluster quorum. It can be used instead of a disk witness or a fail share witness. The cluster nodes simply need public internet access to reach an Azure storage account that you have provisioned as part of your Azure subscription.

So why would I use a disk witness? In most shared storage clusters you will still use a node and disk witness majority quorum. However, when you are doing #SANLess clusters, or multisite clusters, you now have another option to consider instead of a file share witness. Let’s look at some scenarios where a Cloud Witness would make more sense than a File Share Witness.

Scenario 1 – Multisite Cluster

If you have done your research on multisite clusters, you will have discovered that if you want automatic failover in the event of a complete site loss, the only safe way to do this is to have an even number of cluster votes in each site and to configure a File Share Witness in a 3rd site. In addition, the network connection between your primary site and your DR site must be completely independent of the network connection you have between this 3rd site and your primary and DR sites.

The cost associated with maintaining a completely independent network and having access to a 3rd data center for hosting a file share witness is not always possible. This is where having a Cloud Witness in Windows Azure comes in handy. Assuming you have an equal number of cluster votes in each data center and each data center also has access to the internet, you can define a Windows Azure Storage account as a Cloud Witness instead of a File Share Witness. Using a Cloud Share Witness eliminates the cost associated with maintaining a 3rd data center. There will be a slight monthly fee for the Azure Cloud service, but this will be minimal in comparison to the cost associated with maintaining a File Share Witness.

Scenario 2 – #SANLess Hyper-V Cluster at Remote Office/Branch Office (ROBO)

Here is the scenario. You run a fast food chain, department store chain, drug store chain, etc. You have the need to run a handful of servers to support your local operations at each of your store fronts. You decide that running these servers as virtual machines in Hyper-V are the way you want to go. Having these servers highly available is very important, so you decide it would be best to implement a two node cluster at each location. To minimize costs and to make management easy, you decide to purchase an identical pair of servers for each location and use the locally attached storage to build a #SANLess cluster with DataKeeper Cluster Edition. You come to realize that because you went #SANLess you don’t have access to a disk witness. And also, because you didn’t plan on purchasing a 3rd server for each location, a file share witness is also out of the question. You are in a real conundrum…a 2 node cluster NEEDS A WITNESS!

Here is where the Cloud Witness in Windows Azure comes and saves the day. Assuming your servers have access to the internet, a simple Cloud Witness can be configured and now you can support a 2-node #SANLess Hyper-V Cluster in each location. I would configure a non-clustered DC VM on each physical server and then create as many highly available VMs as a need in the cluster just using local attached storage.

Cloud Witness is a great new option in Windows Server 10. The only thing that would make it better is if they back ported it to Windows Server 2012 R2 so I could use it today!


UPDATE 11/5/2014 – When you create your Storage Account in Azure, make sure you choose “Locally Redundant” as Geo-Redundant Storage is not supported for the Cloud Witness.

Windows Server 10 New Cloud Witness

Windows Server 10 “Cloud Witness” in a failover cluster

My favorite new cluster feature in Windows Server 10 is the Cloud Witness. The Cloud Witness is another option in addition to the traditional disk witness and file share witness which are used when configuring the quorum in a Windows Server Failover Cluster. For a complete history of cluster quorums and their options please read my article on the Microsoft Press blog http://blogs.msdn.com/b/microsoft_press/archive/2014/04/28/from-the-mvps-understanding-the-windows-server-failover-cluster-quorum-in-windows-server-2012-r2.aspx

So what exactly is a Cloud Witness? A Cloud Witness utilizes a Windows Azure IaaS Storage Account to act as a vote in your cluster quorum. It can be used instead of a disk witness or a fail share witness. The cluster nodes simply need public internet access to reach an Azure storage account that you have provisioned as part of your Azure subscription.

So why would I use a disk witness? In most shared storage clusters you will still use a node and disk witness majority quorum. However, when you are doing #SANLess clusters, or multisite clusters, you now have another option to consider instead of a file share witness. Let’s look at some scenarios where a Cloud Witness would make more sense than a File Share Witness.

Scenario 1 – Multisite Cluster

If you have done your research on multisite clusters, you will have discovered that if you want automatic failover in the event of a complete site loss, the only safe way to do this is to have an even number of cluster votes in each site and to configure a File Share Witness in a 3rd site. In addition, the network connection between your primary site and your DR site must be completely independent of the network connection you have between this 3rd site and your primary and DR sites.

The cost associated with maintaining a completely independent network and having access to a 3rd data center for hosting a file share witness is not always possible. This is where having a Cloud Witness in Windows Azure comes in handy. Assuming you have an equal number of cluster votes in each data center and each data center also has access to the internet, you can define a Windows Azure Storage account as a Cloud Witness instead of a File Share Witness. Using a Cloud Share Witness eliminates the cost associated with maintaining a 3rd data center. There will be a slight monthly fee for the Azure Cloud service, but this will be minimal in comparison to the cost associated with maintaining a File Share Witness.

Scenario 2 – #SANLess Hyper-V Cluster at Remote Office/Branch Office (ROBO)

Here is the scenario. You run a fast food chain, department store chain, drug store chain, etc. You have the need to run a handful of servers to support your local operations at each of your store fronts. You decide that running these servers as virtual machines in Hyper-V are the way you want to go. Having these servers highly available is very important, so you decide it would be best to implement a two node cluster at each location. To minimize costs and to make management easy, you decide to purchase an identical pair of servers for each location and use the locally attached storage to build a #SANLess cluster with DataKeeper Cluster Edition. You come to realize that because you went #SANLess you don’t have access to a disk witness. And also, because you didn’t plan on purchasing a 3rd server for each location, a file share witness is also out of the question. You are in a real conundrum…a 2 node cluster NEEDS A WITNESS!

Here is where the Cloud Witness in Windows Azure comes and saves the day. Assuming your servers have access to the internet, a simple Cloud Witness can be configured and now you can support a 2-node #SANLess Hyper-V Cluster in each location. I would configure a non-clustered DC VM on each physical server and then create as many highly available VMs as a need in the cluster just using local attached storage.

Cloud Witness is a great new option in Windows Server 10. The only thing that would make it better is if they back ported it to Windows Server 2012 R2 so I could use it today!

Windows Server 10 “Cloud Witness” in a failover cluster

Windows Server 10 Storage Replica Configuration and First Impressions #Windows10

One of the most exciting new features in Windows Server 10 announced by Microsoft is Storage Replicas. It is described by Microsoft here: http://technet.microsoft.com/en-us/library/dn765475.aspx#BKMK_SR

“Storage Replica (SR) is a new feature that enables storage-agnostic, block-level, synchronous replication between servers for disaster recovery, as well as stretching of a failover cluster for high availability. Synchronous replication enables mirroring of data in physical sites with crash-consistent volumes ensuring zero data loss at the file system level. Asynchronous replication allows site extension beyond metropolitan ranges with the possibility of data loss.

What value does this change add?

Storage Replication enables you to do the following:

Provide an all-Microsoft disaster recovery solution for planned and unplanned outages of mission-critical workloads.

Use SMB3 transport with proven reliability, scalability, and performance.

Stretch clusters to metropolitan distances.

Use Microsoft software end to end for storage and clustering, such as Hyper-V, Storage Replica, Storage Spaces, Cluster, Scale-Out File Server, SMB3, Deduplication, and ReFS/NTFS.

Help reduce cost and complexity as follows:

Hardware agnostic, with no requirement to immediately abandon legacy storage such as SANs.

Allows commodity storage and networking technologies.

Features ease of graphical management for individual nodes and clusters through Failover Cluster Manager and Microsoft Azure Site Recovery.

Includes comprehensive, large-scale scripting options through Windows PowerShell.

Helps reduce downtime, and increase reliability and productivity intrinsic to Windows.

Provide supportability, performance metrics, and diagnostic capabilities.”

They mention a lot of use cases “… Hyper-V, Storage Replica, Storage Spaces, Cluster, Scale-Out File Server, SMB3, Deduplication, and ReFS/NTFS”. I’m not even sure what they mean by listing technologies such as ReFS/NTFS, Deduplication, SMB3, Storage Replica, Storage Spaces. These seem more like features rather than use cases, which I’m going to assume they are.

But let’s look at some of the other use cases they mentioned: Hyper-V, Cluster, Scale-out-File Server. I can easily imagine how Storage Replica is going to enhance these use cases by enabling shared nothing Scale-Out-File Servers and multisite clusters, including Hyper-V, SQL Server, File Servers, etc. In some cases it can also enable SANLess local area network clusters, allowing clusters to be built without requiring a shared Physical Disk resource.

In my first look at this solution I decided to focus on what I know and love, failover clusters. To keep things easy I decided I was going to focus on building a simple two node traditional file server (not scale out file server). I decided I was going to start with three fresh VMs in an entirely pure Windows Server 10 domain. It was easy enough to download the ISO’s and the install onto my 3 VMs went surpringly fast. Promoting a DC was a pretty similar experience to 2012 R2, though I think it was made a little more obvious that you have to actually run the DCPromo after the AD feature was installed.

I got my domain installed and my basic two node cluster with no resources built without a problem. I used VMware Fusion as my Hypervisor since it supports nested Hypervisors (a feature sorely lacking in Hyper-V for testing and demo by the way). I added a few additional VMDK files to each VM in my cluster and formatted them as E: and F: on each VM, figuring these would be my replica volumes. I had not defined resources yet and the cluster had no shared storage. Perfect, ready to start configuring Storage Replica!

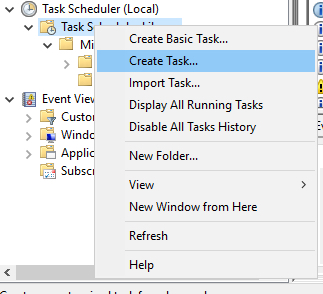
So I fire up the Failover Cluster Manager and start poking around to see how I could start the replication process. There was absolutely nothing in the UI that I could find that said, Replica, Replication or anything even close to that. Because the documentation hadn’t shipped and the bits had only become available a few hours ago I was on my own to figure it out, despite my desperate Twitter searches for a how to blog. No problem I said, I’m a cluster MVP and my specialty is replication and multisite clusters so I’ll figure this out.

After a little searching I find that there is a new feature called Windows Volume Replication.


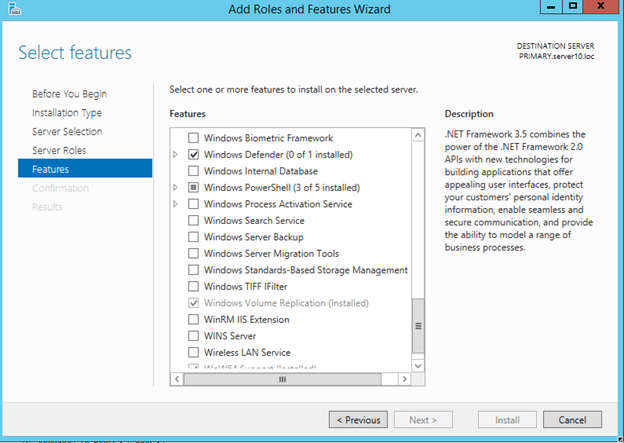
Great, so I enable that on both nodes thinking this is going to be great, but still nothing is jumping out at me in the Windows Failover Cluster UI that says “Configure Replica”. Scratching my head some more and trying to reach out to a few smart people I still had no clue. Then it dawned on me…”maybe it only supports Cluster Disk?” Now the feature announcement says “supports commodity storage”. To me that means any old hard drive in my PC or in this case the attached virtual disk on my VMs. As it turns out, I was correct; the disk has to appear in the cluster as a Physical Disk Resource in Available Storage.

OK, not the greatest requirement, but I continued plugging away. To get some disks that could be added as Physical Disk Resources attached to my VMs I enabled the iSCSI target role on my DC and create two iSCSI Virtual Disks for each of my VMs. Now remember, this is not like a regular cluster so each of these virtual disks were only assigned to one VM, they were not shared.

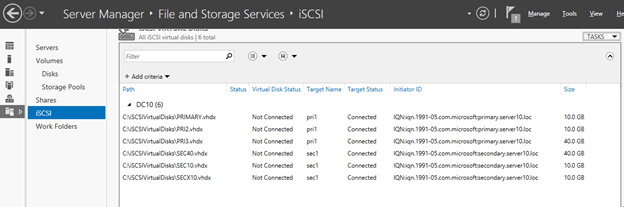
One each VM I used the iSCSI initiator to connect to these disks, initialized, onlined and formatted them. I then used Failover Cluster Manager to add them to the cluster.

Finally, I see some new options for replication.

I still struggled for a while to get the Replication enable button to even become selectable.

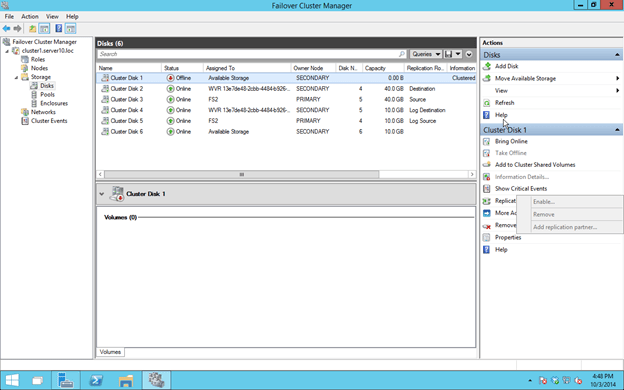
Here are the IMPORT things you need to know to get this show on the road:

  • The Disk must be Physical Dis Resources in the cluster. This means they must support SCSI3 reservations and must pass cluster validation.
  • The Disk must be GPT, not MBR
  • Each Disk you want to replicate must have an associated Disk to be used for the “Log File”. I assume this is where they queue data when replication is interrupted or in asynchronous mirrors where the data can be slightly behind
  • You must add the disk (just the data disk, not the log disk) to a cluster resource BEFORE your can enable replication. You cannot enable replication on a disk that is sitting in Available Storage
  • Your Source and Target Servers must have the same size disks and volume letters

Once you do that you will finally be able to enable Replication.

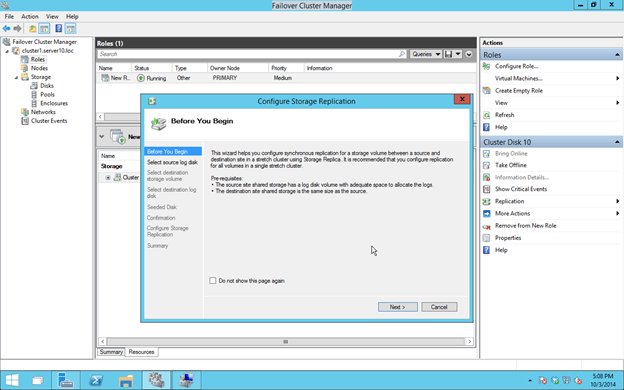
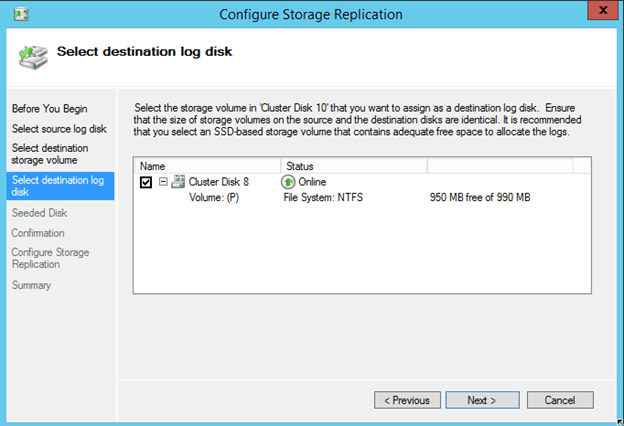
Like I said, you will need to choose a source log disk that needs to be in available storage. Microsoft recommends a SSD disks. I don’t know how big it should be. I assume the bigger it is the longer replication can be interrupted before you consume all the space and break your mirror.

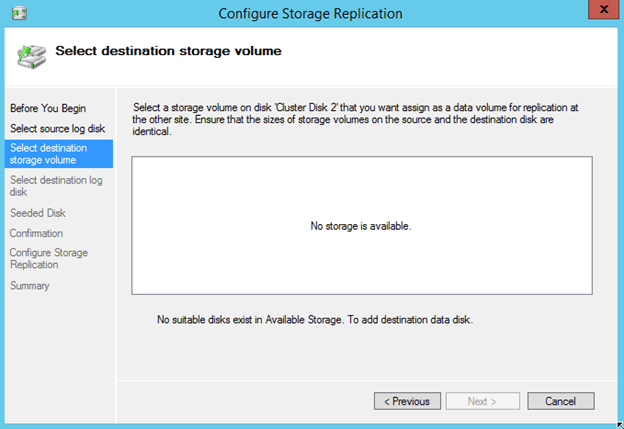
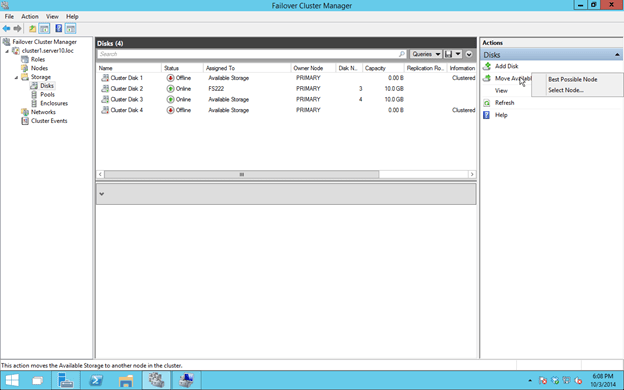
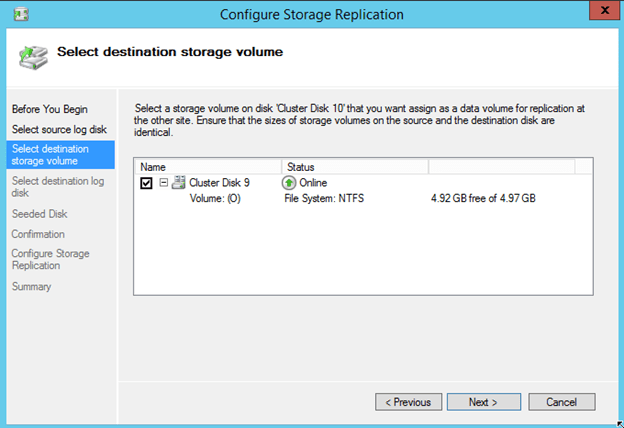
Next step is to choose the Disk on your target server. If you get a message like “No Storage Available” you probably need to move “Available Storage” so that the target disk is Online on the Secondary server.

Make not that in the Technical Preview the Move Available Storage seems to be broken if you choose “Select Node”. However, if you choose “Best Possible Node” things seem to work and Available Storage will come online on the SECONDARY server.

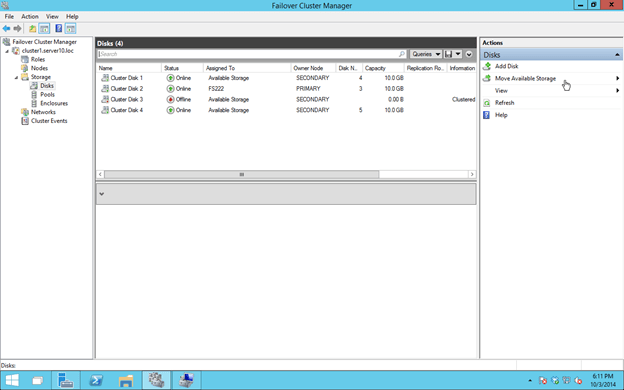
Now all Available Storage should be online on the SECONDARY server.


And a disk for the target’s log file

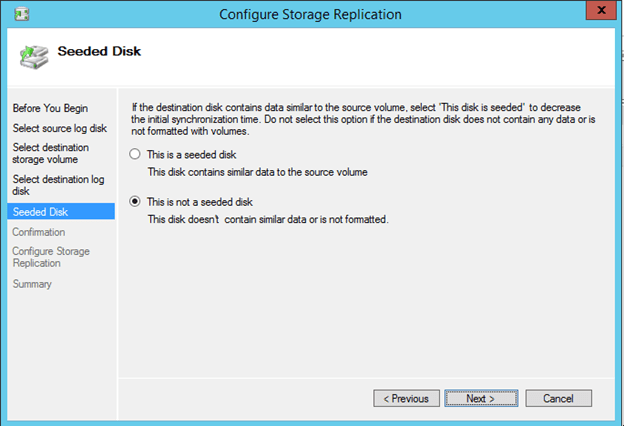
This looks like a nice feature, especially for WAN replication. Apparently you can seed to destination disk, avoiding a full sync over the WAN.

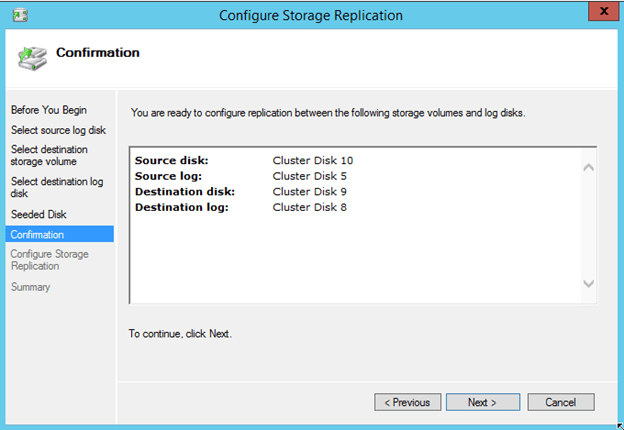
The next screen just confirms everything…

When all is said and done, your cluster should look like this. You’ll probably notice that the Replication status displays “Unknown”. I’m assuming that is a bug that will be addressed later.

The other bug that I noticed is that the File Share creation wizard that is available via the Failover Cluster Manager doesn’t seem to work. It just closes unexpectedly after you launch it. However, you can create shares on the active node using File Manager and it will automatically be added to the cluster.

Some basic testing seems to indicate that it works fine. Just be careful that you know which of your volumes are the replicated data volumes and which ones are the log volumes. Data written to the log files is not replicated, so if you make a mistake (like I did) you may think replication is not working.

And finally, after all this trial and error I come to find that Microsoft has started to post at least a few pointers on how to make this work. Check out the requirements in this post from Ned Pyle, Storage Replica PM. http://social.technet.microsoft.com/Forums/windowsserver/en-US/f843291f-6dd8-4a78-be17-ef92262c158d/getting-started-with-windows-volume-replication?forum=WinServerPreview&prof=required

My thoughts…

I reserve my thoughts until I have some more time to play with this feature…


Windows Server 10 Storage Replica Configuration and First Impressions #Windows10