I was the principal author of this SIOS whitepaper, which describes how to build a 2-node SQL Server cluster in Google Cloud Platform (GCP) spanning multiple zones. Today, I’ll explain how to extend this cluster by adding a third node in a different GCP region.
Assuming you’ve completed all the steps in the referenced documentation, here’s how to proceed:
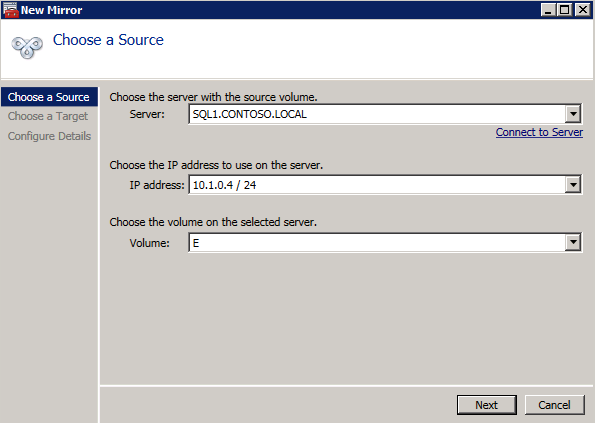
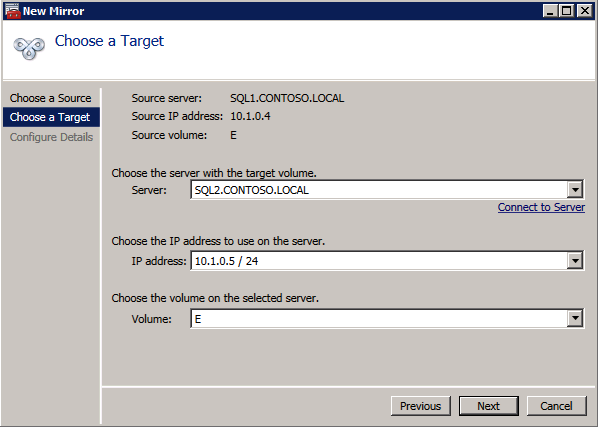
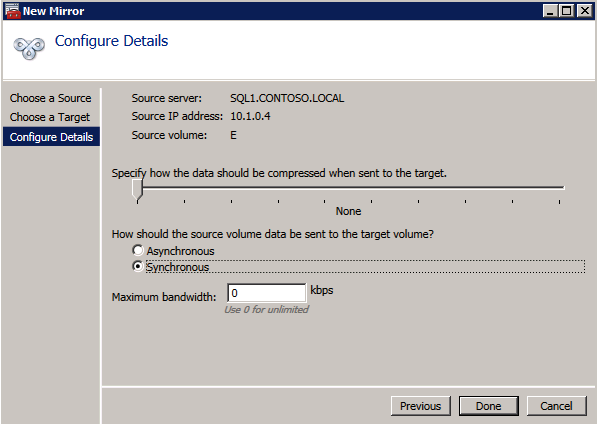
11. Add a new mirror to the existing Datakeeper job
Follow the screenshots below to extend the existing DataKeeper job to the new server.
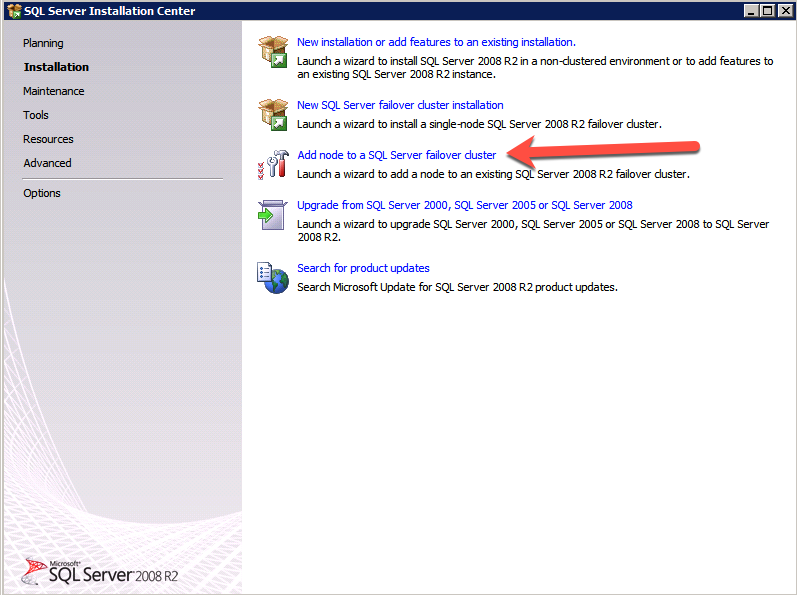
12. Install Windows Failover Clustering and add to the cluster
Install clustering tools and add the node to the cluster.
Install-WindowsFeature -Name Failover-Clustering -IncludeManagementTools
Add-ClusterNode -Cluster fileserver.datakeeper.local -Name wsfc-3

Test-Cluster -Name fileserver.datakeeper.local

Note: Adding the node through the WSFC UI may be necessary if there’s a load balancer issue with the cluster name.
This completes the steps to extend your SQL Server cluster across multiple GCP regions. In the future I’ll probably write a single comprehensive how-to guide, but for now, let me know if you have any questions!
So you have built a SQL Server Failover Cluster Instance (FCI), or maybe an SAP ASCS/ERS cluster in Azure. Each node of the cluster resides in a different Availability Zone (AZ), or maybe you have strict latency requirements and are using Placement Proximity Groups (PPG) and your nodes all reside in the same Availability Set. Regardless of the scenario, you now have a much higher level of availability for your business critical application than if you were just running a single instance.
Now that you have high availability (HA) covered, what are you going to do for disaster recovery? Regional disasters that take out multiple AZs are rare, but as recent history has shown us, Mother Nature can really pack a punch. You want to be prepared should an entire region go offline.
Azure Site Recovery (ASR) is Microsoft’s disaster recovery-as-a-service (DRaaS) offering that allows you to replicate entire VMs from one region to another. It can also replicate virtual machines and physical servers from on-prem into Azure, but for the purpose of this blog post we will focus on the Azure Region-to-Region DR capabilities.
Setting up ASR
We are going to assume you have already built your cluster using SIOS DataKeeper. If not, here are some pointers to help get you started.
We are also going to assume you are familiar with Azure Site Recovery. Instead of yet another guide on setting up ASR, I suggest you read the latest documentation from Microsoft. This article will focus instead on some things you may not have considered and the specific steps required to fix your cluster after a failover to a different subnet.
Paired Regions
Before you start down the DR path, you should be aware of the concept of Azure Paired Regions. Every Region in Azure has a preferred DR Region. If you want to learn more about Paired Regions, the documentation provides a great background. There are some really good benefits of using your paired region, but it’s really up to you to decide on what region you want to use to host your DR site.
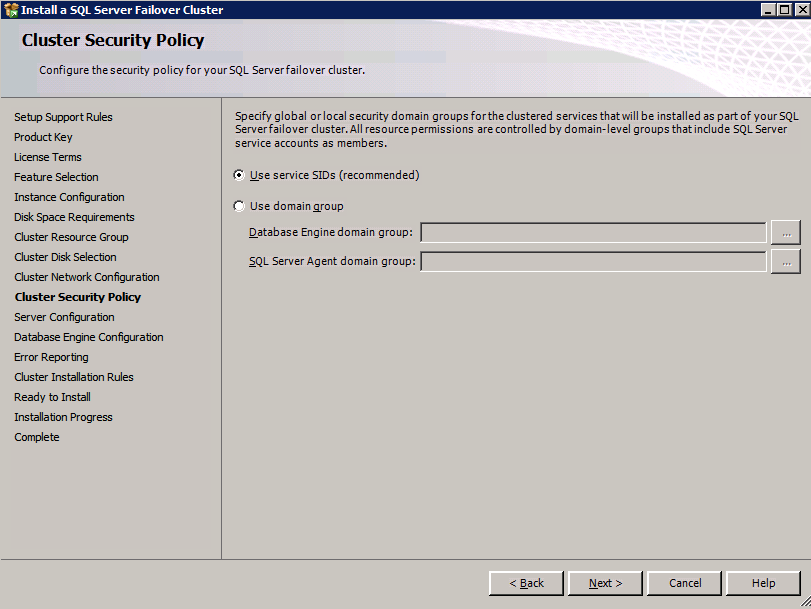
Cloud Witness Location
When you originally built your cluster you had to choose a witness type for your quorum. You may have selected a File Share Witness or a Cloud Witness. Typically either of those witness types should reside in an AZ that is separate from your cluster nodes.
However, when you consider that, in the event of a disaster, your entire cluster will be running in your DR region, there is a better option. You should use a cloud witness, and place it in your DR region. By placing your cloud witness in your DR region, you provide resiliency not only for local AZ failures, but it also protects you should the entire region fail and you have to use ASR to recover your cluster in the DR region. Through the magic of Dynamic Quorum and Dynamic Witness, you can be sure that even if your DR region goes offline temporarily, it will not impact your production cluster.
Multi-VM Consistency
When using ASR to replicate a cluster, it is important to enable Multi-VM Consistency to ensure that each cluster node’s recovery point is from the same point in time. That ensures that the DataKeeper block level replication occurring between the VMs will be able to continue after recovery without requiring a complete resync.
Crash Consistent Recovery Points
Application consistent recovery points are not supported in replicated clusters. When configuring the ASR replication options do not enable application consistent recovery points.
Keep IP Address After Failover?
When using ASR to replicate to your DR site there is a way to keep the IP address of the VMs the same. Microsoft described it in the article entitled Retain IP addresses during failover. If you can keep the IP address the same after failover it will simplify the recovery process since you won’t have to fix any cluster IP addresses or DataKeeper mirror endpoints, which are based on IP addresses.
However, in my experience, I have never seen anyone actually follow the guidance above, so recovering a cluster in a different subnet will require a few additional steps after recovery before you can bring the cluster online.
Your First Failover Attempt
Recovery Plan
Because you are using Multi-VM Consistency, you have to failover your VMs using a Recovery Plan. The documentation provides pretty straightforward guidance on how to do that. A Recovery Plan groups the VMs you want to recover together to ensure they all failover together. You can even add multiple groups of VMs to the same Recovery Plan to ensure that your entire infrastructure fails over in an orderly fashion.
A Recovery Plan can also launch post recovery scripts to help the failover complete the recovery successfully. The steps I describe below can all be scripted out as part of your Recovery Plan, thereby fully automating the complete recovery process. We will not be covering that process in this blog post, but Microsoft documents this process.
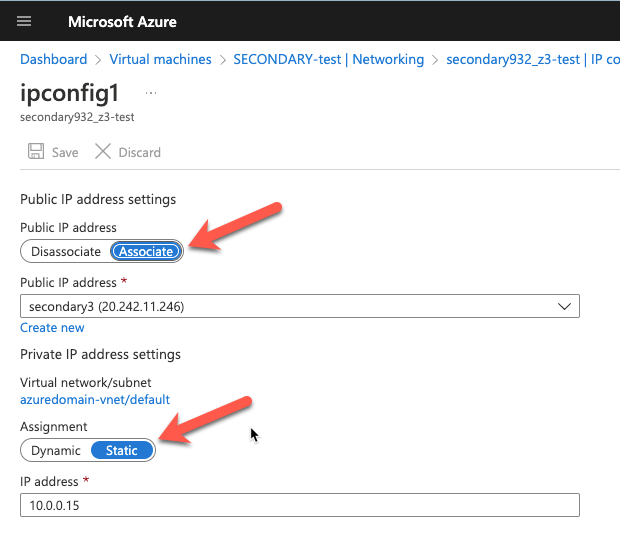
Static IP Addresses
As part of the recovery process you want to make sure the new VMs have static IP addresses. You will have to adjust the interface properties in the Azure Portal so that the VM always uses the same address. If you want to add a public IP address to the interface you should do so at this time as well.
Network Configuration
After the replicated VMs are successfully recovered in the DR site, the first thing you want to do is verify basic connectivity. Is the IP configuration correct? Are the instances using the right DNS server? Is name resolution functioning correctly? Can you ping the remote servers?
If there are any problems with network communications then the rest of the steps described below will be bound to fail. Don’t skip this step!
Load Balancer
As you probably know, clusters in Azure require you to configure a load balancer for client connectivity to work. The load balancer does not fail over as part of the Recovery Plan. You need to build a new load balancer based on the cluster that now resides in this new vNet. You can do this manually or script this as part of your Recovery Plan to happen automatically.
Network Security Groups
Running in this new subnet also means that you have to specify what Network Security Group you want to apply to these instances. You have to make sure the instances are able to communicate across the required ports. Again, you can do this manually, but it would be better to script this as part of your Recovery Plan.
Fix the IP Cluster Addresses
If you are unable to make the changes described earlier to recover your instances in the same subnet, you will have to complete the following steps to update your cluster IP addresses and the DataKeeper addresses for use in the new subnet.
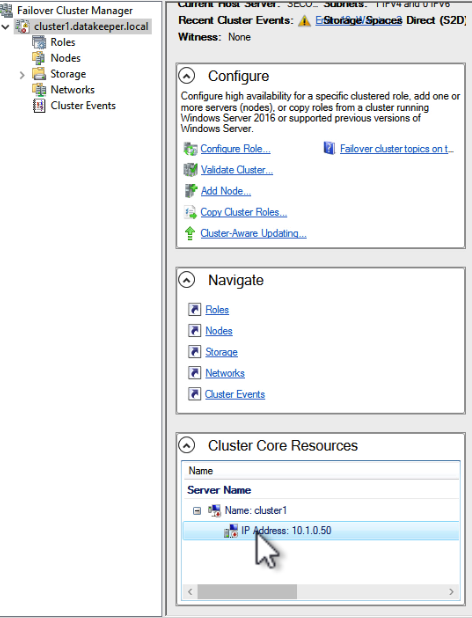
Every cluster has a core cluster IP address. What you will see if you launch the WSFC UI after a failover is that the cluster won’t be able to connect. This is because the IP address used by the cluster is not valid in the new subnet.
If you open the properties of that IP Address resource you can change the IP address to something that works in the new subnet. Make sure to update the Network and Subnet Mask as well.
Once you fix that IP Address you will have to do the same thing for any other cluster address that you use in your cluster resources.
Fix the DataKeeper Mirror Addresses
SIOS DataKeeper mirrors use IP addresses as mirror endpoints. These are stored in the mirror and mirror job. If you recover a DataKeeper based cluster in a different subnet, you will see that the mirror comes up in a Resync Pending state. You will also notice that the Source IP and the Target IP reflect the original subnet, not the subnet of the DR site.
Fixing this issue involves running a command from SIOS called CHANGEMIRRORENDPOINTS. The usage for CHANGEMIRRORENDPOINTS is as follows.
In our example, the command and output looked like this.
After the command runs, the DataKeeper GUI will be updated to reflect the new IP addresses as shown below. The mirror will also go to a mirroring state.
Conclusions
You have now successfully configured and tested disaster recovery of your business critical applications using a combination of SIOS DataKeeper for high availability and Azure Site Recovery for disaster recovery. If you have questions please leave me a comment or reach out to me on Twitter @daveberm
I get asked this question all the time, so I figured it was time to write a blog post, record a video and write some code to automate the process so that it completes in under a minute.
First, some background. Typically when someone asks me how to do this, I point them to the DataKeeper documentation.
This first document talks about extending the cluster and adding a 3rd node to the existing cluster. That’s fine if your cluster supports three nodes, but if you are using SQL Server Standard Edition, Microsoft limits you to a 2-node cluster. In the case of a 2-node cluster you can still replicate to a 3rd node, but the recovery will be more of a manual process. This process is described here.
People typically read these instructions and get a little worried. They feel like they would be performing open heart surgery on their cluster. It really is more like changing your shirt! You are simply replacing the Cluster Disk resource with a DataKeeper Volume resource. As you’ll see in the video below the process takes just a few seconds.
After you run that code don’t forget you also need to click on Manage Shared Volumes to add the backup node to the DataKeeper job as shown in the video.
If you have SQL Server Enterprise Edition then the final step would be to install SQL Server in the DR node and choose add node to existing cluster.
If you are using SQL Server Standard Edition then your job is done. You would simply follow these instructions to access you data on the 3rd node and then mount the replicated databases.
These directions are applicable whether your DR node is in the Cloud or your own DR site.
If you are considering deploying your own Microsoft SQL Server instances in AWS EC2 you have some decisions to make regarding the resiliency of the solution. Sure, AWS will offer you a 99.99% SLA on your Compute resources if you deploy two or more instances across different availability zones. But don’t be fooled, there are a lot of other factors you need to consider when calculating your true application availability. I recently blogged about how to calculate your application availability in the cloud. You probably should have a quick read of that article before you move on.
When it comes to ensuring your Microsoft SQL Server instance is highly available, it really comes down to two basic choices: Always On Availability Group (AG) or SQL Server Failover Cluster Instance (FCI). If you are reading this article I’m making an assumption you are well aware of both of these options and are seriously considering using a SQL Server FCI instead of a SQL Server Always On AG.
Benefits of a Microsoft SQL Server Failover Cluster Instance
The following list summarize what AWS says are the benefits of a SQL Server FCI:
FCI is generally preferable over AG for SQL Server high availability deployments when the following are priority concerns for your use case:
License cost efficiency: You need the Enterprise Edition license of SQL Server to run AGs, whereas you only need the Standard Edition license to run FCIs. This is typically 50–60% less expensive than the Enterprise Edition. Although you can run a Basic version of AGs on Standard Edition starting from SQL Server 2016, it carries the limitation of supporting only one database per AG. This can become a challenge when dealing with applications that require multiple databases like SharePoint.
Instance-level protection versus database-level protection: With FCI, the entire instance is protected – if the primary node becomes unavailable, the entire instance is moved to the standby node. This takes care of the SQL Server logins, SQL Server Agent jobs, certificates, etc. that are stored in the system databases, which are physically stored in shared storage. With AG, on the other hand, only the databases in the group are protected, and system databases cannot be added to an AG – only user databases are allowed. It is the database administrator’s responsibility to replicate changes to system objects on all AG replicas. This leaves the possibility of human error causing the database to become inaccessible to the application.
DTC feature support: If you’re using SQL Server 2012 or 2014, and your application uses Distributed Transaction Coordinator (DTC), you are not able to use an AG as it is not supported. Use FCI in this situation.
Of course, the challenge with building an FCI that spans availability zones is the lack of a shared storage device that is normally required when building a SQL Server FCI. Because the nodes of the cluster are distributed across multiple datacenters, a traditional SAN is not a viable option for shared storage. That leaves us with a two choices for cluster storage: 3rd party storage class resources like SIOS DataKeeper or the new Amazon FSx. Let’s take a look at what you need to know before you make your choice.
Normally 99.99% availability represents the starting point of what is considered “highly available”. This is what AWS promises you for your compute resources when two or more are deployed in different availability zones.
In case you didn’t know the difference between three nines and four nines…
99.9% availability allows for 43.83 minutes of downtime per month
99.99% availability allows for only 4.38 minutes of downtime per month
By hosting your cluster storage on FSx despite your 99.99% compute availability, your overall application availability will be 99.9%. In contrast, EBS volumes that span availability zones, such as in a DataKeeper deployment, qualifies for the 99.99% SLA at both the storage and compute layers, meaning your overall application availability is 99.99%.
Storage Location
When configuring FSx for high availability, you will want to enable multi-AZ support. By enabling multi-AZ you have an effectively have a “preferred” AZ and a “standby” AZ. When you deploy your SQL Server FCI nodes you will want to distribute those nodes across the same AZs.
Now in normal situations, you will want to make sure the active cluster node resides in the same AZ as the preferred FSx storage node. This is to minimize the distance and latency to your storage, but also to minimize the costs associated with data transfer across AZs. As specified in the FSx price guide, “Standard data transfer fees apply for inter-AZ or inter-region access to file systems.”
In the unfortunate circumstance where you have a SQL Server FCI failure, but not a FSx failure, there is no mechanism to tie both the storage and compute together. In the event that FSx fails over, it will automatically fail back to the primary availability zone. However, best practices dictate SQL FCI remain running on the secondary node until root cause analysis is performed and fail back is typically scheduled to occur during maintenance periods. This leaves you in a situation where your storage resides in a different AZ, which will incur additional costs. Currently the cost for transferring data across AZs, both ingress and egress, is $0.01/GB.
Without keeping a close eye on the state of your FSx and SQL Server FCI, you may not even be aware that they are running in different regions until you see the data transfer charge at the end of the month.
In contrast, in a configuration that use SIOS DataKeeper, the storage failover is part of the SQL Server FCI recovery, ensuring that the storage always fails over with the SQL Server instance. This ensures SQL Server is always reading and writing to the EBS volumes that are directly attached to the active node. Keep in mind, DataKeeper will incur a data transfer cost associated with write operations which are replicated between AZs or regions. This data transfer cost can be minimized with the use of compression available in DataKeeper.
Controlling Failover
In an FSx multi-subnet configuration there is a preferred availability zone and a standby availability. Should the FSx file server in the preferred availability zone experience a failure, the file server in the standby AZ will recover. AWS reports that this recovery time takes about 30 seconds with standard shares. With the use of continuously available file shares Microsoft reports this failover time can be closer to 15 seconds. During this failover time, there is a brownout that occurs where reads and writes are paused, but will continue once recovery completes.
FSx multi-site has automatic failback enabled, meaning that for every unplanned failover of FSx, you also have an unplanned failback. In contrast, typically when a SQL Server FCI experience an unplanned failover you would either just leave it running on the secondary or schedule a failback after hours or during the next maintenance period.
SQL Server Analysis Services Cluster Not Supported with FSx
If you want to cluster SSAS, you will need a clustered disk resource like SIOS DataKeeper. The How to Cluster SQL Server Analysis Server white paper clearly states that SMB cannot be used and that cluster drives with drive letters must be used. In contrast, the DataKeeper Volume resource presents itself as a clustered disk and can be used with SSAS.
Summary
While FSx certainly can make sense for typical SMB uses like Windows user files and other non-critical services where 99.9% availability SLA suffices, FSx is an excellent option If you application requires high availability (99.99%) or HA/DR solutions that also span regions, the SIOS DataKeeper is the right fit.
Once downloaded, navigate to the download location and run the executable with /x. This will give you an option to specify a location to extract the files to.
ENU\x64\SQLEXPRADV_x64_ENU.exe /x
Once the extraction completes, navigate to the extracted location and the following location:
SQL\1033_enu_lp\x64\setup\x64
Within that folder you should find SQLWriter.msi. Run this on the system where you want to update the SQL writer.
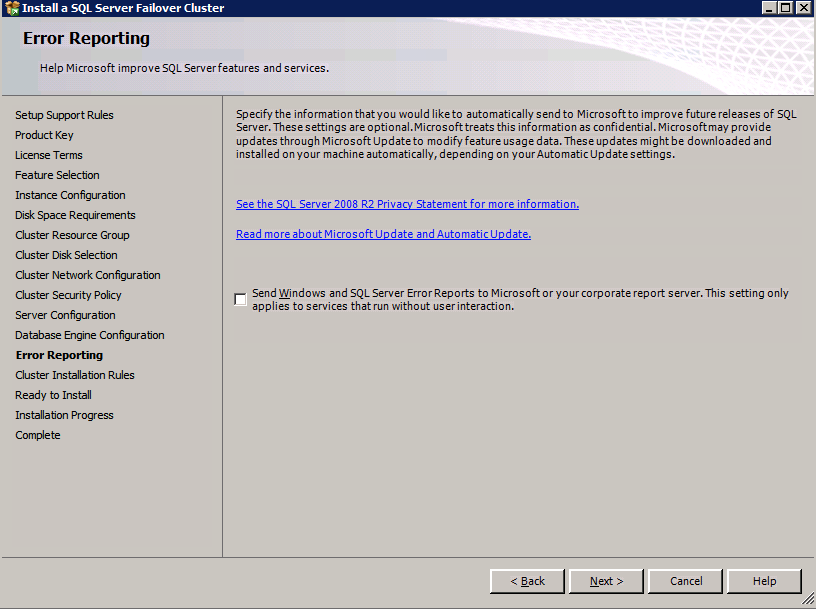
You now will be able to use ASR to do application consistent recovery points of SQL Server 2008 R2.
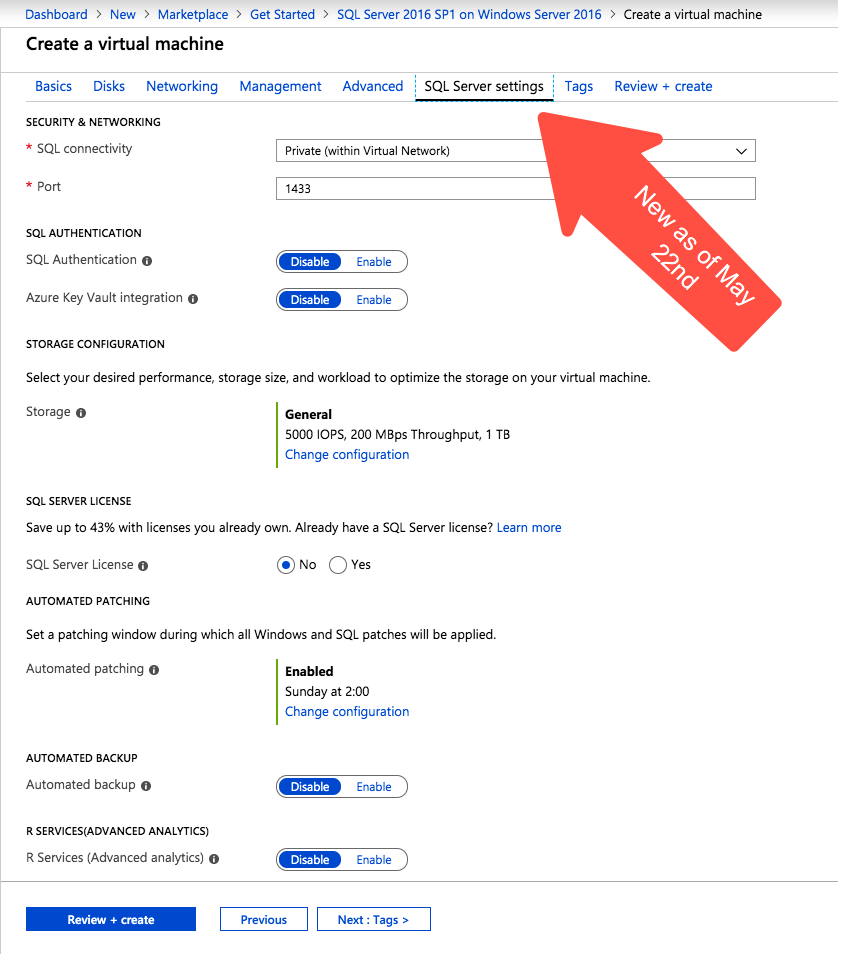
I just noticed today that there is a new blade in the Azure portal when creating a new SQL Server virtual machine. I’ve been looking for an announcement regarding this new Azure portal experience, but I haven’t found one yet. This feature wasn’t available when I took the screen shots for my last post on creating a SQL Server 2008 R2 FCI in Azure on April 19th, so it must be relatively new.
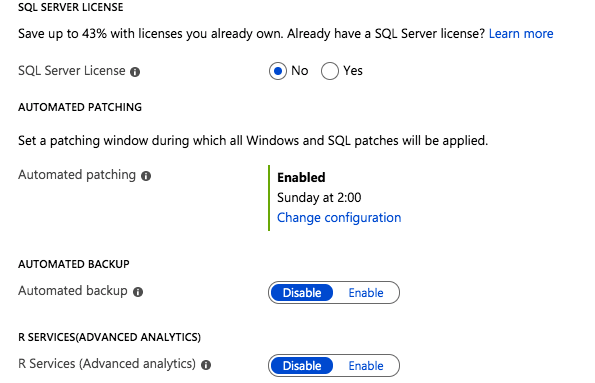
New Azure “SQL Server Settings” blade on the Azure portal
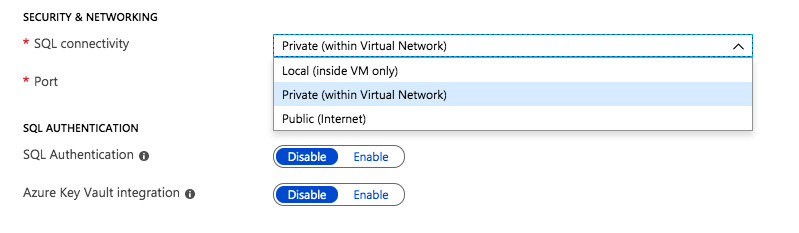
Most of the settings are pretty self explanatory. Under Security and Networking you can specify the port you want SQL to listen on. It also appears as if the Azure Security Group will be updated to allow different levels of access to the SQL instance: Local, Private or Public. Authentication options are also exposed in this new SQL Server settings blade.
Security, Networking and Authentication options are part of your SQL Server deployment
The rest of the features include licensing, patching and backup options. In addition, if you are deploying the Enterprise Edition of SQL Server 2016 or later you also have the option to enable SQL Server R Services for advanced analytics.
Licensing, Patching, Backup and R Services options can be automatically configured
All of those options are welcome additions to the Azure portal experience when provisioning a new SQL Server instance. I’m sure the seasoned DBA probably has a list of a few dozen other options they would like to tweak before a SQL Server deployment, but this is certainly a step in the right direction.
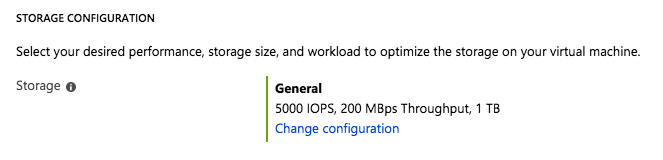
Storage Configuration Options
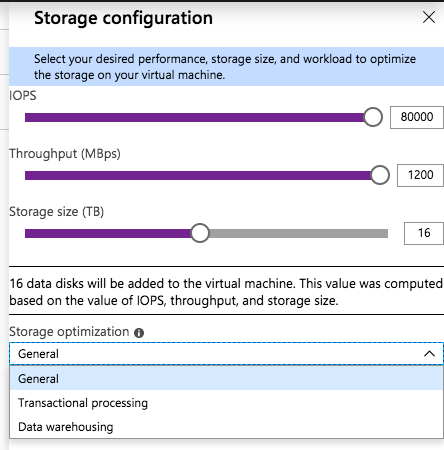
The most interesting new feature I have found on this blade is the Storage Configuration option.
When you click on Change Configuration, you get the following blade.
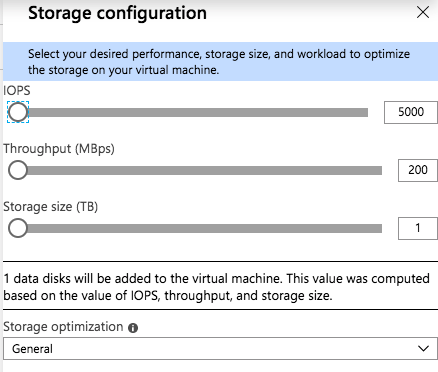
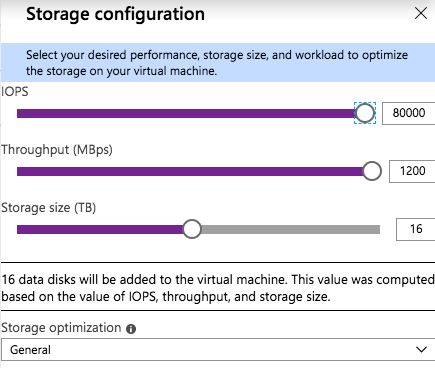
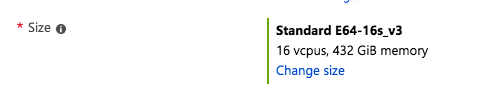
As you slide the IOPS slider to the right you will see the number of data disks increase, the Storage Size increase, and the Throughput increase. You will be limited to the max number of IOPS and disks supported by that instance size. You see in the screenshot below I am able to go as high as 80,000 IOPS when provisioning storage for a Standard E64-16s_v3 instance.
The Standard E64-16s_v3 instance size supports up to 80,000 IOPS
There is also a “Storage optimization” option. I haven’t tried all the different combinations to know exactly what the Storage optimization setting does. If you know how the different options change the storage configuration, leave me a comment, or we will just wait for the official documentation to be released.
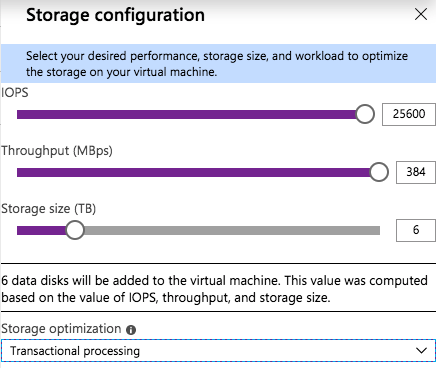
For my test, I provisioned a Standard DS13 v2 instance and maxed out the IOPS at 25600, the max IOPS for that instance size. I also optimized the storage for Transactional processing.
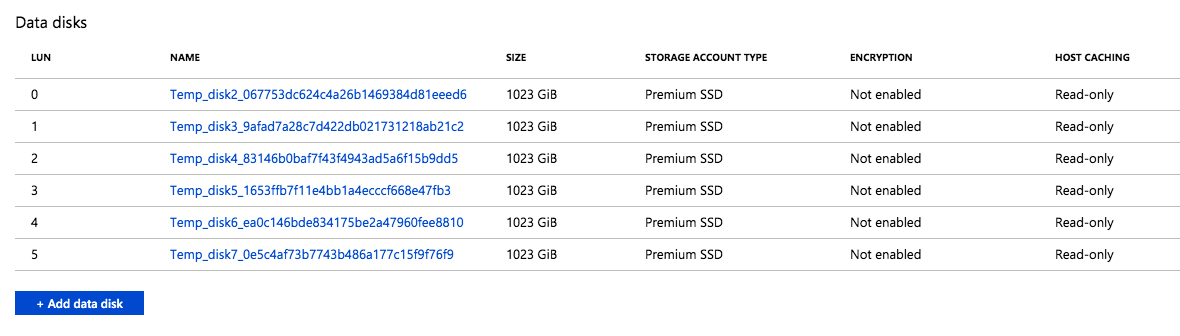
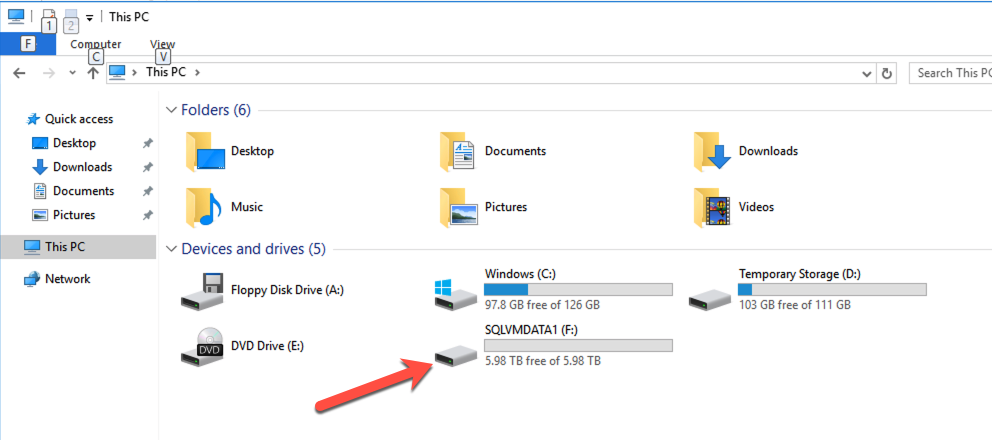
I found that when this instance was provisioned, six P30 premium disk were attached to the instance. This makes sense, since each P30 delivers 5000 IOPS, so it would take at least six of them to deliver the 25,600 IOPS requested. This also increased the Storage Size to 6 TB, since each P30 gives you one 1 TB of storage space. The Read-only host caching was also enabled on these disks.
The six disks were automatically provisioned and attached to the instance
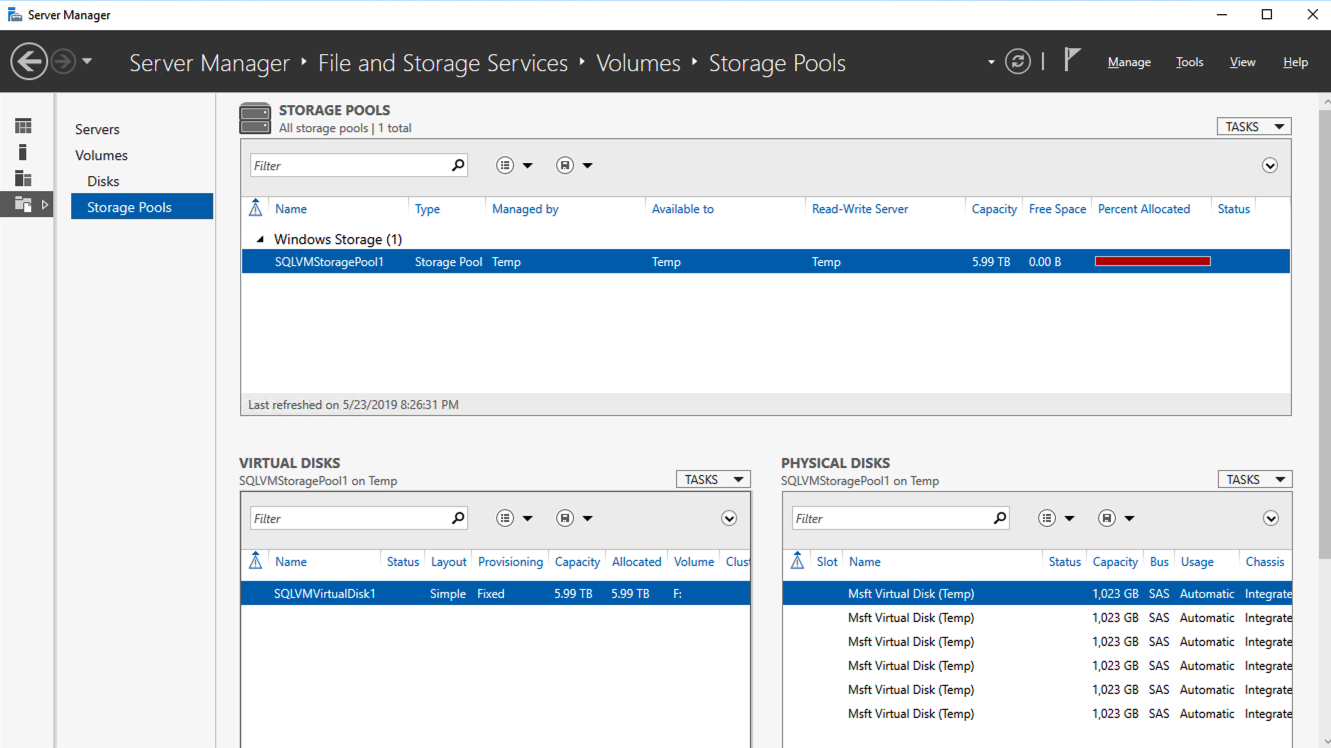
When I logged in to the instance to see what Azure had done with those disk I found that they had done exactly what I would have done; they created a single Storage Pool with the six P30 disks and created a Simple (aka, RAID 0) Storage Space and provisioned a single 6 TB F:\ drive.
This storage configuration wizard validates some of the cloud storage assumptions I made in my previous blog post, Storage Considerations for Running SQL Server in Azure. It seems like a single, large disk should suffice in most circumstances.
A Simple Storage Space consisting of the six P30s are presented as a single F:\ drive
I have found this storage optimization is not available in every Azure Marketplace offering. For example, if you are moving SQL Server 2008 R2 to Azure for the extended security updates you will find that this storage optimization in not available in the SQL2008R2/Windows Server 2008 R2 Azure Marketplace image. Of course, Storage Spaces was not introduced until Windows Server 2012, so that makes sense. I did verify that this option is available with the SQL Server 2012 SP4 on Windows Server 2012 R2 Azure Marketplace offering.
There is a minor inconvenience however. In addition to adding this new Storage configuration option on SQL Server settings blade, they also removed the option to add Data Disks on the Disks blade. So if I wanted to provision additional storage without creating a Storage Space, I would have to create the instance first and then come back and add Data disks after it the virtual machine is provisioned.
Final thoughts
All of the SQL Server configuration options in this new Azure blade are welcome additions. I would love to see the list tunable settings grow. Information text should include guidance on current best practices for each tunable.
What SQL Server or Windows OS tunables would you like to see exposed as part of the provisioning process to make your life as a DBA easier? Not only would these tunables make your life easier, but they would also make the junior DBA look like a season pro by guiding them through all the current SQL Server configuration best practices.
I think the new Storage configuration option is probably the most compelling new addition. Prior to the Storage configuration wizard, users had to be aware of the limits of their instance size, the limits of the storage they were adding, and have the wherewithal to stripe together multiple disks in a Simple Storage Space to get the maximum IOPS. A few years ago I put together a simple Azure Storage Calculator to help people make these decisions. My calculator is currently outdated, but this new Storage configuration option may make it obsolete anyway.
I would love to see this Storage configuration wizard included as a standard offering in the Disks blade of every Windows instance type, rather than just the SQL Server instances. I would let the user choose to use the new Storage configuration “Wizard” experience, or the “Classic” experience where you manually add and manage storage.
If you are deploying SQL Server in Azure, or any Cloud platform for that matter, instead of just provisioning storage like you did for your on-premises deployments for many years, you may consider that storage in the Azure isn’t exactly like the storage you may have had access to on-premises. Some traditional “best practices” may wind up costing you additional money and give you less than optimal performance, all while not providing you any of the intended benefits. Much of what I am about to discuss is also described in Performance Guidelines for Azure in SQL Server Virtual Machines.
Disk Types
I’m not here to tell you that you must use UltraSSD, Premium Storage, or any other disk type. You just need to be aware that you have options, and what each disk type brings to the table. Of course, like anything else in the cloud, the more money you spend, the more power, speed, throughput, etc., you will achieve. The trick is finding the optimal configuration so that you spend just enough to achieve the desired results.
Size DOES Matters
Like many things in the cloud, certain specs are tied together. For servers if you want more RAM you often get more CPU, even if you didn’t NEED more CPU. For storage, IOPS, throughput and size are all tied together. If you want more IOPS, you need a bigger disk. If you need more space, you also get more IOPS. Of course you can jump between storage classes to circumvent that to some extent, but it still holds true that if you need more IOPS, you also get more space on any of the different storage types.
The size of your virtual machine instance also matters. Regardless of what storage configuration you eventually go with, the overall throughput will be capped at whatever the instance size allows. So once again, you may need to pay for more RAM and CPU than you need, just to achieve your desired storage performance. Make sure you understand what your instance size can support in terms of max IOPS and MBps throughput. Many times the instance size will turn out to be the bottleneck in a perceived storage performance problem in Azure.
Use RAID 0
RAID 0 is traditionally the 3rd rail of storage configuration options. Although it provides the best combination of performance and storage utilization of any RAID option, it does so at the risk of a catastrophic failure. If just a single disk in a RAID 0 stripe set should fail, the entire stripe set fails. So traditionally RAID 0 is only used in scenarios where data loss is acceptable and high performance is desirable.
However, in Azure software RAID 0 is desirable and even recommended in many situations. How can we get away with RAID 0 in Azure? The answer is easy. Each disk you present to an Azure virtual machine instance already has triple redundancy on the backend, meaning you would need to have multiple failures before you would lose your stripe set. By using RAID 0, you can combine multiple disks and the overall performance of the combined stripe set will increase by 100% for each additional disk you add to the stripe set.
So for example, if you had a requirement of 10,000 IOPS, you might think that you need UltraSSD since Premium Storage maxes out at 7,500 IOPS with a P50. However, if you put two P50s in a RAID 0, you now have the potential to achieve up to 15,000 IOPS, assuming you are running a Standard_F16s_v2 or similarly large instance size that supports that many IOPS.
In Windows 2012 and later, RAID 0 is achieved by creating a Simple Storage Space. In Windows Server 2008 R2 you can use Dynamic Disks to create a RAID 0 Striped Volume. Just a word of caution, if you are going to use a local Storage Space and also configure Availability Groups or a SANless Failover Cluster Instance with DataKeeper, it is best to configure your storage BEFORE you create a cluster.
Just a reminder, you only have about two more months to move your SQL Server 2008 R2 instances to Azure. Check out my post on how to deploy a SQL Server 2008 R2 FCI on Azure to ensure high availability.
Don’t bother separating log and data files
Traditionally log and data files would reside on different physical disks. Log files tend to have a lot of write activity and data files tend to have more read activity, so sometimes storage would be optimized based on those characteristics. It was also desirable to keep log and data files on different disks for recovery purposes. If you should lose one or the other, with a proper backup strategy in place you could recover your database with no data loss.
With cloud based storage, the likelihood of losing just a single volume is EXTREMELY low. If by chance you lose storage, it is likely your entire storage cluster, along with the triple redundancy, went to lunch. So while it may feel right to put logs in E:\ logs and data in F:\data, you really are doing yourself a disservice. For example, if you provision a P20 for logs and a P20 for data, each volume will be 512 GiB in size and capped at 2,300 IOPS. And just think, you may not need all that size for log files, but it might not give you much room to grow for your data files, which will eventually require moving to a more expensive P30 just for the extra space.
Wouldn’t it be much nicer to simply stripe those two volumes together into a nice large 1 TB volume that supports 4,600 IOPS? By doing that both the log and data files can take advantage of the increased IOPS and you have also just optimized your storage utilization and decreased your cloud storage cost by putting off the move to a P30 disk for your data file.
The same holds true files and filegroups. Really think hard about what you are doing and whether it still makes sense once you move to the cloud. What makes sense might be counter intuitive to what you have done in the past. When in doubt, follow the KISS rule, Keep It Simple Stupid! The beauty of the cloud is you can always add more storage, increase instance size, or do whatever it takes to optimize performance vs. cost.
What to do about TempDB
Use the local SSD, aka, the D: drive. The D drive is going to be the best location for your tempdb. Because it is a local drive the data is considered “temporary”, meaning it can be lost if a server is moved, rebooted, etc. That’s okay, tempdb is recreated each time SQL starts anyway. The local SSD is going to be fast and have low latency, but because it is local the reads and writes to it do not contribute to the overall storage IOPS limit of the instance size, so effectively it is FREE IOPS, so why not take advantage? If you are building a SANless SQL Server FCI with SIOS DataKeeper, be sure to create a non-mirrored volume resource of the D drive so you don’t needlessly replicate TempDB.
Mount Points Become Obsolete
Mount Points are commonly used in SQL Server FCI configurations when multiple instances of SQL Server are installed on the same Windows Cluster. This reduces the overall cost of SQL Server licenses and can help save cost by driving higher server utilization. As we discussed in the past, typically there might be five or more drives associated with each SQL Server instance. If each of those drives had to consume a drive letter you would run out of letters in just about three to four instances. So instead of giving each drive a letter, mount points were used so that each instance could just be serviced by a single drive letter, the root drive. The root drive has mount points that map to separate physical disks that don’t have drive letters.
However, as we discussed above, the concept of using a bunch of individual disks really doesn’t make a lot of sense in the cloud, hence mount points become obsolete in the cloud. Instead, create a RAID 0 stripe we as described and each clustered instance SQL Server will simply have its own individual volume that is optimised for space, performance and cost. This solves the problem of running out of drive letters and gives you much better storage utilization and performance while also reducing the cost of your cloud storage.
Conclusions
This post is meant as a jumping off point, not a definitive guide. The main point of the post is to get you thinking differently about cloud and storage as it pertains to running SQL Server. Don’t simply take what you did on-premise and recreate it in the cloud, that will almost always result in less than optimal performance and a much larger storage bill than necessary.
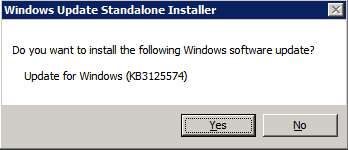
On July 9, 2019, support for SQL Server 2008 and 2008 R2 will end. That means the end of regular security updates. However, if you move those SQL Server instances to Azure or Azure Stack (I will simply refer to both as Azure for the rest of the guide), Microsoft will give you three years of Extended Security Updates at no additional charge. If you are currently running SQL Server 2008/2008 R2 and you are unable to update to a later version of SQL Server before the July 9th deadline, you will want to take advantage of this offer rather than running the risk of facing a future security vulnerability. An unpatched instance of SQL Server could lead to data loss, downtime or a devastating data breach.
One of the challenges you will face when running SQL Server 2008/2008 R2 in Azure is ensuring high availability. On premises you may be running a SQL Server Failover Cluster (FCI) instance for high availability, or possibly you are running SQL Server in a virtual machine and are relying on VMware HA or a Hyper-V cluster for availability. When moving to Azure, none of those options are available. Downtime in Azure is a very real possibility that you must take steps to mitigate.
In order to mitigate the possibility of downtime and qualify for Azure’s 99.95% or 99.99% SLA, you have to leverage SIOS DataKeeper. DataKeeper overcomes Azure’s lack of shared storage and allows you to build a SQL Server FCI in Azure that leverages the locally attached storage on each instance. SIOS DataKeeper not only supports SQL Server 2008 R2 and Windows Server 2008 R2 as documented in this guide, it supports any version of Windows Server, from 2008 R2 through Windows Server 2019 and any version of SQL Server from from SQL Server 2008 through SQL Server 2019.
This guide will walk through the process of creating a two-node SQL Server 2008 R2 Failover Cluster Instance (FCI) in Azure, running on Windows Server 2008 R2. Although SIOS DataKeeper also supports clusters that span Availability Zones or Regions, this guide assumes each node resides in the same Azure Region, but different Fault Domains. SIOS DataKeeper will be used in place of the shared storage normally required to create a SQL Server 2008 R2 FCI.
Pre-Requisites
Active Directory This guide assumes you have an existing Active Directory Domain. You can manage your own Domain Controllers or use Azure Active Directory Domain Services. For this tutorial we will connect to a domain called contoso.local. Of course you will connect to your own domain when following this tutorial.
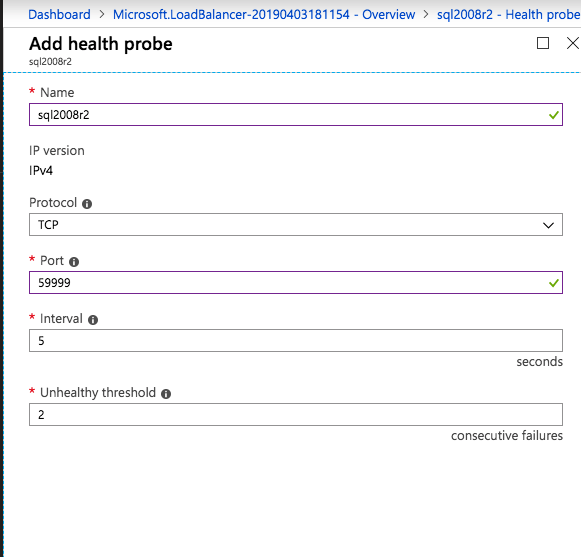
Open Firewall Ports – SQL Server:1433 for Default Instance – Load Balancer Health Probe: 59999 – DataKeeper: these firewall rules are added to the Windows host based firewall automatically during installation. For details on which ports are opened consult the SIOS documentation. – Keep in mind, if you have any network based security in place that blocks ports between the cluster nodes you will need to account for these ports there as well.
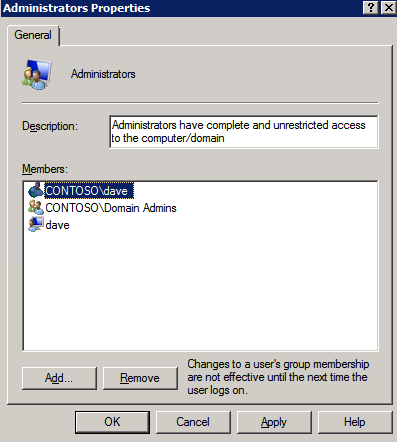
DataKeeper Service Account Create a Domain account. We will specify this account when we install DataKeeper. This account will need to be added to the Local Administrators group on each node of the cluster.
Create the first SQL Server Instance in Azure
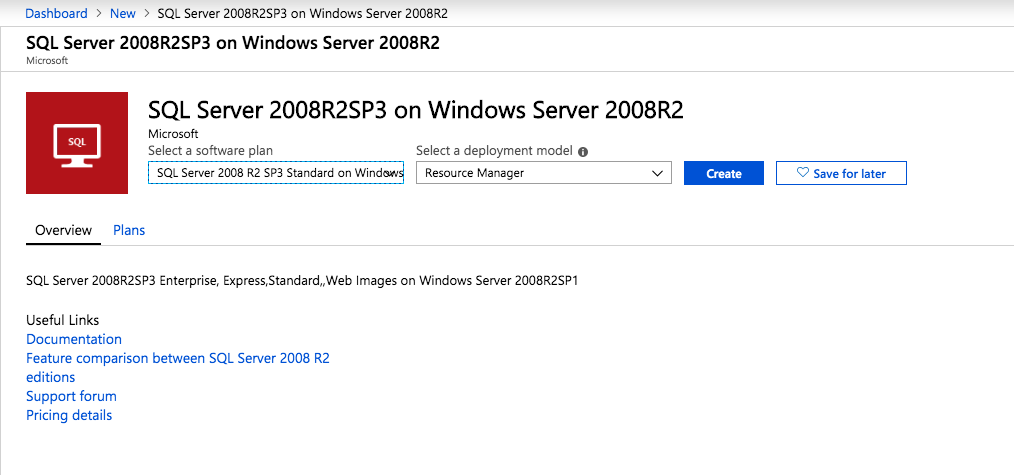
This guide will leverage the SQL Server 2008R2SP3 on Windows Server 2008R2 image that is published in the Azure Marketplace.
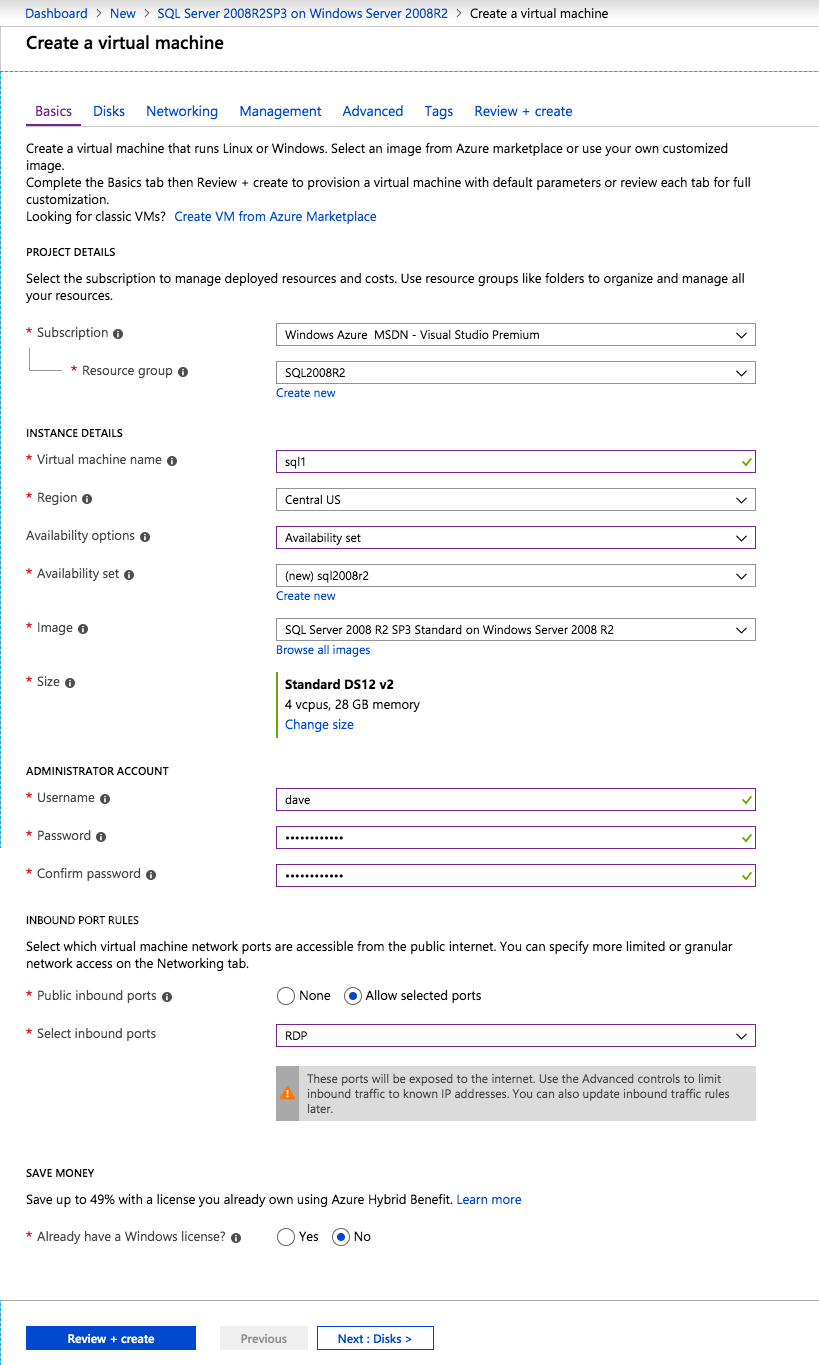
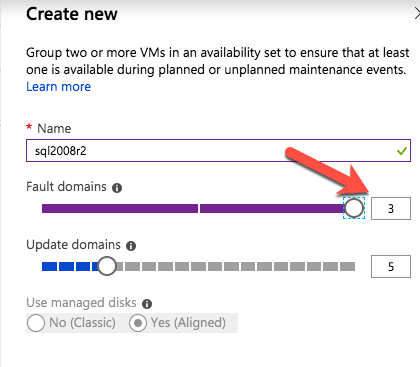
When you provision the first instance you will have to create a new Availability Set. During this process be sure to increase the number of Fault Domains to 3. This allows the two cluster nodes and the file share witness each to reside in their own Fault Domain.
If you don’t already have a virtual network configured, allow the creation wizard to create a new one for you.
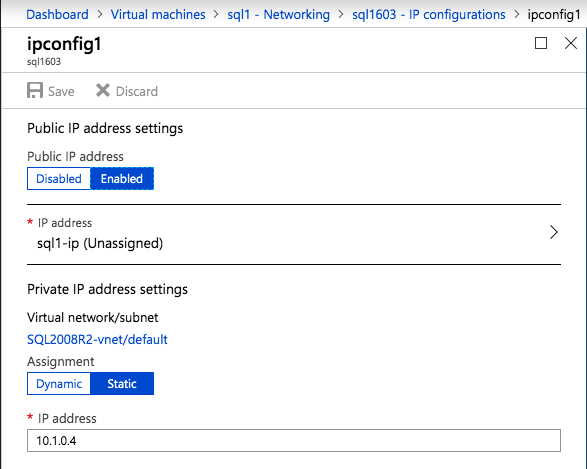
Once the instance is created, go in to the IP configurations and make the Private IP address static. This is required for SIOS DataKeeper and is best practice for clustered instances.
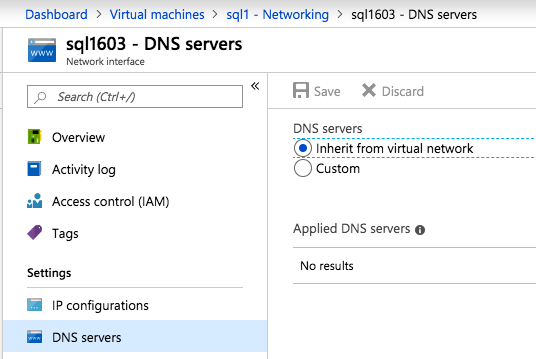
Make sure that your virtual network is configured to set the DNS server to be a local Windows AD controller to ensure you will be able to join the domain in a later step.
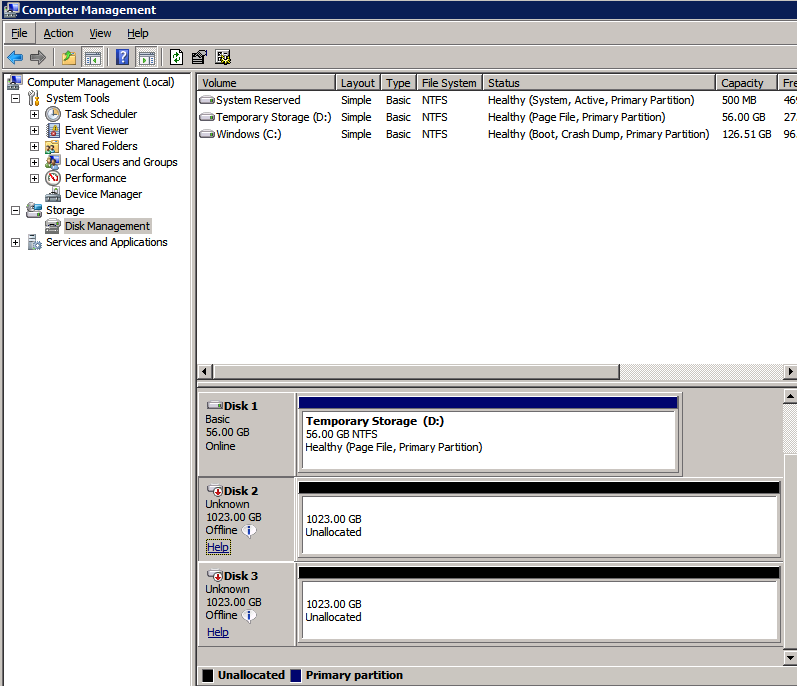
After the virtual machines are provisioned, add at least two additional disks to each instance. Premium or Ultra SSD are recommended. Disable caching on the disks used for the SQL log files. Enable read-only caching on the disk used for the SQL data files. Refer to Performance guidelines for SQL Server in Azure Virtual Machines for additional information on storage best practices.
Create the 2nd SQL Server Instance in Azure
Follow the same steps as above, except be sure to place this instance in the same virtual network and Availability Set that you created with the 1st instance.
Create a File Share Witness (FSW) Instance
In order for the Windows Server Failover Cluster (WSFC) to work optimally you are required to create another Windows Server instance and place it in the same Availability Set as the SQL Server instances. By placing it in the same Availability Set you ensure that each cluster node and the FSW reside in different Fault Domains, ensuring your cluster stays on line should an entire Fault Domain go off line. This instances does not require SQL Server, it can be a simple Windows Server as all it needs to do is host a simple file share.
This instance will host the file share witness required by WSFC. This instance does not need to be the same size, nor does it require any additional disks to be attached. It’s only purpose is to host a simple file share. It can in fact be used for other purposes. In my lab environment my FSW is also my domain controller.
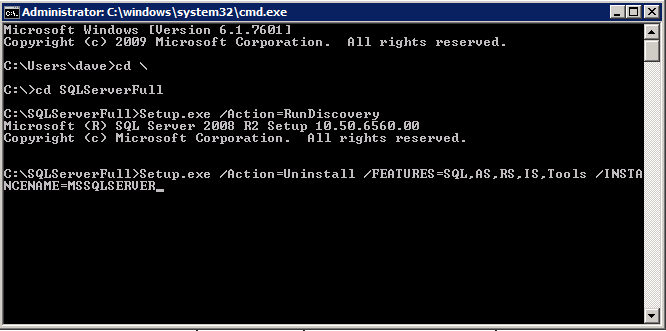
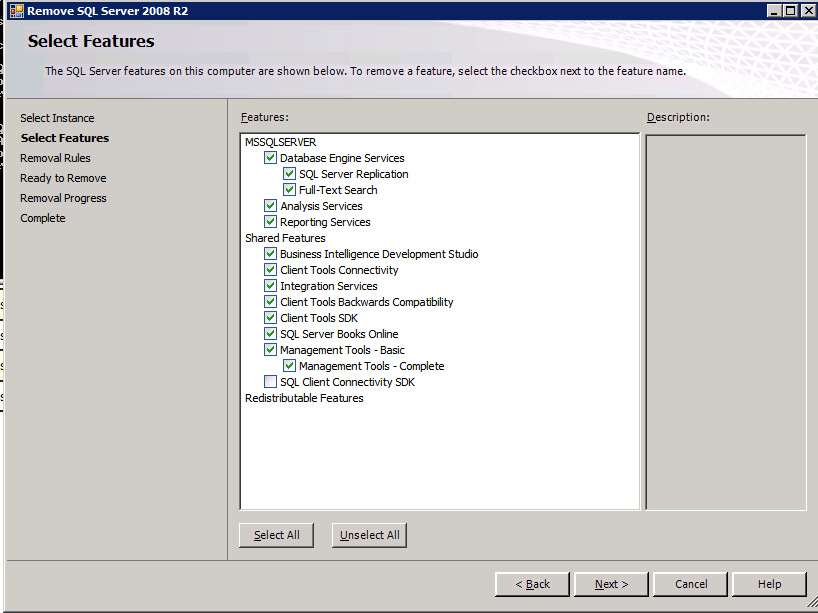
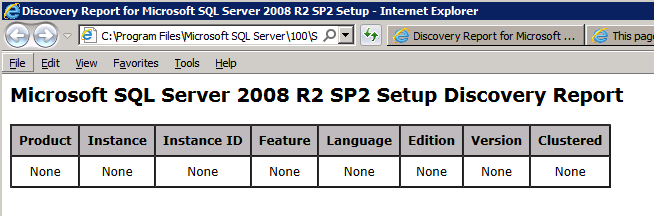
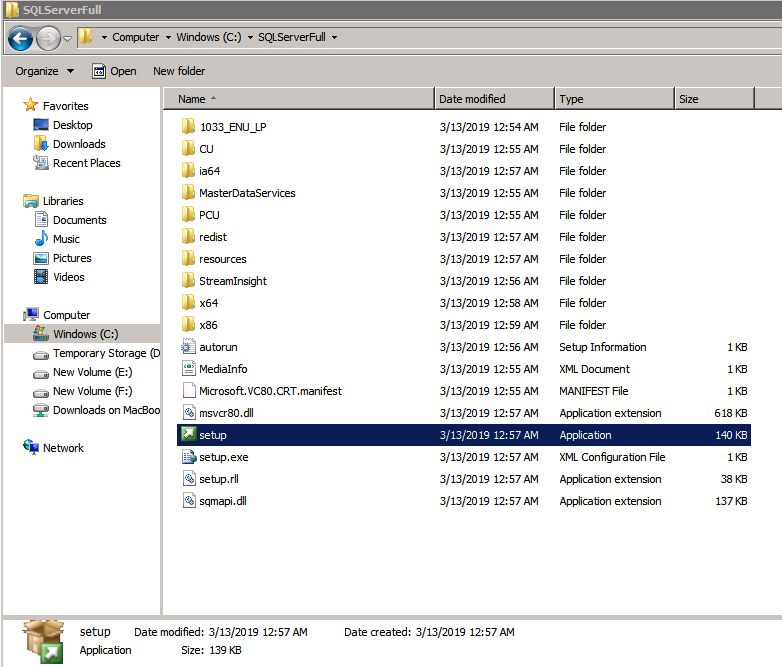
Uninstall SQL Server 2008 R2
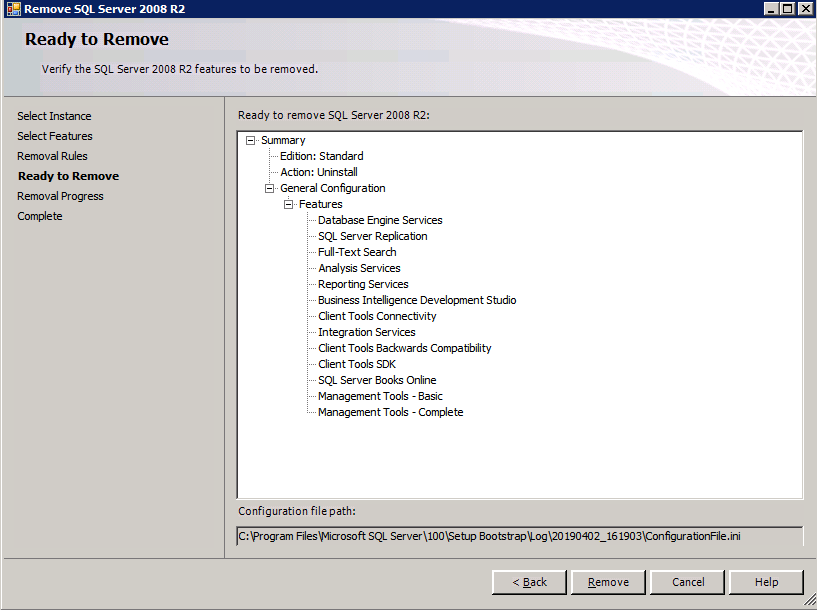
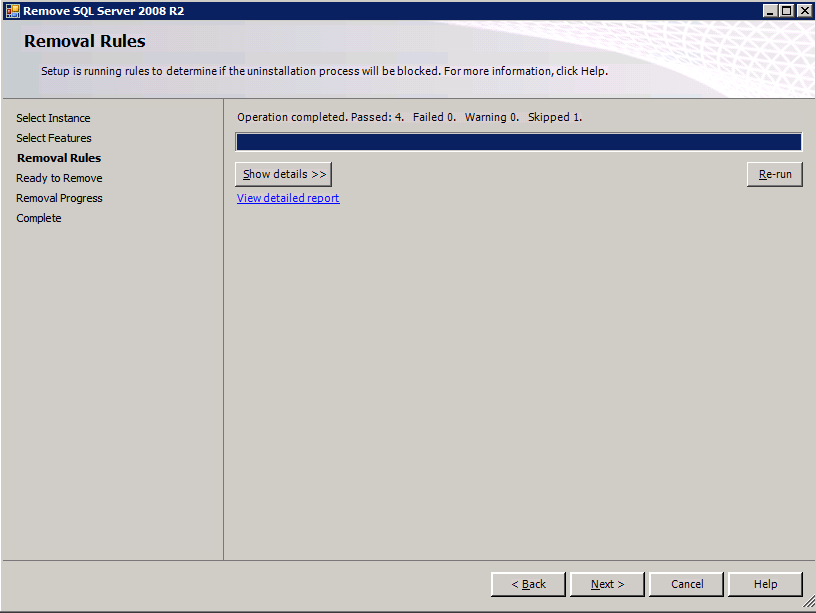
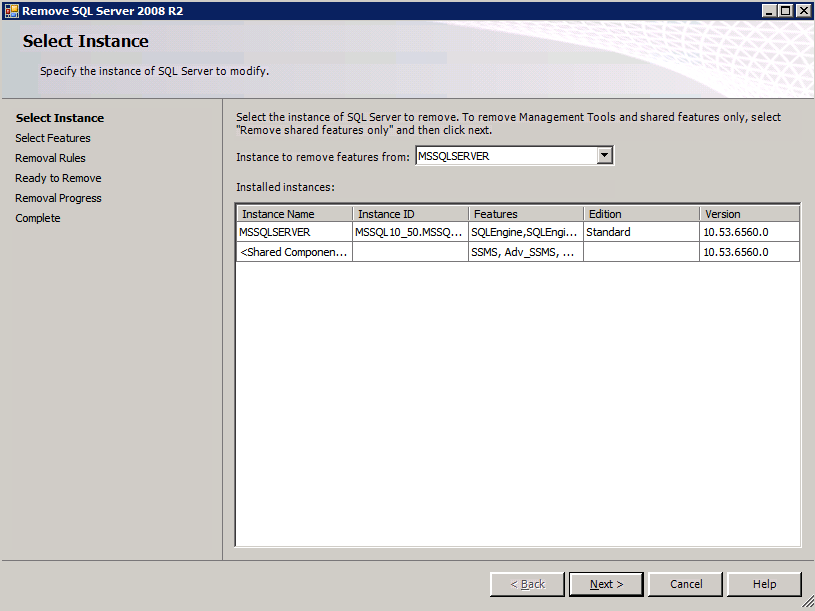
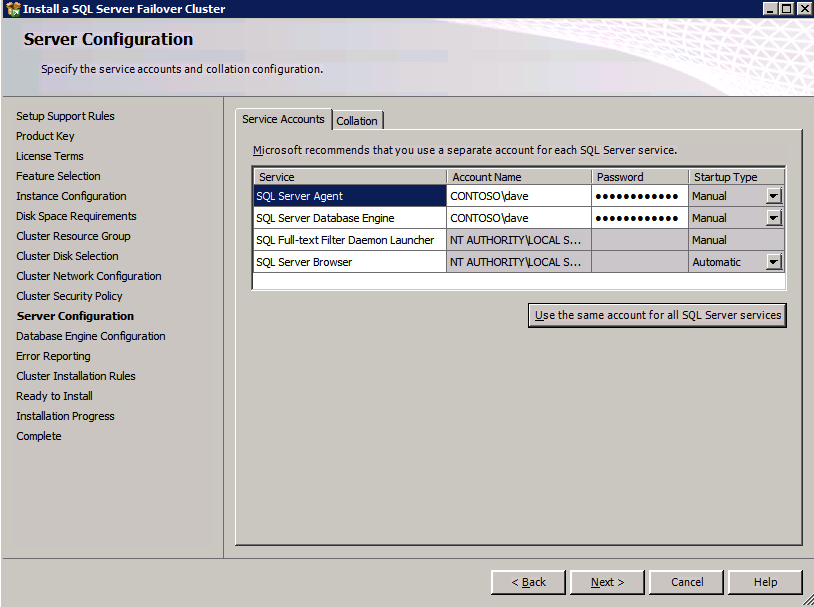
Each of the two SQL Server instances provisioned already have SQL Server 2008 R2 installed on them. However, they are installed as standalone SQL Server instances, not clustered instances. SQL Server must be uninstalled from each of these instances before we can install the cluster instance. The easiest way to do that is to run the SQL Setup as shown below.
When you run setup.exe /Action-RunDiscovery you will see everything that is preinstalled
setup.exe /Action=RunDiscovery
Running setup.exe /Action=Uninstall /FEATURES=SQL,AS,RS,IS,Tools /INSTANCENAME=MSSQLSERVER kicks off the uninstall process
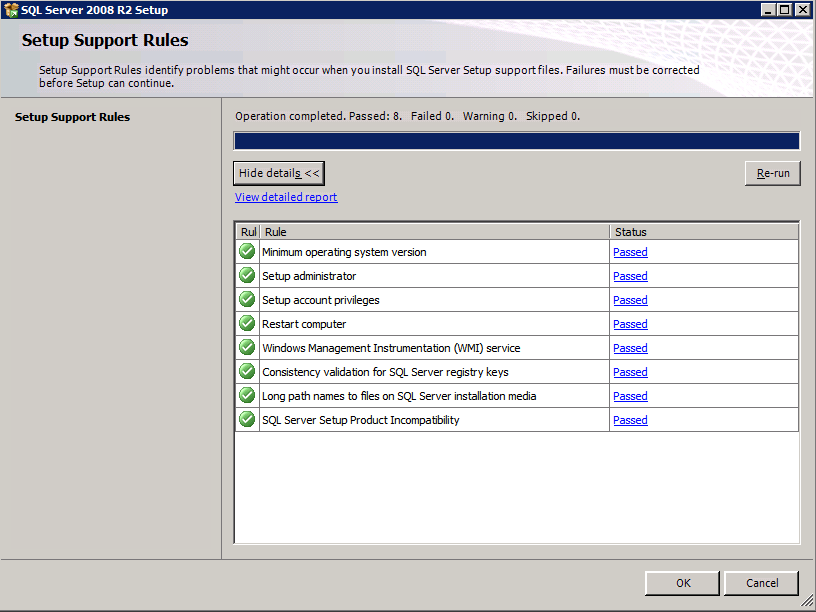
Running setup.exe /Action-RunDiscovery confirms the uninstallation completed
setup.exe /Action-RunDiscovery
Run this uninstallation process again on the 2nd instance.
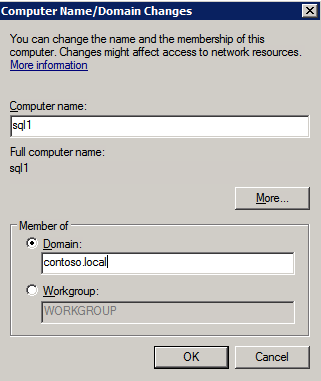
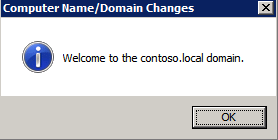
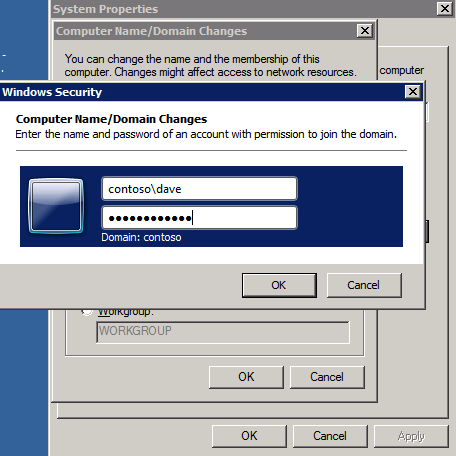
Add instances to the Domain
All three of these instances will need to be added to a Windows Domain. As mentioned in the Prerequisites section, you must have access to join an existing Windows Active Directory. In our case, we are joining a domain called contoso.local.
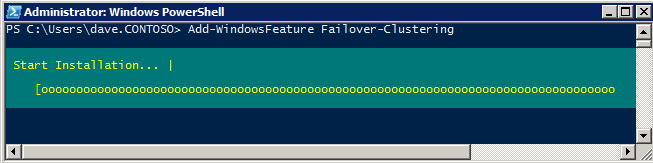
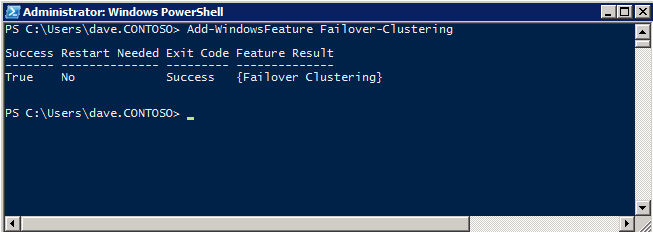
Add Windows Failover Clustering Feature
The Failover Clustering Feature needs to be added to the two SQL Server instances
Add-WindowsFeature Failover-Clustering
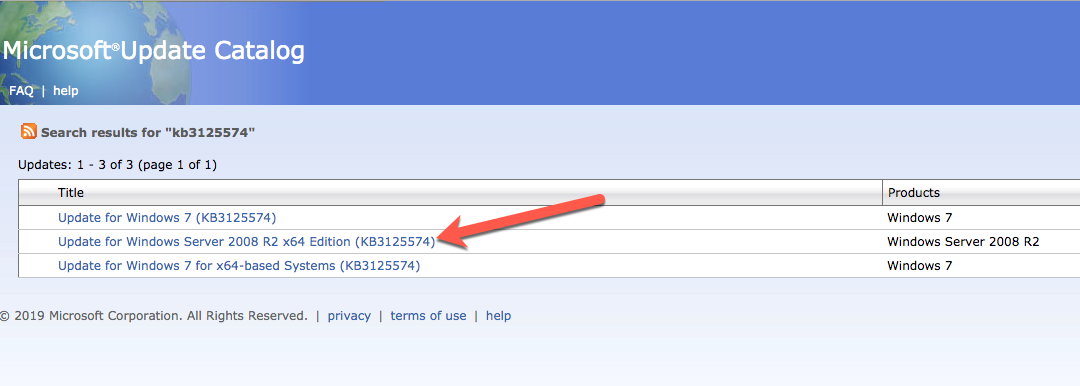
Install Convenience Rollup Update for Windows Server 2008 R2 SP1
There is a critical update ( kb2854082) that is required in order to configure a Windows Server 2008 R2 instance in Azure. That update and many more are included in the Convenience Rollup Update for Windows Server 2008 R2 SP1. Install this update on each of the two SQL Server instances.
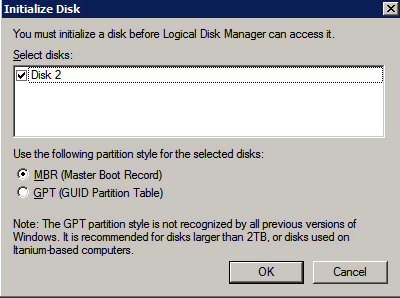
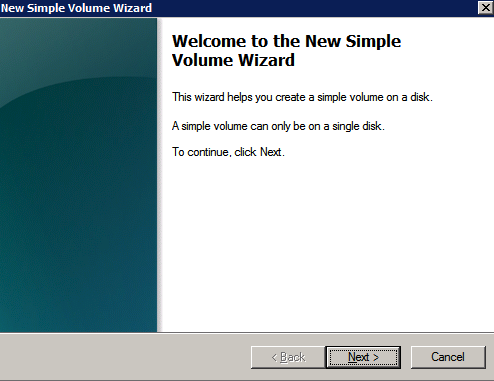
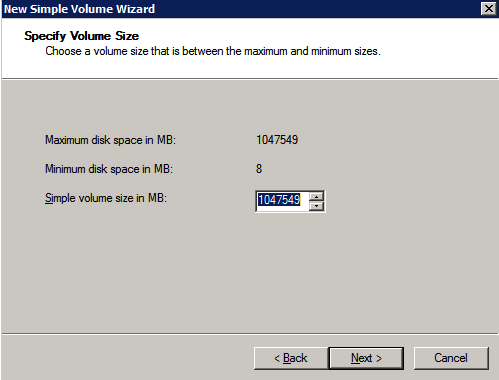
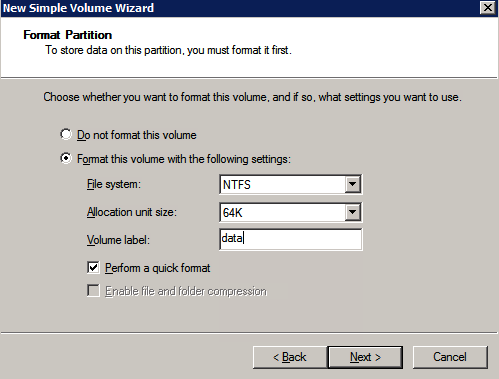
Format the Storage
The additional disks that were attached when the two SQL Server instances were provisioned need to be formatted. Do the following for each volume on each instance.
“NTFS allocation unit size: When formatting the data disk, it is recommended that you use a 64-KB allocation unit size for data and log files as well as TempDB.”
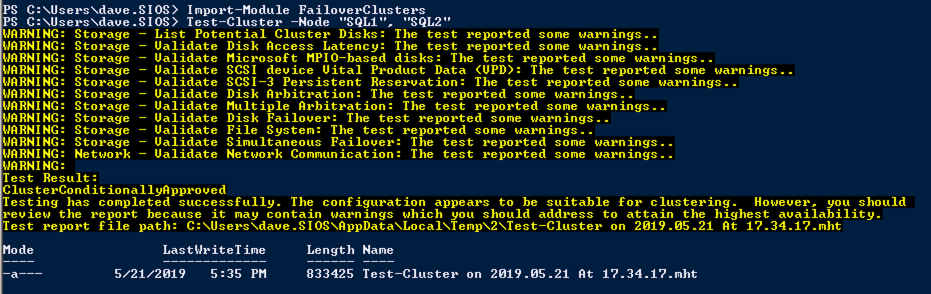
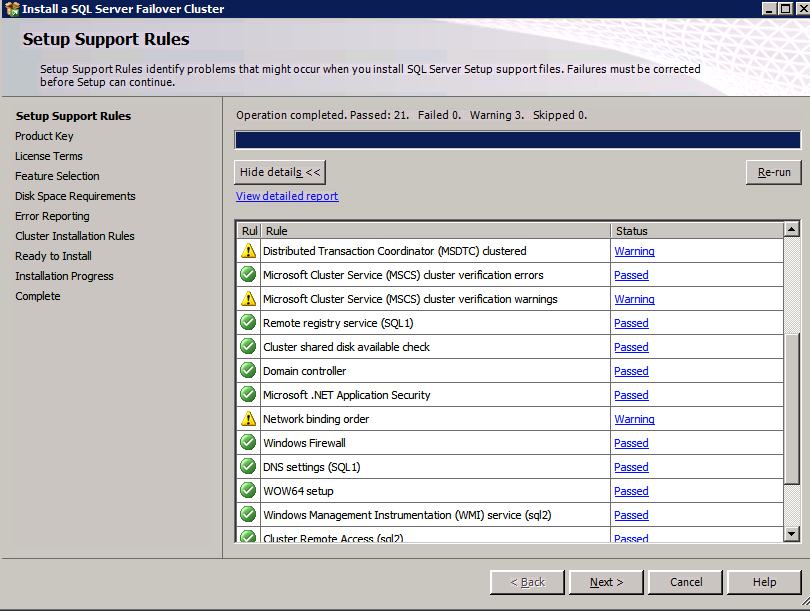
Run Cluster Validation
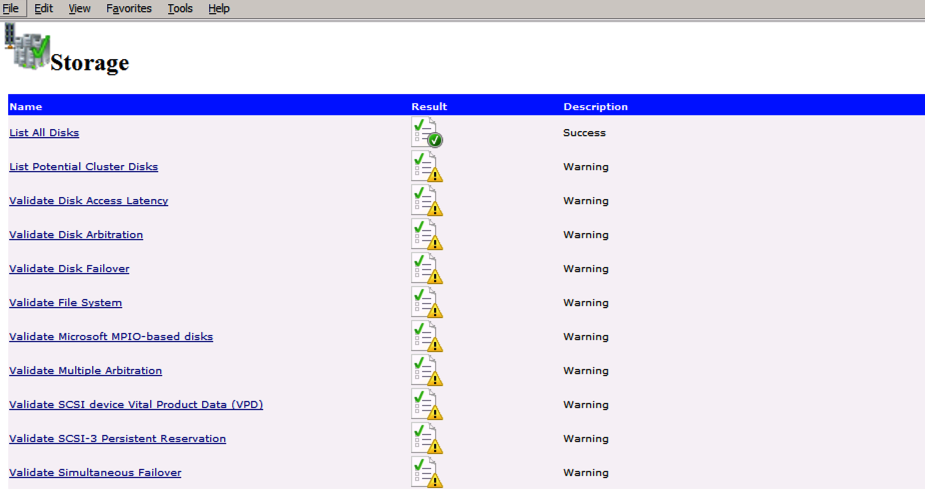
Run cluster validation to ensure everything is ready to be clustered.
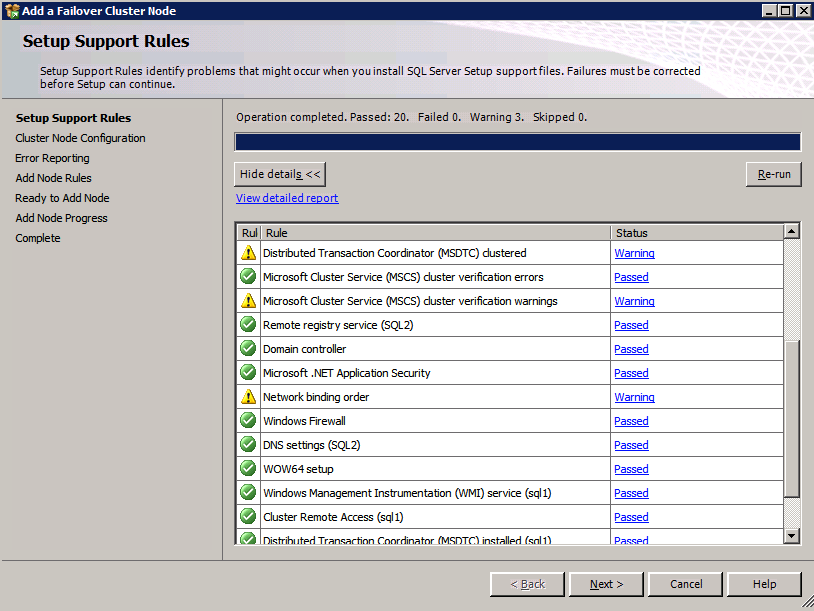
Your report will contain WARNINGS about Storage and Networking. You can ignore those warnings as we know there are no shared disks and only a single network connection exists between the servers. You may also receive a warning about network binding order which can also be ignored. If you encounter any ERRORS you must address those before you continue.
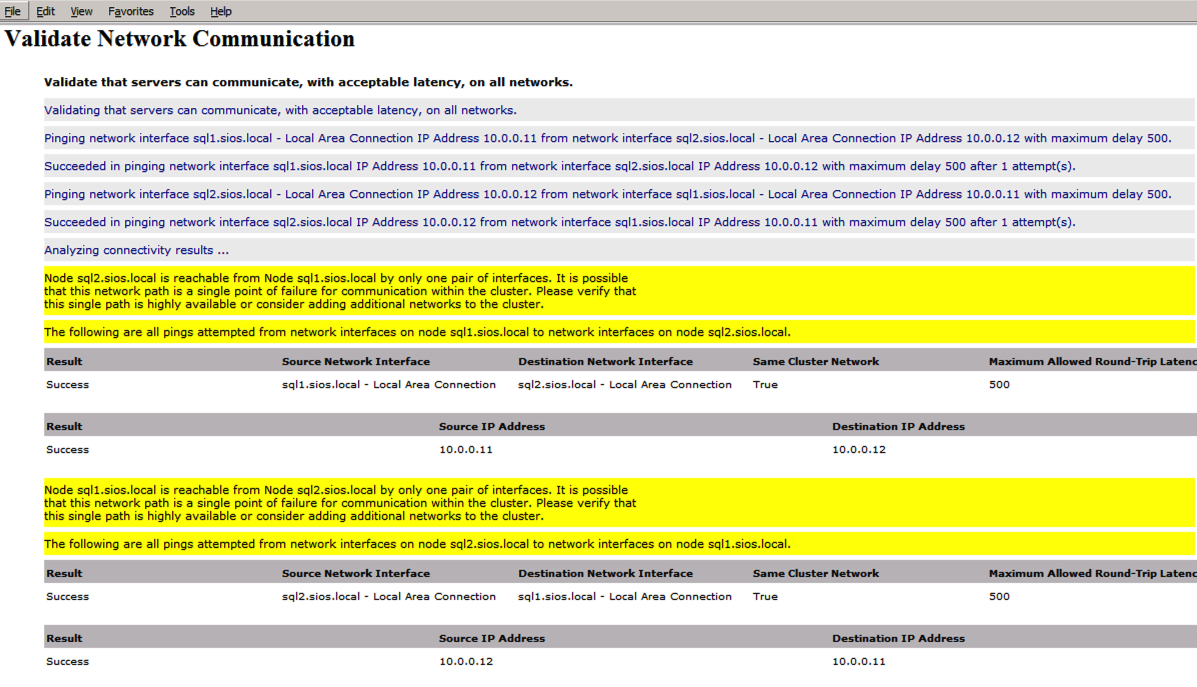
Since there are no “Potential Cluster DIsks” available, the first test throws a warning and all the subsequent disks test are skipped. This is expected since we will be using just local disks replicated with SIOS DataKeeper.The Validate Network Communication tests warn about just a single network being available between cluster nodes. You can ignore this warning since the network redundancy is handled at the virtual layer by Azure.
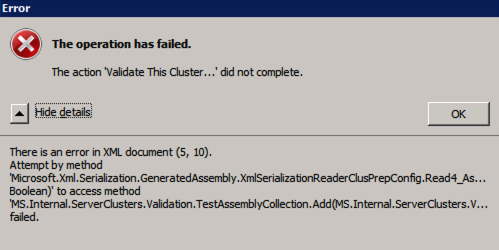
Error trying to run Cluster Validation?
I have encountered this error on a few occasions and I’m still trying to sort out under what conditions this occurs. Occasionally you will find that test-cluster fails to run as described in the forum post.
Test-Cluster
Unable to Validate a Cluster Configuration. The operation has failed. The action validate a configuration did not complete
There is an error in XML document (5, 73).

Attempt by method

Microsoft.Xml.Serialzation.GeneratedAssembly.XmlSerialzationReaderClusterPrep.Config.Read4_As...Bolean) to access method

MS.Internal.ServerClusters.Validation.TestAssemblyCollection.Add(MS.Internal.ServerClusters.V....Failed
If this happens to you, I have found the following fix recommended in the forum post works for me.
Inside C:\Windows\System32\WindowsPowerShell\v1.0 make a copy of powershell_ise.exe.config file (make a copy inside C:\Windows\System32\WindowsPowerShell\v1.0)- rename it to powershell.exe.config

Open it with notepad- delete current config line and paste:
<?xml version="1.0" encoding="utf-8" ?>
<configuration>
  <system.xml.serialization>
    <xmlSerializer useLegacySerializerGeneration="true"/>
  </system.xml.serialization>
</configuration>
- save and run test-cluster
While this fix will allow you to run test-cluster from Powershell, I have found that running Validate through the GUI still throws an error, even with this fix. I have a query in to Microsoft to see if they have a solution, but for now if you need to run cluster Validation you may have to use Test-Cluster in Powershell.
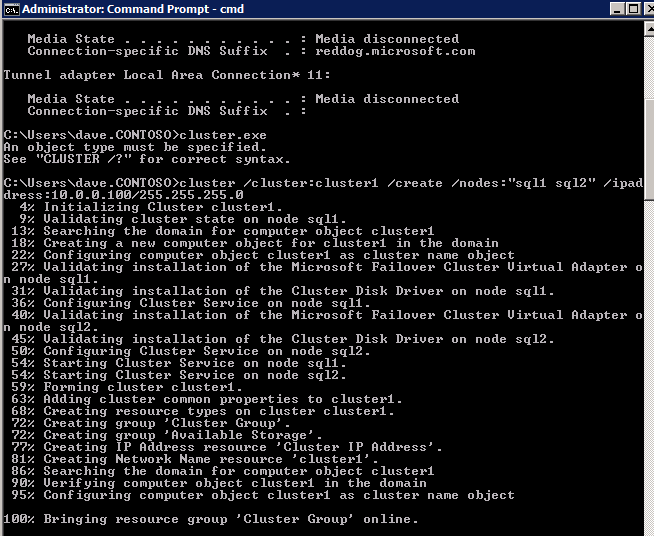
Create the Cluster
Best practices for creating a cluster in Azure would be to use Powershell to create a cluster, specifying a static IP address. Powershell allows us to specify a Static IP Address, whereas the GUI method does not. Unfortunately, Azure’s implementation of DHCP does not work well with WSFC, so if you use the GUI method you will wind up with a duplicate IP address as the Cluster IP Address that will need to be fixed before the cluster is usable.
However, what I have found is that the typical New-Cluster powershell command with the -StaticAddress command doesn’t work. To avoid the problem of the duplicate IP address, we have to resort to the cluster.exe utility and run the following command.
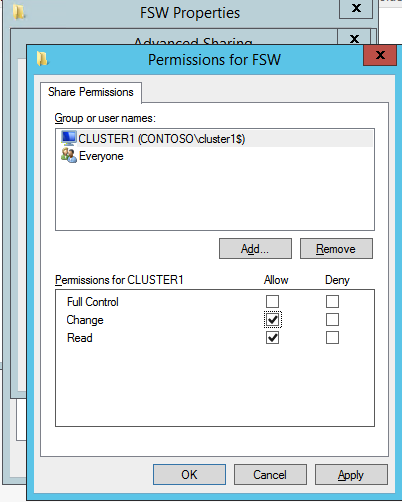
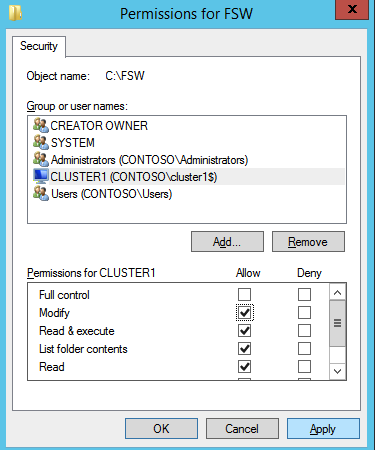
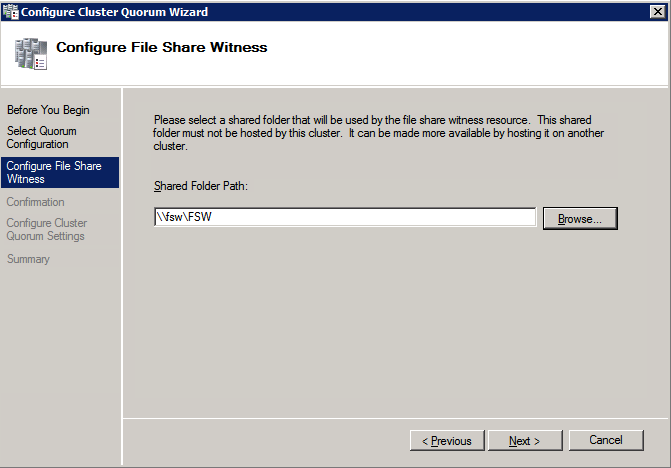
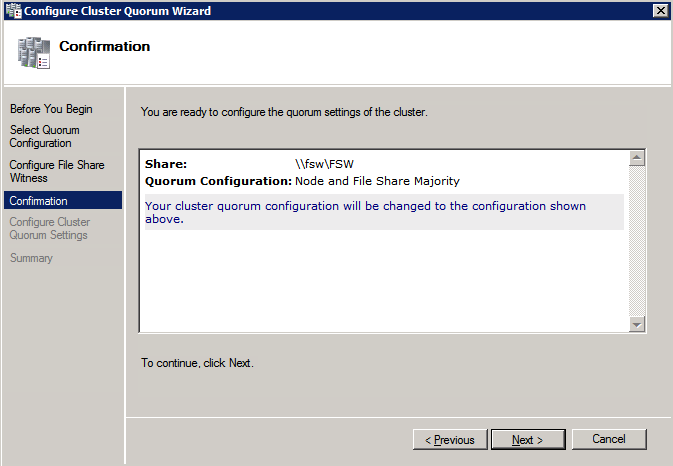
Next we need to add the File Share Witness. On the 3rd server we provisioned as the FSW, create a folder and share it as shown below. You will need to grant the Cluster Name Object (CNO) read/write permissions at both the Share and Security levels as shown below.
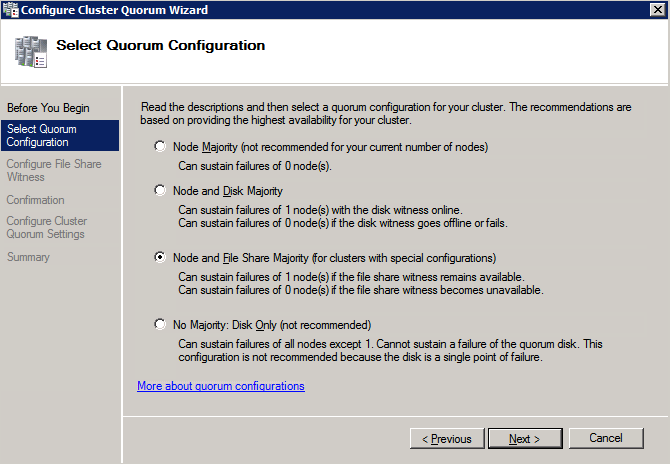
Once the share is created, run the Configure Cluster Quorum wizard on one of the cluster nodes and follow the steps illustrated below.
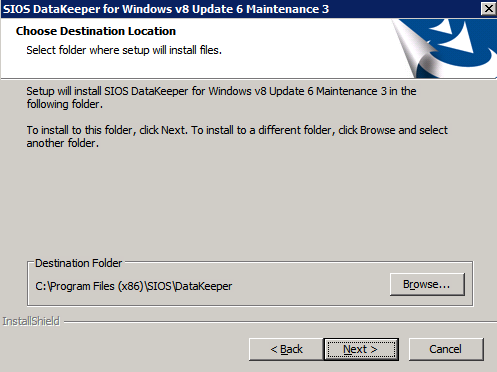
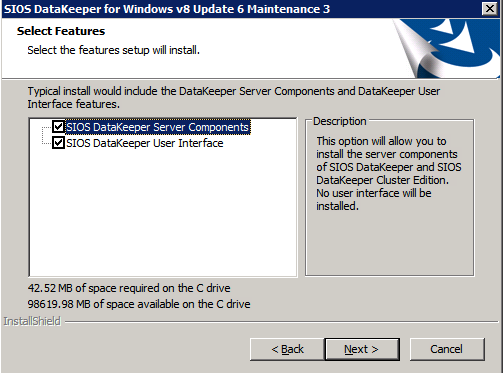
Install DataKeeper
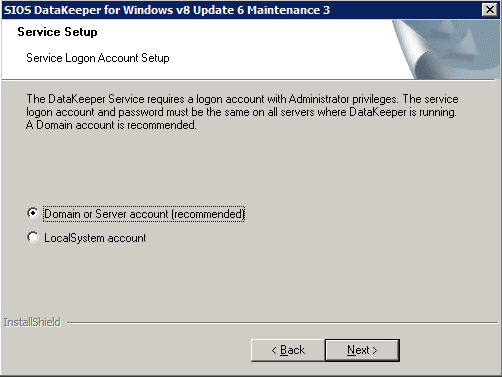
Install DataKeeper on each of the two SQL Server cluster nodes as shown below.
This is where we will specify the Domain account we added to each of the local Domain Administrators group.
Configure DataKeeper
Once DataKeeper is installed on each of the two cluster nodes you are ready to configure DataKeeper.
NOTE – The most common error encountered in the following steps is security related, most often by pre-existing Azure Security groups blocking required ports. Please refer to the SIOS documentation to ensure the servers can communicate over the required ports.
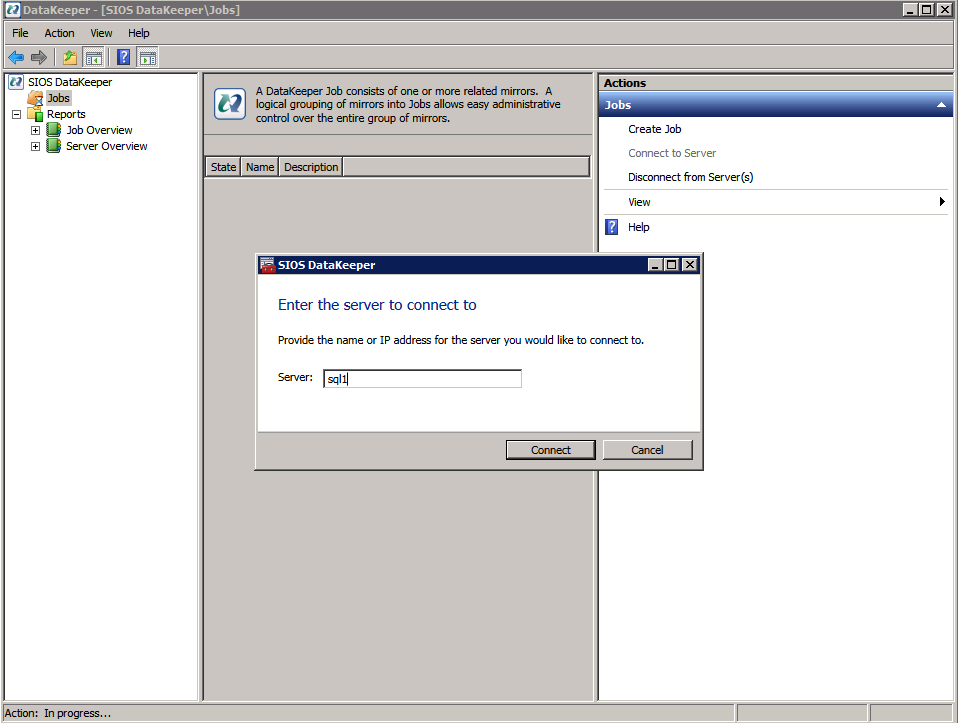
First you must connect to each of the two nodes.
If everything is configured properly, you should then see the following in the Server Overview report.
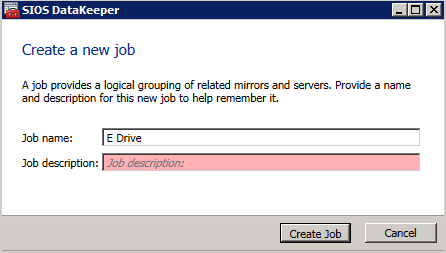
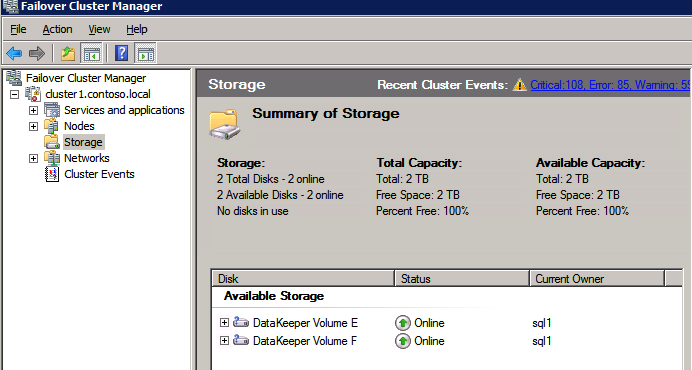
Next, create a New Job and follow the steps illustrated below
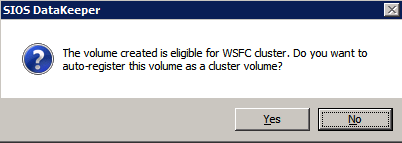
Choose Yes here to register the DataKeeper Volume resource in Available Storage
Complete the above steps for each of the volumes. Once you are finished, you should see the following in the WSFC UI.
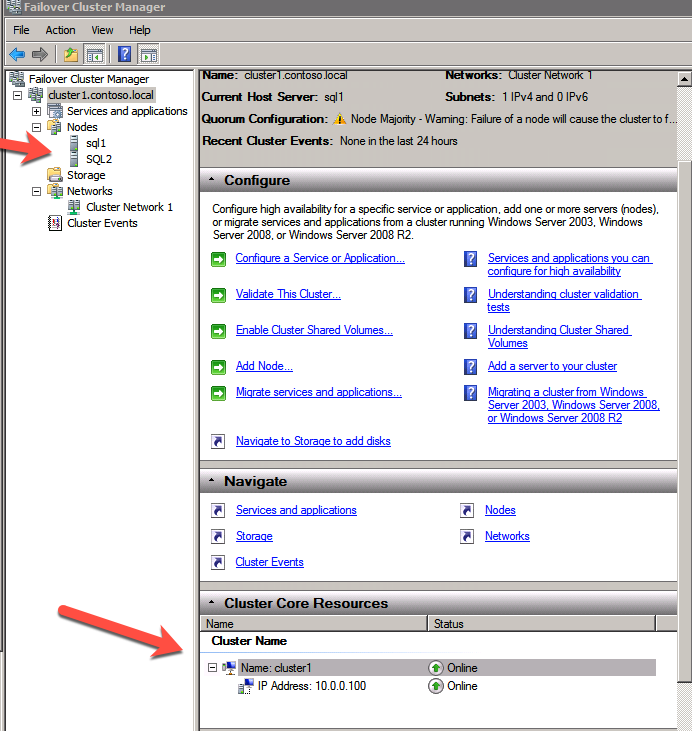
You are now ready to install SQL Server into the cluster.
NOTE – At this point the replicated volume is only accessible on the node that is currently hosting Available Storage. That is expected, so don’t worry!
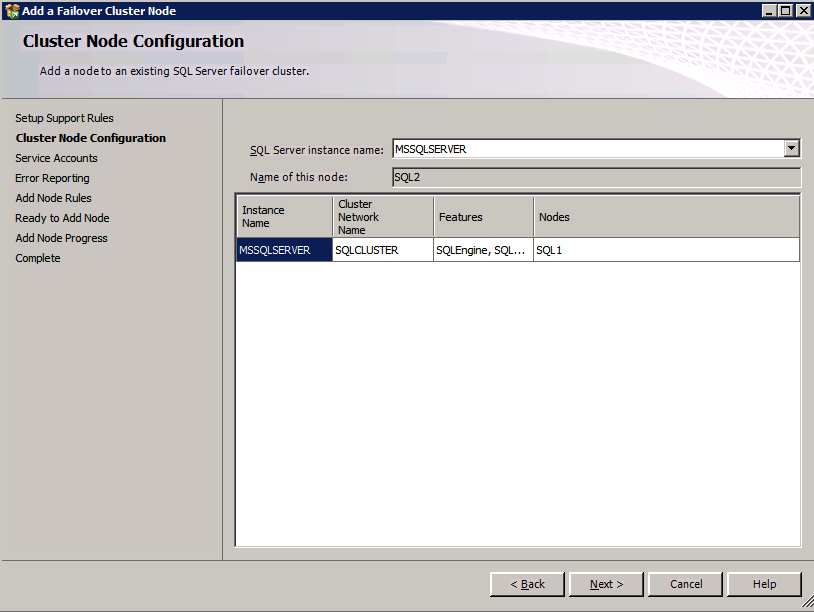
Install SQL Server on the first node
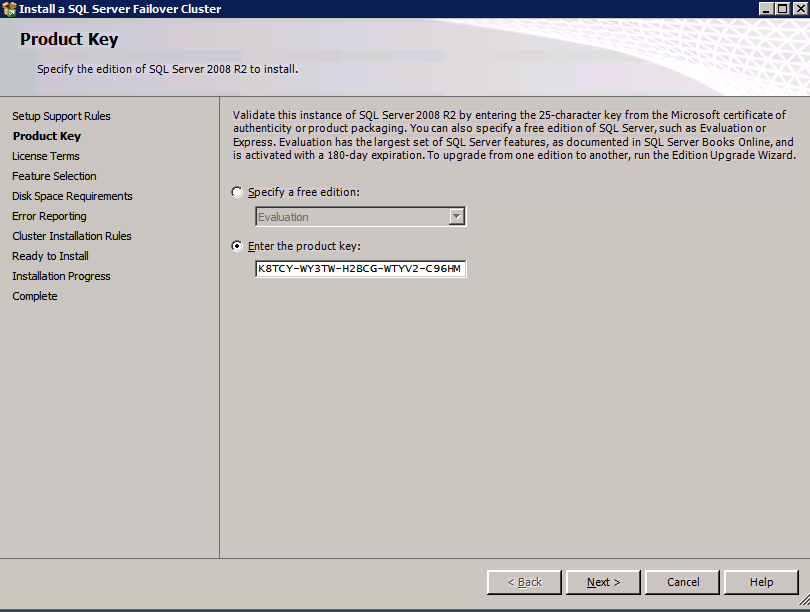
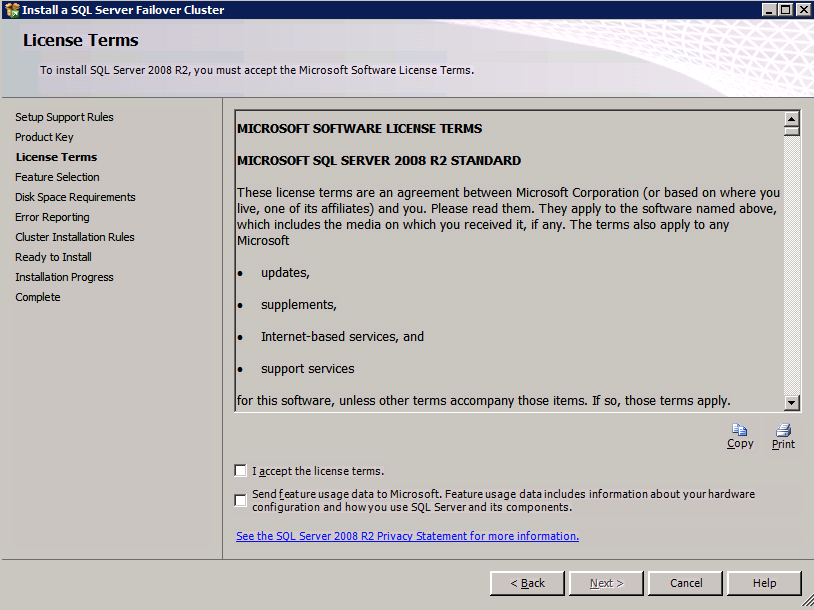
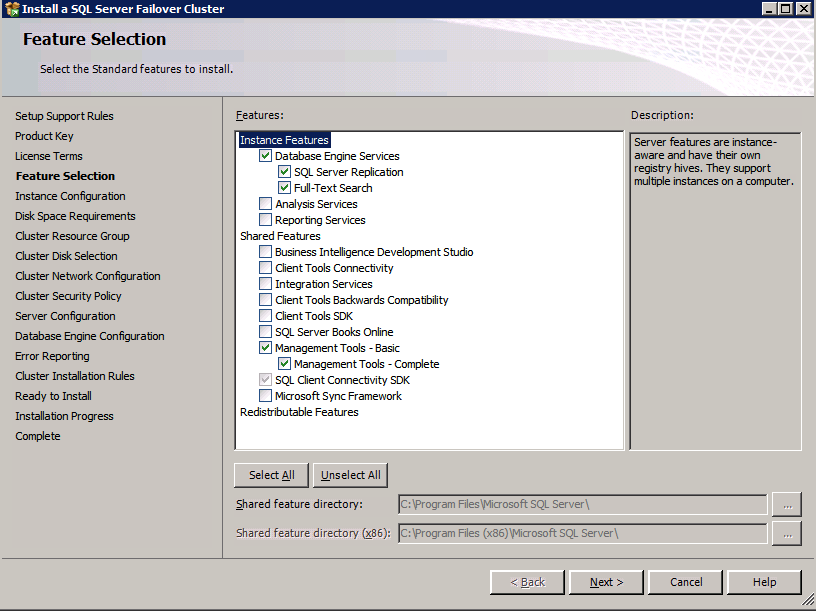
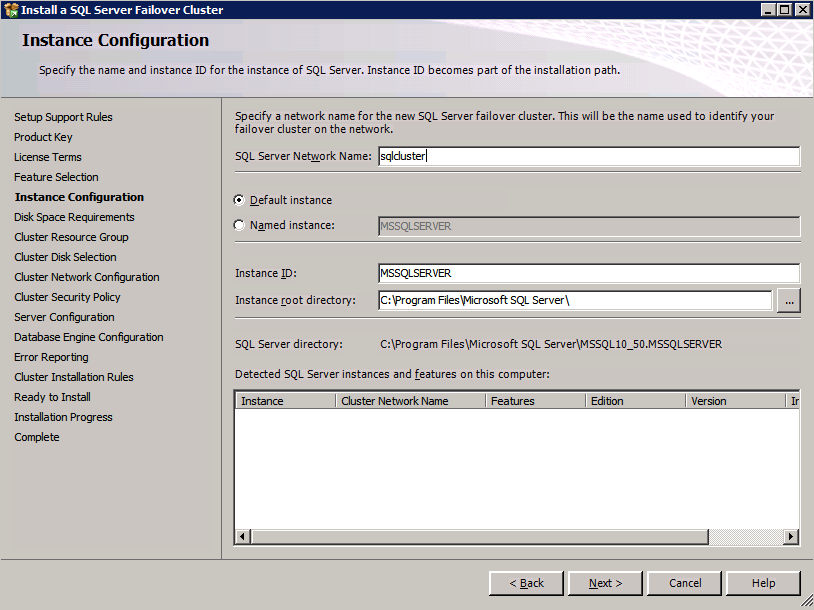
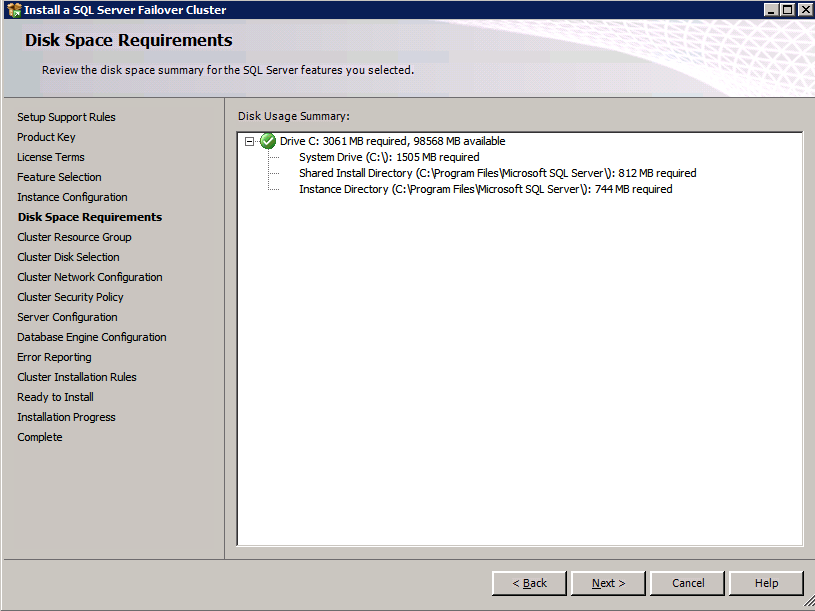
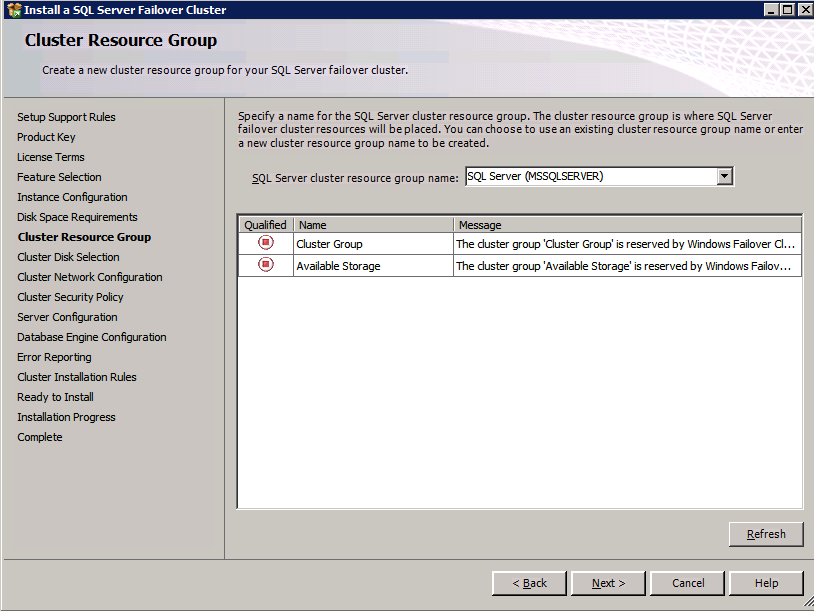
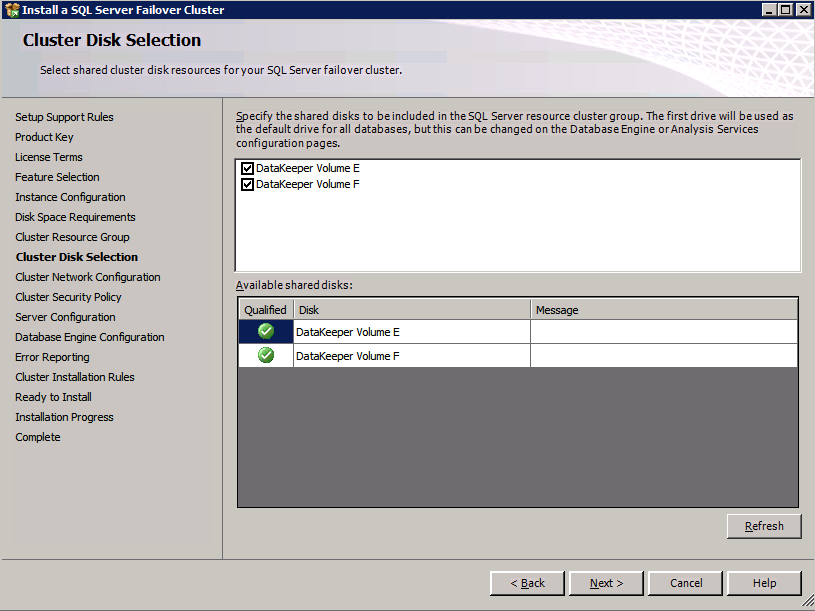
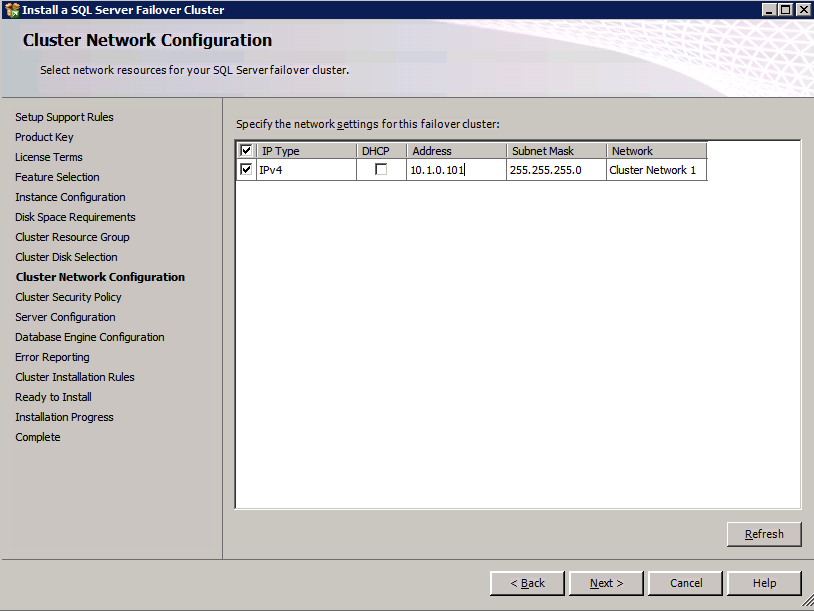
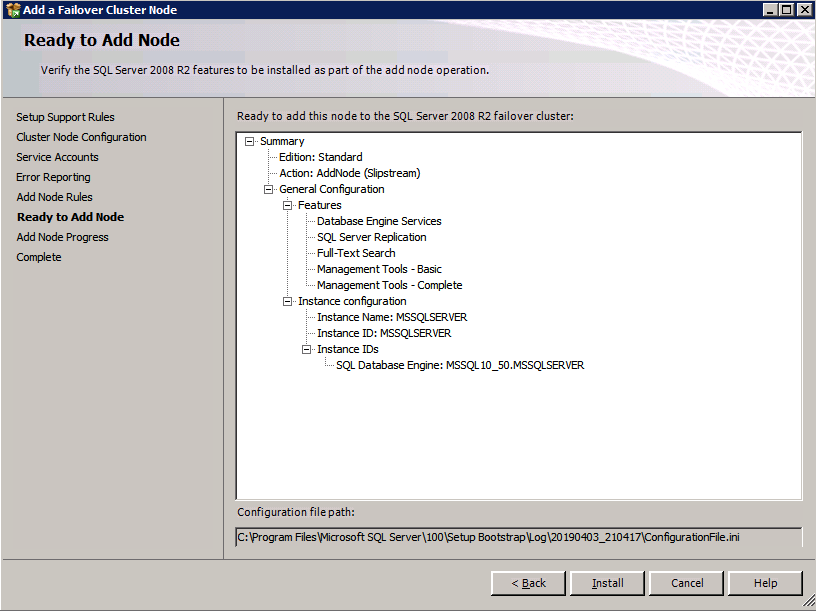
If you want to script the installation, I have included the example below of a scripted cluster installation of SQL Server 2008 R2 into the first node of cluster. The script to add a node to existing cluster is found further down in the guide.
If you prefer to use the GUI, just follow along with the screenshots below.
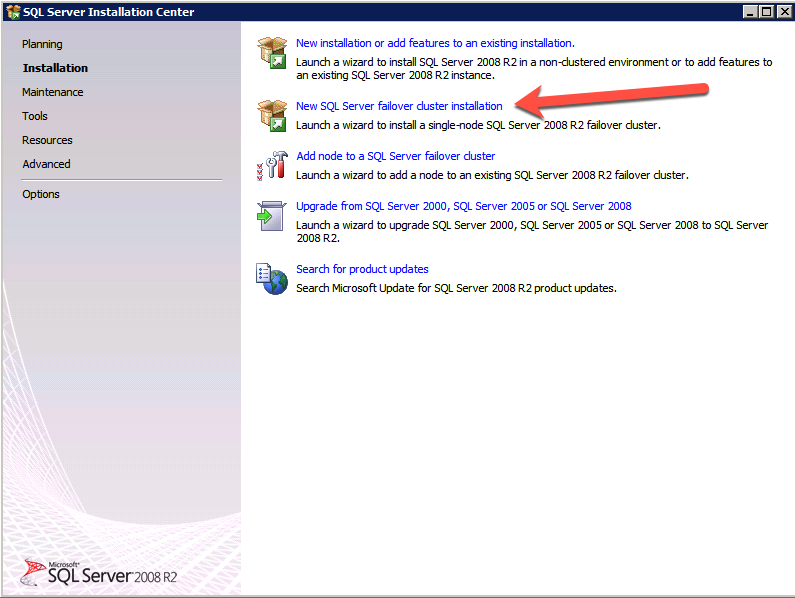
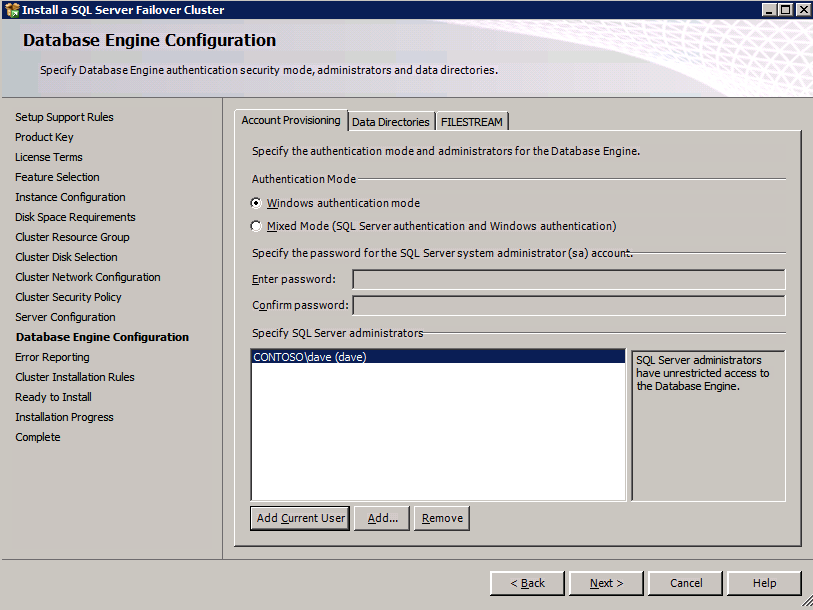
On the first node, run the SQL Server setup.
Choose New SQL Server Failover Cluster Installation and follow the steps as illustrated.
Choose only the options you need.
Please note, this document assumes you are using the Default instance of SQL Server. If you use a Named Instance you need to make sure you lock down the port that it listens on, and use that port later on when you configure the load balancer. You also will need to create a load balancer rule for the SQL Server Browser Service (UDP 1434) in order to connect to a Named Instance. Neither of those two requirements are covered in this guide, but if you require a Named Instance it will work if you do those two additional steps.
Here you will need to specify an unused IP address
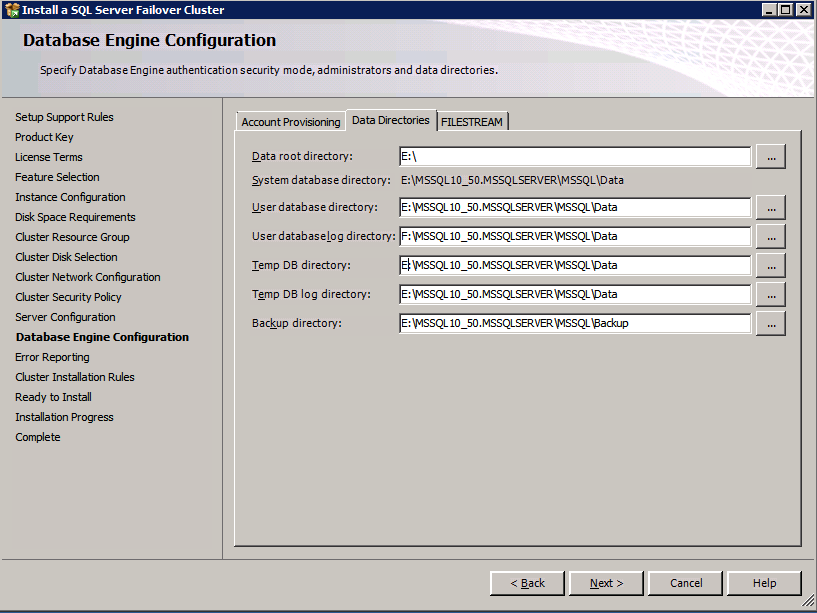
Go to the Data Directories tab and relocate data and log files. At the end of this guide we talk about relocating tempdb to a non-mirrored DataKeeper Volume for optimal performance. For now, just keep it on one of the clustered disks.
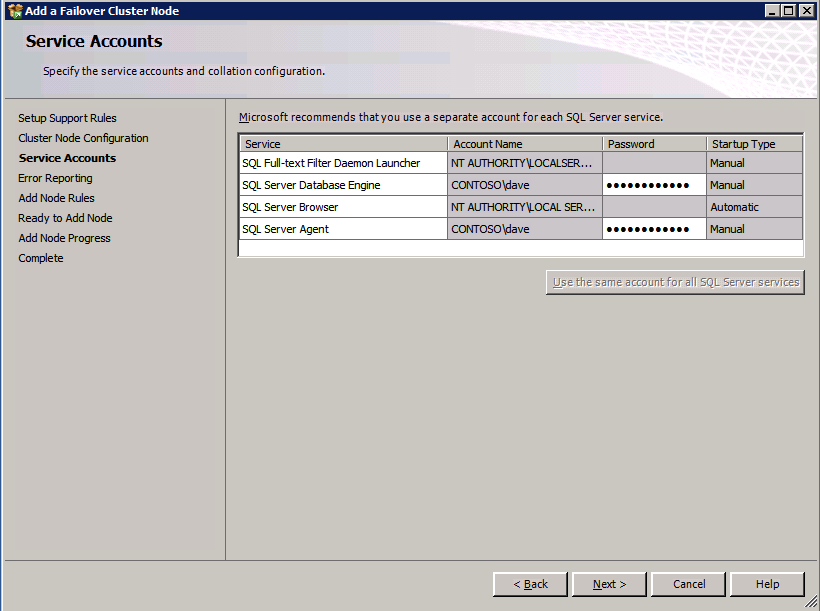
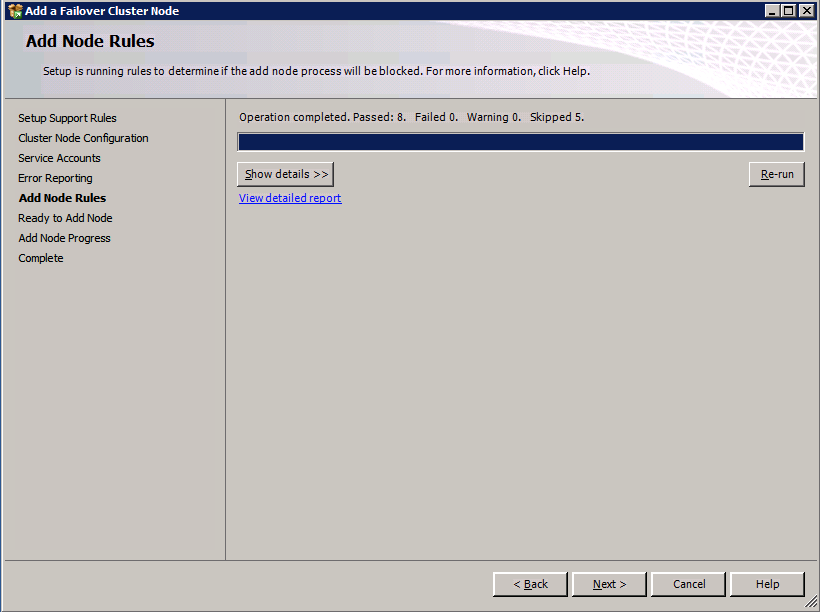
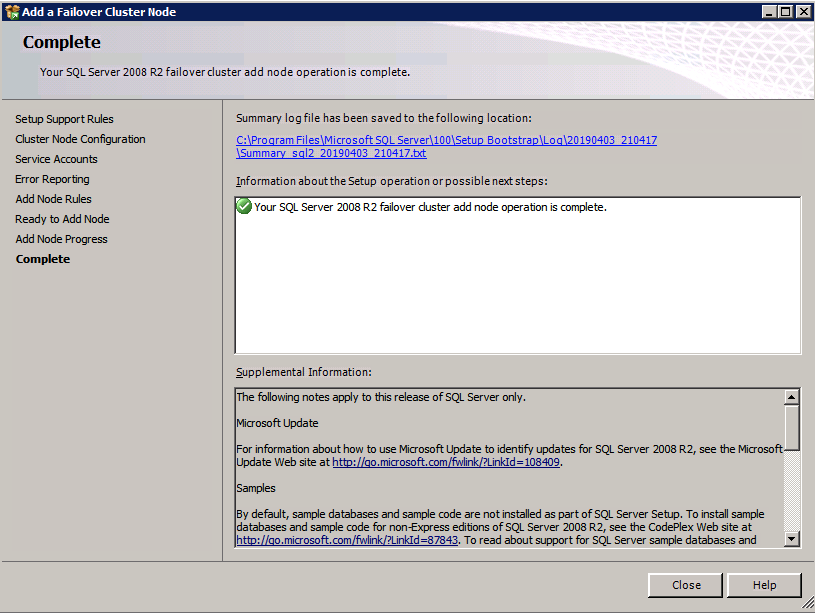
Install SQL Server on the second node
Below is an example of the command you can run to add an additional SQL Server 2008 R2 node into an existing cluster.
If you prefer using the GUI, follow along with the following screenshots.
Run the SQL Server setup again on the second node and choose Add node to a SQL Server Failover Cluster.
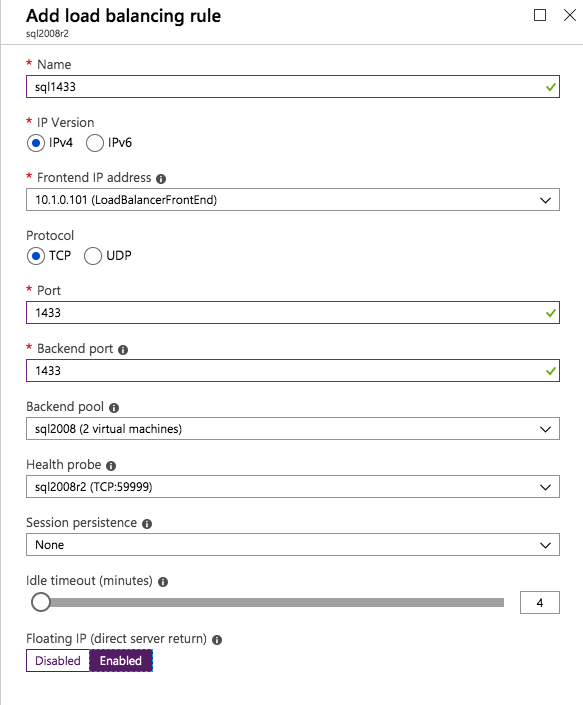
Congratulations, you are almost done! However, due to Azure’s lack of support for gratuitous ARP, we will need to configure an Internal Load Balancer (ILB) to assist with client redirection as shown in the following steps.
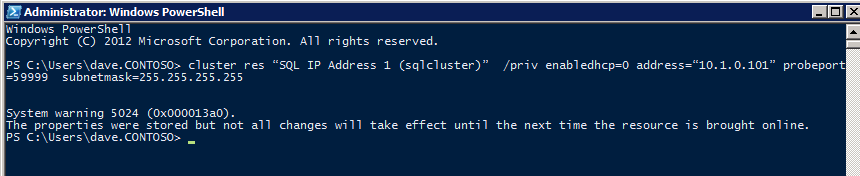
Update the SQL Cluster IP Address
In order for the ILB to function properly, you must run run the following command from one of the cluster nodes. It SQL Cluster IP enables the SQL Cluster IP address to respond to the ILB health probe while also setting the subnet mask to 255.255.255.255 in order to avoid IP address conflicts with the health probe.
cluster res <IPResourceName> /priv enabledhcp=0 address=<ILBIP> probeport=59999 subnetmask=255.255.255.255
NOTE – I don’t know if it is a fluke, but on occasion I have run this command and it looks like it runs, but it doesn’t complete the job and I have to run it again. The way I can tell if it worked is by looking at the Subnet Mask of the SQL Server IP Resource, if it is not 255.255.255.255 then you know it didn’t run successfully. It may simple be a GUI refresh issue, so you can also try restarting the cluster GUI to verify the subnet mask was updated.
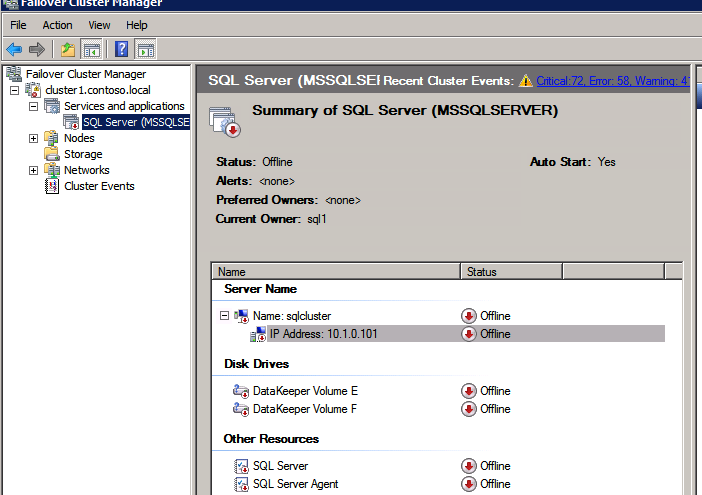
After it runs successfully, take the resource offline and bring it back online for the changes to take effect.
Create the Load Balancer
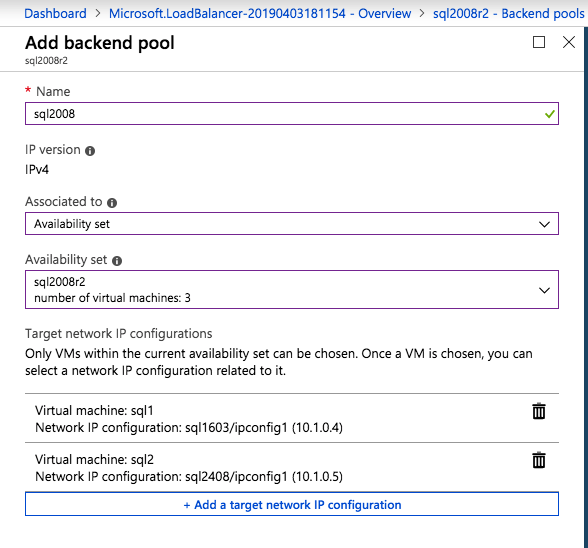
The final step is to create the load balancer. In this case we are assuming you are running the Default Instance of SQL Server, listening on port 1433.
The Private IP Address you define when you Create the load balancer will be the exact same address your SQL Server FCI uses.
Add just the two SQL Server instances to the backend pool. Do NOT add the FSW to the backend pool.
In this load balancing rule you must enable Floating IP
Validate the Cluster
Before you continue, run cluster validation one more time. The Cluster Validation report should return just the same network and storage warnings that it did the first time you ran it. Assuming there are no new errors or warnings, your cluster is configured correctly.
Edit sqlserv.exe Config File
In directory C:\Program Files (x86)\Microsoft SQL Server\100\Tools\Binn we created a sqlps.exe.config file and sqlservr.exe.config with the following lines in the config file:
These files, by default, will not exist and may be created. If this file(s) already exists for your installation, the <supportedRuntime version=”v2.0.50727″/> line simply needs to be placed with the <startup>…</startup> sub-section of the <configuration>…</configuration> section. This should be done on both servers.
Test the Cluster
The most simple test is to open SQL Server Management Studio on the passive node and connect to the cluster. If you are able to connect, congratulations, you did everything correct! If you can’t connect don’t fear, you wouldn’t be the first person to make a mistake. I wrote a blog article to help troubleshoot the issue. Managing the cluster is exactly the same as managing a traditional shared storage cluster. Everything is controlled through Failover Cluster Manager.
Optional – Relocate Tempdb
For optimal performance it would be advisable to move tempdb to the local, non replicated, SSD. However, SQL Server 2008 R2 requires tempdb to be on a clustered disk. SIOS has a solution called a Non-Mirrored Volume Resource which addresses this issue. It would be advisable to create a non-mirrored volume resource of the local SSD drive and move tempdb there. However, the local SSD drive is non-persistent, so you must take care to ensure the folder holding tempdb and the permissions on that folder are recreated each time the server reboots.
After you create the Non-Mirrored Volume Resource of the local SSD, follow the steps in this article to relocate tempdb. The startup script described in that article must be added to each cluster node.
For More Information
As always, if you have questions or comments you can leave them in the comment section below or reach me on Twitter @daveberm
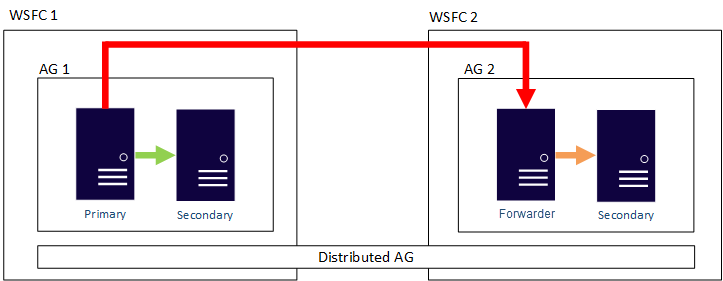
The topic of mixing SQL Server Failover Cluster Instances (FCI) with Always On Availability Groups (AG) is pretty well documented. However, most of the available documentation documents configurations that assume the SQL Server FCI portion of the solution utilizes shared storage. What if I want to build a SANless SQL Server FCI using Storage Spaces Direct (S2D), can I still add a SQL Server AG to the mix? Unfortunately, the answer to this question is no. As of today, this combination of S2D based SQL Server FCI and Always On AG is not supported. I previously blogged about this S2D limitation here.
However, the good news is you CAN build a SANless SQL Server FCI with SIOS DataKeeper and still leverage Always On AG for things like readable secondaries. You still have to abide by the same rules that apply when mixing traditional SAN based SQL Server FCI and Always On AGs, but other than that it is exactly the same….mostly.
DataKeeper Synchronous replication is commonly used between nodes in the same data center or cloud region, but you may want to replicate asynchronously to an additional node in a different region for disaster recovery. In this case, if you ever do have to bring the DR node online after an unexpected failure, you will have to scrap the Always On AG configurations and reconfigure them. This requirement is very similar to to what Microsoft published here in regards to restoring asynchronous snapshots of SQL Server Always On AGs running inside VMs.
Availability Groups
Essentially, a SANLess SQL Server FCI w/DataKeeper looks like a single instance of SQL Server as far as the Always On Availability Group Wizard is concerned. The configuration of the Always On AG is exactly the same as if you were creating just an Always On AG between two Standalone (non-clustered) SQL Server instances.
The real confusion arise in the fact that in this configuration all the servers reside in the same failover cluster, but the SQL Server FCI is only configured to run only on the cluster nodes where SQL Server was installed as a Clustered SQL Server Instance. The other nodes are in the same cluster, but SQL is installed on those nodes as a Standalone SQL Server Instance, not a Clustered Instance. It’s a bit confusing, but what is happening is that Always On AG’s leverage the WSFC quorum model and listeners, so all the AG Replicas need to reside in the same WSFC, even though they typically do not run clustered instances of SQL Server. If you are completely confused that is okay, most people are confused when they first try to wrap their head around this hybrid configuration.
The real benefit in a configuration like this is that a SQL Server FCI can be a better and more cost effective (more on this later*) HA solution than Always On AG in many circumstances, but it lacks the ability to offer a readable secondary replica. Adding an Always On AG readable secondary replica becomes a viable option to address this need. And using SIOS DataKeeper eliminates the need for a SAN for the SQL Server FCI, which opens up the possibility of configuring SQL Server FCIs where nodes reside in different data center, which also means support for SQL Server FCI’s that span Availability Zones in both Azure and AWS.
Please note that pictured below is just one possible configuration. Multiple FCI cluster nodes, multiple AGs and multiple Replicas are all supported. You are only limited by the limits imposed by your version of SQL Server.
This article seems to document the setup steps pretty well. Of course, instead of shared storage for the SQL FCI, you will use SIOS DataKeeper to build the FCI as I document here.
Basic Availability Groups
As of SQL Server 2016 a scaled down “Basic Availability Groups” became available in SQL Server Standard Edition, making this configuration possible even in SQL Server Standard Edition. Basic AGs are limited to a single database per Availability Group, a Single Replica (2-nodes). However, they do not support a readable secondary replica so their use cases in this hybrid configuration are very limited.
Distributed Availability Groups
Distributed AGs were introduced in SQL Server 2016 are also supported in this hybrid configuration. Distributed AGs are very similar to regular AGs, but the Replicas do not need to reside in the same cluster, or even in the same Windows Domain. Microsoft documents the the main use cases of Distributed Availability Groups as follows:
Disaster recovery and easier multi-site configurations
Migration to new hardware or configurations, which might include using new hardware or changing the underlying operating systems
Increasing the number of readable replicas beyond eight in a single availability group by spanning multiple availability groups
Summary
If you like the idea of SQL Server FCIs for high availability, but want the flexibility of read-only secondary replicas, this hybrid solution might just be the thing you are looking for. Traditional SAN baseds SQL Server FCIs, and even Storage Spaces Direct (S2D) based FCIs, limit you to a single data center. SIOS DataKeeper frees you from the limits of your SAN and enables configurations such as SQL Server FCI that span Availability Zones or Cloud Regions. It also eliminates the reliance on the SAN, allowing you to leverage locally attached high speed storage devices without giving up your SQL Server FCI.
* How to Save Money
Earlier I promised I would tell you how to save money by doing this all with SQL Server Standard Edition. If you can live with readable replicas that are point in time based snapshots, you can skip Always On AGs completely and just use the SIOS DataKeeper target side snapshot feature to periodically take an application consistent snapshot of the volumes on the target server without impacting ongoing replication or availability. Here’s how…
Create a 2-node SQL Server FCI with SQL Server Standard Edition and save a boatload of money on SQL licenses, but yet still replicate the data to a 3rd node outside the cluster for reporting or DR purposes. If you take a snapshot of the volumes on this third server these snapshots are read-right accessible, so you can mount those databases from a standalone instance of SQL Server to run month end reports, copy to archives, or you might even want to use those snapshot to quickly and easily update your QA and Test/Dev environments with the latest SQL data.
I hope you found this helpful and informative. As always, if you have questions, add them here or reach me on Twitter @daveberm
If you have been following my blog, you probably know that I write a lot of step-by-step guides for building SQL Server Failover Cluster Instances (FCI) on Azure, from SQL Server 2008 through the lastest. Here are some links to get you started, but really there is very little difference in the configuration between the different versions of Windows and SQL Server, so I think you will be able to figure it out regardless of what versions you use.
However, that article/video only addresses SQL Server 2016 and later. The good news is that most of that guidance can be applied to SQL Server 2008/2012/2014. Until I have time to do a proper step-by-step guide I wanted to jot down some basic notes, more as a reminder to myself, but you might find this information useful as well in the meantime.
The steps below assume you have already created a SQL Server FCI in Azure and clustered the DTC resource. Reference the guides above for the details on those steps. The steps below really just detail the load balancer configuration required in Azure to make this work.
Create Load Balancer for MSDTC
The MSDTC resource will require its own load balancer. Instead of creating a new load balancer, we will add a new frontend to the load balancer that should already be configured for the SQL Server FCI. Of course this frontend IP address should match the cluster IP address associated with the clustered MSDTC resource.
For the backend pool just reuse the existing pool that you created that contains the SQL cluster nodes.
You will need to create a new health probe dedicated to the MSDTC resource. The port you use has to be different than the one you used for the SQL resource, so don’t use 59999. Instead maybe use something like 49999.
The final step is to create the load balancing rule for MSDTC. Create a new rule and reference the MSDTC frontend that we just created and the existing backend. Next we need to create a new load balancing rule. Since MSDTC uses ephemeral ports, which is a big range of ports, when you create the rule you have to select the box that says “HA Ports”. And finally make sure Direct Server Return is enabled.
Update MSDTC Cluster IP Resource
Just like our SQL Server Cluster IP address, we need to run a Powershell command that will for the MSDTC cluster IP resource to respond to the health probe we just created that probes port 49999. It also sets the subnet mask of that MSDTC cluster IP address to 255.255.255.255 to avoid IP address conflicts with the load balancer frontend we setup that shares the same address.
# Define variables $ClusterNetworkName = “”
# the cluster network name (Use Get-ClusterNetwork on Windows Server 2012 of higher to find the name of the MSDTC resource) $IPResourceName = “”
# the IP Address resource name of the MSDTC resource  $ILBIP = “”
# the IP Address of the Internal Load Balancer (ILB) and MSDTC resource
Import-Module FailoverClusters
# If you are using Windows Server 2012 or higher:
Get-ClusterResource $IPResourceName | Set-ClusterParameter -Multiple @{Address=$ILBIP;ProbePort=49999;SubnetMask="255.255.255.255";Network=$ClusterNetworkName;EnableDhcp=0}
# If you are using Windows Server 2008 R2 use this:
#cluster res $IPResourceName /priv enabledhcp=0 address=$ILBIP probeport=59999  subnetmask=255.255.255.255
Confirm it is working!
You can use DTCPing or go into Component Services and look under Computers>My Computers>Distributed Transaction Coordinator where you should see a local DTC and a clustered DTC. Any distributed transactions should appear in the clustered DTC, not the local DTC. Check out this video for an example of how to create a distributed transaction for testing.
Next Steps
This is a quick and dirty guide, but for the experienced user it should get your MSDTC resource up and running in Azure. I’ll be publishing a detailed step-by-step guide in the near future. In the meantime, if you get stuck don’t hesitate to reach out to me on Twitter @daveberm