New Azure ILB feature allows you to build a multi-instance SQL Server Failover Cluster in #Azure

At Microsoft Ignite this past September, Microsoft made some announcements around Azure. One of these announcements was the general availability of multiple VIPs on internal load balancers. Why is this so important to a SQL Server DBA? Well, up until now if you want to deploy highly available SQL Server in Azure you were limited to a single SQL Server FCI per cluster or a single Availability Group listener.

This limitation forced you to deploy a new cluster for each instance of SQL Server you wanted to protect in a Failover Cluster. It also forced you to group all of your databases into a single Availability Group if you wanted automatic failover and client redirection in your AlwaysOn AG configuration.

Those restrictions have now been lifted with these new ILB features. In this post I am going to walk you through the process of deploying a SQL Server FCI in Azure that contains two SQL Server instances. In a future post I will walk you through the same process for SQL Server AlwaysOn AG.

Let’s start with a basic, single instance SQL Server FCI in Azure as I describe in my post Deploying Microsoft SQL Server 2014 Failover Clusters in Azure Resource Manager .

That post describes the process of creating the cluster, using DataKeeper to create the replicated volume resources used in the cluster, creating the Internal Load Balancer (ILB) and then fixing the SQL Server Cluster IP Resource to work with the ILB. If you want to skip that process and jumpstart your configuration you can always use the Azure Deployment Template that creates a 2-Node SQL Server FCI using SIOS DataKeeper

Assuming you now have a basic two node SQL Server FCI, the steps to add a 2nd named instance are as follows:

  1. Create another DataKeeper Volume Resource on another volume that is not currently being used. You may need to add additional disks to your Azure instance if you have no available volumes. As part of this volume creation process the new DataKeeper Volume resource will be registered in Available Storage in the cluster. Refer to the article referenced earlier for the details.
  2. Install a named instance of SQL Server on the first node, specifying the DataKeeper Volume that we just created as the storage location.
  3. “Add a node” to the cluster on the second node.
  4. Lock down the port number of this new named instance to a port that is not in use. In my example I use port 1440.

Next we have to adjust the ILB to redirect traffic to this second instance. Here are the steps you need to follow:

Add a frontend IP address that is identical to the SQL cluster IP address you used for the second instance of SQL Server as shown below.
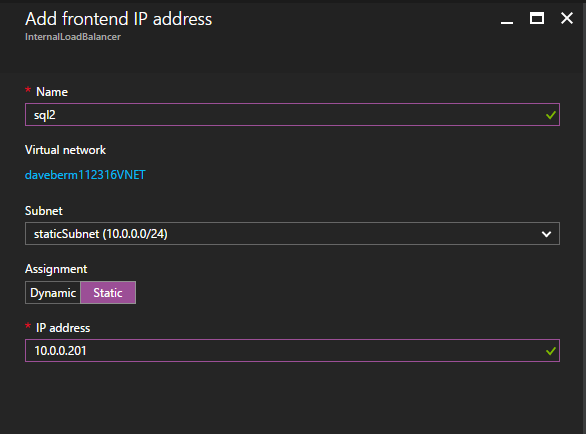
1_-_add_frontend_ip_address

Next, we will need to add another probe since the instances could be running on different servers. As shown below, I added a probe that probes port 59998 (instead of the usual 59999). We will need to make sure the new rules reference this proble. We will also need to remember that port number since we will need to update IP address associated with this instance during the last step of this process.

2_-_add_probe

Now we need to add two new rules to the ILB to direct traffic destined for this 2nd instance of SQL. Of course we need to add a rule to redirect TCP port 1440 (the port I used for the named instance of SQL), but because we are now using named instances we will also need to have a port to support the SQL Server Browser Service, UDP Port 1434.

In the picture below depicting the rule for the SQL Server Browser Service, take note that the Front End IP Address is referencing the new FrontendIP address (10.0.0.201), UDP port 1434 for both the Port and Backend Port. In the pool you will need to specify the two servers in the cluster, and finally make sure you choose the new Health Probe we just created.
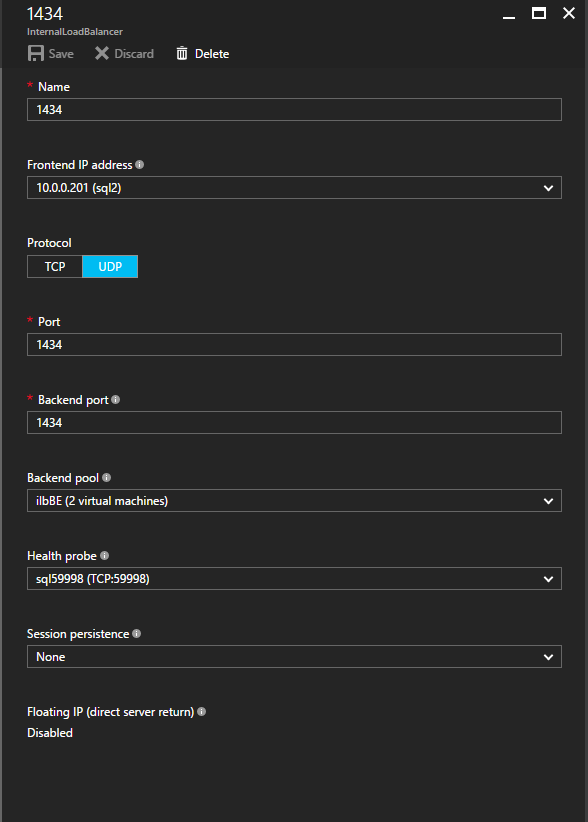
3_-_add_probe

We will now add a rule for TCP/1440. As show in the picture below, add a new rule for port TCP 1440, or whatever port locked down for the named instance of SQL Server. Again, be sure to choose the new FrontEnd IP Address and the new Health Probe (59998). Also, make sure the Floating IP (direct server return) is enabled.
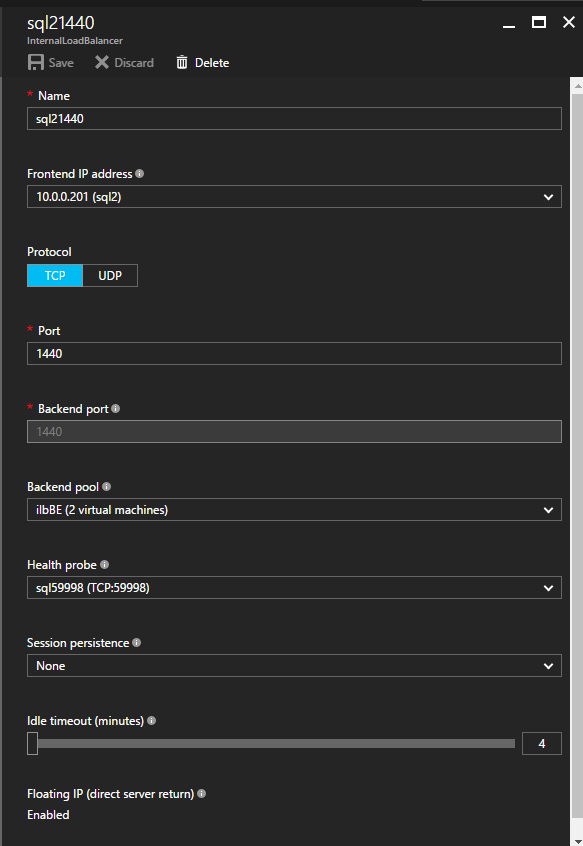
4_-_Add_Probe.png

Now that the load balancer is configured, the final step is to run the PowerShell script to update the new Cluster IP address associated with this 2nd instance of SQL Server. This PowerShell script only needs to be run on one of the cluster nodes.

# Define variables

$ClusterNetworkName = “”

# the cluster network name (Use Get-ClusterNetwork on Windows Server 2012 of higher to find the name)

$IPResourceName = “”

# the IP Address resource name of the second instance of SQL Server

$ILBIP = “”

# the IP Address of the second instance of SQL, which should be the same as the new Frontend IP address as well

Import-Module FailoverClusters

# If you are using Windows Server 2012 or higher:

Get-ClusterResource $IPResourceName | Set-ClusterParameter -Multiple @{Address=$ILBIP;ProbePort=59998;SubnetMask="255.255.255.255";Network=$ClusterNetworkName;EnableDhcp=0}

# If you are using Windows Server 2008 R2 use this:

#cluster res $IPResourceName /priv enabledhcp=0 address=$ILBIP probeport=59998  subnetmask=255.255.255.255

You now have a fully functional multi-instance SQL Server FCI in Azure. Let me know if you have any questions.
New Azure ILB feature allows you to build a multi-instance SQL Server Failover Cluster in #Azure

Understanding the Windows Server Failover Cluster Quorum in Windows Server 2016

Before we look at the new quorum features in Windows Server 2016, I think it is important to know where we came from. In my previous post Understanding the Windows Server Failover Cluster Quorum in Windows Server 2012 R2 I went into some great detail regarding the history and evolution of the cluster quorum. I suggest you review that post to understand how the quorum works in Windows Server 2012 R2 and how the new features of Windows Server 2016 are going to make your cluster deployments even more resilient.

Cloud Witness

Let’s start with my favorite new feature, Cloud Witness. A Cloud Witness allows you to leverage Azure Blob Storage to act as a witness for your cluster. This witness would be in place of a Disk Witness or File Share Witness. The configuration of a Cloud Witness is extremely easy and from my experience costs next to nothing to host in Azure.  The only downside is that the cluster nodes will need to be able to communicate over the internet to with your Azure Blob Storage. Very often cluster nodes are forbidden to communicate over to the public internet, so you will need to coordinate with your security team if you want to enable a Cloud Witness.

There are many compelling reasons for using a Cloud Witness, but for me it makes most sense in three very specific environments: Failover Cluster in Azure, Branch Office Clusters, and Multisite Clusters. Let’s take a look at each of these scenarios to see how a Cloud Witness can help.

azure-cloud-witness

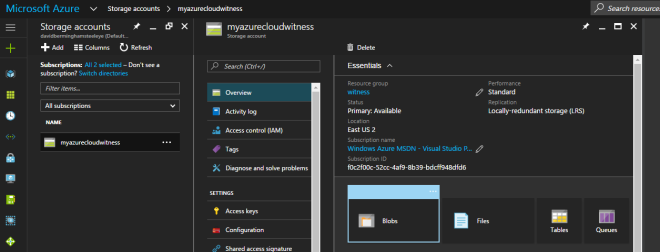
Figure 1 – The cloud witness storage account should always be configured Locally Redundant Storage (LRS)         

If you are moving to Azure (or really any cloud provider), you will want to make sure your deployments are highly available. If you are taking about SQL Server, File Servers, SAP or other workloads traditionally clustered with Windows Server Failover Clustering, you will need to use either a File Share Witness or a Cloud Witness, since a Disk Witness is not possible in Azure. With Windows Server 2012 R2 or Windows Server 2008 R2, you will need to use a File Share Witness. With Windows Server 2016 it is now possible to use a Cloud Witness. The advantage of a Cloud Witness is that you don’t have to maintain another Windows instance in Azure to host the File Share. Instead, Microsoft allows you to leverage Blob Storage.  This gives you a less expensive solution, one that is much easier to manage, and one that is more resilient.

When looking at cluster deployments in branch offices, cost and maintenance is always a consideration. If you think about a retail chain with hundreds or thousands of locations, having a SAN in each location can be cost prohibitive.  If you consider that each location might to run a two node Hyper-V cluster on a S2D Hyper-converged configuration or a 3rd party replication solution to host a number of virtual machines, a Cloud Witness helps the business avoid the cost of adding an additional physical server in each location to act as a File Share Witness or the cost of adding a SAN to each location.

And finally, when deploying a multisite cluster, the Cloud Witness eliminates the need for a 3rd data center to host the File Share Witness. Before the introduction of the Cloud Witness, best practice would dictate that the File Share Witness reside in a 3rd location. Access to a 3rd datacenter just to host a file share witness was not always feasibly and certainly introduced another layer of complexity. By placing using a Cloud Witness you eliminate the need to maintain a 3rd location and access to the witness is done over the public internet, minimizing the network requirements as well.

Site Awareness

When building a multisite cluster, there has always been another common problem. Controlling the failover to always prefer the local site was not possible. While you could specify Preferred Owners, the Preferred Owners setting is commonly misunderstood and administrators may not have realized that even if they didn’t list a server as Preferred Owner, that server is automatically appended to the end of the Preferred Owners list maintained by the cluster. The result of this misunderstanding is that although you may have only listed the local servers as Preferred Owners, you could potentially have a cluster resource failover to the DR site even though there is a perfectly good node available in the local site. Obviously this is not what you expect and using Site Awareness will eliminate this problem moving forward.

Site Awareness fixes this problem by always preferring the local site when deciding which node to bring online. So in a normal circumstance a clustered workload will always failover to a local node unless you have a complete site outage, in which case one of the DR nodes will come online. The same holds true once you are running in the DR site, the cluster will recover the workload on a server in the DR site if it was previously running on a node in the DR site. Site Awareness will always prefer a local node.

Fault Domains

Building upon site awareness is Fault Domains. Fault Domains goes a step further and lets you define Node, Chasse, and Rack locations in addition to Site. Fault Domains have three benefits: Storage Affinity in a Stretch Cluster, increases Storage Spaces resiliency, and enhances the Health Services alerts by including meta data about the location of the associated resources raising the alarm. Storage Affinity will help ensure that your cluster workloads and storage are running in the same location. You certainly wouldn’t want your VM reading and writing data that is sitting on a CSV in a different city if you can help it.

However, I think the biggest winner here is the Storage Spaces Direct (S2D) scenario.  SD2 will leverage the information you provide about your cluster nodes location (Site, Rack, Chassis) to ensure that the multiple copies of data that is written for redundancy all live in different Fault Domains. This helps ensure that data placement is optimized so that the failure of a single Node, Chassis, Rack or Site does not bring down your entire S2D deployment.  Cosmos Darwin has an excellent video on Channel 9 that explains this concept in great detail.

Summary

Windows Server 2016 adds several new enhancements to the cluster quorum that will provide some immediate benefits to your cluster deployments. In addition to the enhancements that impact the cluster quorum, you will also want to check out some of the other great new cluster enhancements like rolling system upgrade, Virtual Machine Resiliency, Workgroup and Multi-Domain Clusters and others.

Understanding the Windows Server Failover Cluster Quorum in Windows Server 2016