If you were at my session at SQL Saturday Nashville you may be looking for the scripts I used in my session. You can download them here…
https://www.dropbox.com/s/0lrepcodv63oieg/ARM%20-%20Scripts%20%282%29.zip?dl=0
If you were at my session at SQL Saturday Nashville you may be looking for the scripts I used in my session. You can download them here…
https://www.dropbox.com/s/0lrepcodv63oieg/ARM%20-%20Scripts%20%282%29.zip?dl=0
I deal with users every week that are moving business critical workloads to Azure. The first question I usually ask is whether they are using Azure Service Management (Classic) or Azure Resource Manager (ARM). I usually recommend ARM as it is the new way of doing things and all the new features are being developed for ARM. However, there are a few things that are not compatible with ARM yet. As time goes by this list of unsupported features gets smaller and smaller, but it is good to know there is an existing document which seems to be updated on a regular basis which lists all of the features and whether they are supported with ARM. https://azure.microsoft.com/en-us/documentation/articles/resource-manager-supported-services/
Although this is a good list, I would say it is not complete. I could not find any indication on that App Service Environment was not supported on this page. I only found that out on the App Service Environment page.
If you have any other roadblocks with using ARM for your Azure deployment comment on this article so we all know what to expect in our deployments.
Many times in troubleshooting SQL Server connectivity issues, especially in Azure with all the ILB requirements I use the following tools to help troubleshoot. I’ll keep this article up to date as I find and use other tools. In addition to this article, I have found another resource which is pretty decent.
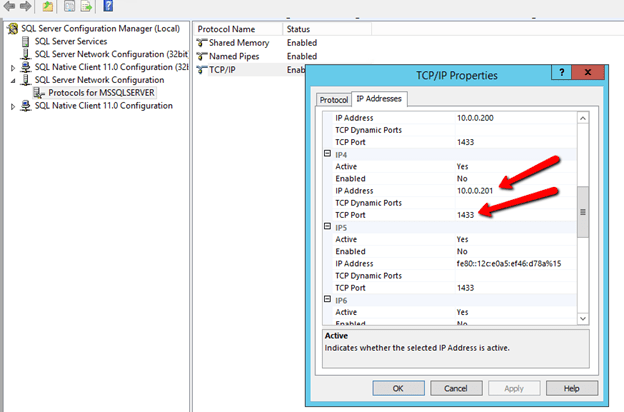
The first tool is a simple test to verify whether the SQL Cluster IP is listening on the port I think it should be listening on. In this case, the SQL Cluster IP address is 10.0.0.201 and it is using the default instance which is port 1433.
Here is the command which will help you quickly identify whether the active node is listening on that port. In our case below everything looks normal.
C:\Users\dave.SIOS>netstat -na | find "1433"
TCP    10.0.0.4:49584         10.0.0.201:1433        ESTABLISHED
TCP    10.0.0.4:49592         10.0.0.201:1433        ESTABLISHED
TCP    10.0.0.4:49593         10.0.0.201:1433        ESTABLISHED
TCP    10.0.0.4:49595         10.0.0.201:1433        ESTABLISHED
TCP    10.0.0.201:1433        0.0.0.0:0              LISTENING
ESTABLISHED
TCP    10.0.0.201:1433        10.0.0.4:49592         ESTABLISHED
TCP    10.0.0.201:1433        10.0.0.4:49593         ESTABLISHED
TCP    10.0.0.201:1433        10.0.0.4:49595         ESTABLISHED
Once I can be sure SQL is listening to the proper port I use PSPING to try to connect to the port remotely.
[EDIT 7/5/18]
I just discovered Test-NetConnection, this should eliminate the need to use PSPing. [/Edit]
PSPing is part of the PSTools package available from Microsoft. I usually download the tool and put PSPing directly in my System32 folder so I can use it whenever I want without having to change directories.
Assuming everything is configured properly from the ILB, Cluster and Firewall perspective you should be able to ping the SQL Cluster IP address and port 1433 from the passive server and get the results shown below…
C:\Users\dave.SIOS>psping 10.0.0.201:1433
PsPing v2.01 - PsPing - ping, latency, bandwidth measurement utility
Copyright (C) 2012-2014 Mark Russinovich
Sysinternals - www.sysinternals.com
TCP connect to 10.0.0.201:1433:
5 iterations (warmup 1) connecting test:
Connecting to 10.0.0.201:1433 (warmup): 6.99ms
Connecting to 10.0.0.201:1433: 0.78ms
Connecting to 10.0.0.201:1433: 0.96ms
Connecting to 10.0.0.201:1433: 0.68ms
Connecting to 10.0.0.201:1433: 0.89ms
If things are not configured properly you may see results similar to the following…
C:\Users\dave.SIOS>psping 10.0.0.201:1433
TCP connect to 10.0.0.102:1433:
5 iterations (warmup 1) connecting test:
Connecting to 10.0.0.102:1433 (warmup): This operation returned because the time out period expired.
Connecting to 10.0.0.102:1433 (warmup): This operation returned because the time out period expired.
Connecting to 10.0.0.102:1433 (warmup): This operation returned because the time out period expired.
Connecting to 10.0.0.102:1433 (warmup): This operation returned because the time out period expired.
Connecting to 10.0.0.102:1433 (warmup): This operation returned because the time out period expired.
If PSPing connects yet your application is having a problem connecting you may need to dig a bit deeper. I have seen some application like Great Plains also want to make a connection to port 445. If your application can’t connect but PSPing connects fine to 1433 then you may need to do a network trace and see what other ports your application is trying to connect to and then add load balancing rules for those ports as well.
If you are using a named instances, not only do you need to make sure you lock down your TCP service to use a static port, but you also need to make sure you add a rule to your load balancer to redirect UDP 1434 for the SQL Browser Service, otherwise you won’t be able to connect to your named instance.
Opening up TCP ports 1433 and 59999 should cover all the manual steps required, but when troubleshooting connection issues I generally turn the Windows Firewall off to eliminate the firewall as a possible cause of the problem. Don’t forget, Azure also has a firewall called Network Security Groups. If anyone changed that from the default that could be blocking traffic as well.
Try pinging the SQL cluster name. It should resolve to the SQL Server cluster iP address, but I have seen on more than a few occasions the DNS A-record associated with the SQL Cluster network name mysteriously disappear from DNS. If that is the case go ahead and read-ad the SQL Custer name and IP address as an A record in DNS.
In SQL Configuration Manager you should see the SQL Cluster IP Address listed and port 1433. If by chance you installed a Named Instace you of course will need to go in here and lock the port to a specific port and make your load balancing rules reflect that port. Because of the Azure ILB limitation of only on ILB per AG, I really don’t see an valid reason to use a named instance. Make it easier on yourself and just use the default instance of SQL. (Update: as of Oct 2016 you CAN have multiple IP addresses per ILB, so you CAN have multiple instances of SQL installed in the cluster.
I’ll be updating this article as I continue to learn about new tips, tricks, tools and common problems I encounter in the field as I support customers trying to get started with clusters in Azure.
In an earlier post I went into some great detail about how to configure the Azure ILB in ARM for SQL Server AlwaysOn FCI or AG resources. The directions in that article were written prior to the GA of Azure PowerShell 1.0. With the availability of Azure PowerShell 1.0 the main script that creates the ILB needs to be slightly different. The rest of the article is still accurate, however if you are using Azure PowerShell 1.0 or later the script to create the ILB described in that article should be as follows.
#Replace the values for the below listed variables
$ResourceGroupName ='SIOS-EAST' # Resource Group Name in which the SQL nodes are deployed
$FrontEndConfigurationName = 'FEEAST' #You can provide any name to this parameter.
$BackendConfiguratioName = 'BEEAST' #You can provide any name to this parameter.
$LoadBalancerName = 'ILBEAST' #Provide a Name for the Internal Local balance object
$Location ='eastus2' # Input the data center location of the SQL Deployements
$subname = 'public' # Provide the Subnet name in which the SQL Nodes are placed
$ILBIP = '10.0.0.201' # Provide the IP address for the Listener or Load Balancer
$subnet = Get-AzureRMVirtualNetwork -ResourceGroupName $ResourceGroupName | Get-AzureRMVirtualNetworkSubnetConfig –name $subname
$FEConfig=New-AzureRMLoadBalancerFrontendIpConfig -Name $FrontEndConfigurationName -PrivateIpAddress $ILBIP -SubnetId $subnet.Id
$BackendConfig=New-AzureRMLoadBalancerBackendAddressPoolConfig -Name $BackendConfiguratioName
New-AzureRMLoadBalancer -Name $LoadBalancerName -ResourceGroupName $ResourceGroupName -Location $Location -FrontendIpConfiguration $FEConfig -BackendAddressPool $BackendConfig
The rest of that original article is the same, but I have just copied it here for ease of use…
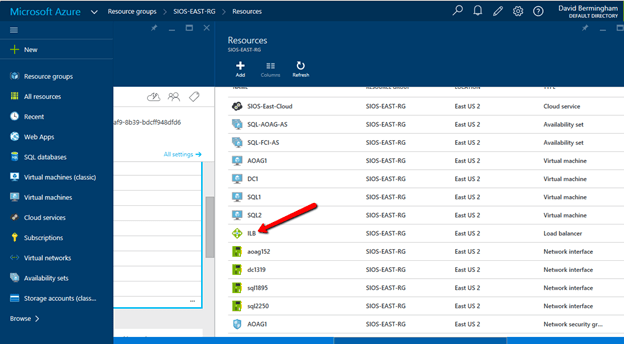
Now that the ILB is created, we should see it in the Azure Portal if we list all the objects in our Resource Group as shown below.
The rest of the configuration I’m sure can also be done through PowerShell, but I’m going to use the GUI in my example. If you want to use PowerShell you could probably piece together the script by looking at the article Get started configuring internal load balancer using Azure Resource Manager but honestly that article gives me a headache. I’ll figure it out some day and try to document it in a user friendly format, but for now I think the GUI is fine for the next steps.
Follow along with the screen shots below. If you get lost, follow the navigation hints at the top of the Azure Portal to figure out where we are.
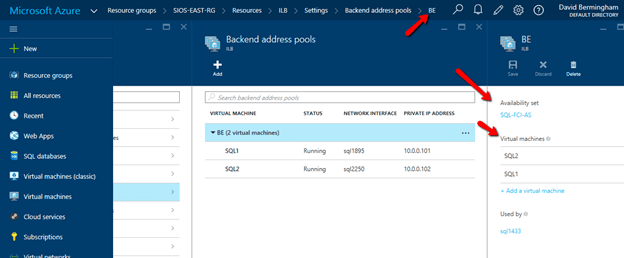
Click Backend Pool setting tab and selects the backend pool to update the Availability Set and Virtual Machines. Save your changes.
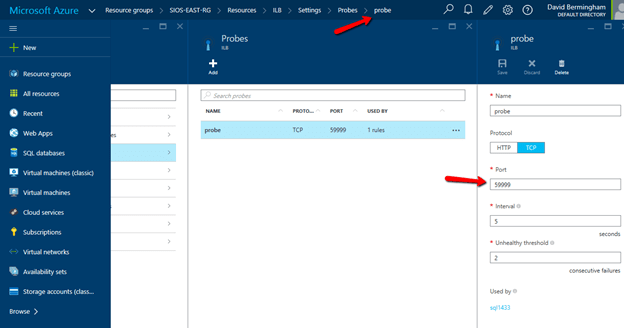
Configure Load Balancer’s Probe by clicking Add on the Probe tab. Give the probe a name and configure it to use TCP Port 59999. I have left the probe interval and the unhealthy threshold set to the default settings, which means it will take 10 seconds before the ILB removes the passive node from the list of active nodes after a failover, meaning your clients may take up to 10 seconds to be redirected to the new active node. Be sure to save your changes.
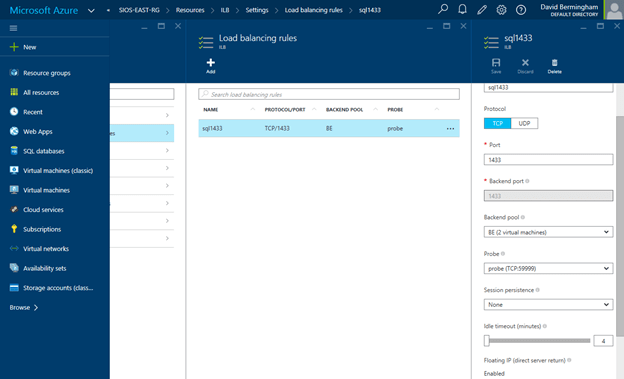
Navigate to the Load Balancing Rule Tab and add a new rule. Give the rule a sensible name (SQL1433 or something) and choose TCP protocol port 1433 (assuming you are using the default instance of SQL Server). Choose 1433 for the Backend port as well. For the Backend Pool we will choose the Backend Pool we created earlier (BE) and for the Probe we will also choose the Probe we created earlier. We do not want to enable Session persistence but we do want to enable Floating IP (Direct Server Return). I have left the idle timeout set to the default setting, but you might want to consider increasing that to the maximum value as I have seen some applications such as SAP log error messages each time the connection is dropped and needs to be re-established.
At this point the ILB is configured and there is only one final step that needs to take place. We need to update the SQL IP Cluster Resource just the exact same way we had to in the Classic deployment model. To do that you will need to run the following PowerShell script on just one of the cluster nodes. And make note,SubnetMask=“255.255.255.255” is not a mistake, use the 32 bit mask regardless of what your actual subnet mask is.
# This script should be run on the primary cluster node after the internal load balancer is created
# Define variables
$ClusterNetworkName = "Cluster Network 1"
# the cluster network name
$IPResourceName = "SQL IP Address 1 (SQLCluster1)"
# the IP Address resource name
$CloudServiceIP = "10.0.0.201"
# IP address of your Internal Load Balancer
Import-Module FailoverClusters
# If you are using Windows 2012 or higher, use the Get-Cluster Resource command. If you are using Windows 2008 R2, use the cluster res command which is commented out.
Get-ClusterResource $IPResourceName
Set-ClusterParameter -Multiple @{"Address"="$CloudServiceIP";"ProbePort"="59999";SubnetMask="255.255.255.255";"Network"="$ClusterNetworkName";"OverrideAddressMatch"=1;"EnableDhcp"=0}
# cluster res $IPResourceName /priv enabledhcp=0 overrideaddressmatch=1 address=$CloudServiceIP probeport=59999 subnetmask=255.255.255.255
I have just one final note. In my initial test I still was not able to connect to the SQL Resource name even after I completed all of the above steps. After banging my head against the wall for a few hours I discovered that for some reason the SQL Cluster Name Resource was not registered in DNS. I’m not sure how that happened or whether it will happen consistently, but if you are having trouble connecting I would definitely check DNS and add the SQL cluster name and IP address as a new A record if it is not already in there.
And of course don’t forget the good ole Windows Firewall. You will have to make exceptions for 1433 and 59999 or just turn it off until you get everything configured properly like I did. You probably want to leverage Azure Network Security Groups anyway instead of the local Windows Firewall for a more unified experience across all your Azure resources.
Good luck and let me know how you make out.
