1/27/2015 UPDATE – Due to new features introduced, I have updated my guidance on deploying SQL Server clusters on Azure. The latest article can be found here: https://clusteringformeremortals.com/2015/01/01/step-by-step-how-to-configure-a-sql-server-failover-cluster-instance-fci-in-microsoft-azure-iaas-sqlserver-azure-sanless/
This is the 3rd post in the series on High Availability and Disaster Recovery in Windows Azure. This post contains step-by-step instructions for implementing a Windows Server Failover Cluster in the Windows Azure IaaS Cloud between two cluster nodes in different Fault Domains. While this post focuses on building a SQL Server 2014 Failover Cluster Instance, you could protect any cluster aware application with just making some minor adjustments to the steps below. In my next post I will show you how to extend this cluster to a third node in a different datacenter for a very robust disaster recovery plan. Because Azure does not have a clustered storage option, we will use the 3rd party solution called DataKeeper Cluster Edition for our cluster storage.
This post assumes you have created a Virtual Network in Azure and you have your first DC already provisioned in Azure. If you haven’t done that yet, you will want to go ahead and have a look at the first two posts on this topic.
- https://clusteringformeremortals.com/2014/01/07/extending-your-datacenter-to-the-azure-cloud-azure/
- https://clusteringformeremortals.com/2014/01/07/extending-your-datacenter-to-the-azure-cloud-azure/ – While creating a VPN connection to your primary Datacenter is not a pre-requisite, I highly recommend you considering doing it so that you can be ready for our hybrid disaster recovery configuration which will be discussed in the next post.
The high levels steps which we will illustrate in this post are as follows:
- Provision two Windows Server 2012 R2 Servers
- Add the servers to the domain
- Enable the Failover Clustering feature
- Create the cluster
- Create a replicated volume cluster resource with DataKeeper Cluster Edition
- Install SQL 2014 Failover Cluster Instance
Provision two Windows Server 2012 R2 Servers
Click on the Virtual Machine tab in the left column and then click the New button in the bottom left corner.

Choose New Virtual Machine From Gallarey

For our cluster we are going to choose Windows 2012 R2 Datacenter

Choose the latest Version Release Date, Name the VM and Size. The user name and password will be the local administrator account that you will use to log in to the VM to complete the configuration.

On this next page you will choose the following:
Cloud Service: I choose the same Cloud Service that I created when I provisioned my first VM. Cloud Service documentation says that it is used for load balancing, but I see no harm in putting all of the cluster VMs and DCs in the same Cloud Service for easier management. By choosing an existing Cloud Service my Virtual Network and Subnets are automatically selected for me.
Storage Account: I choose an existing Storage Account
Availability Set: This is EXTEMELY important. You want to make sure all of your VMs reside in the same Availability Set. By put putting all of your VMs in the same Availability Set you guarantee that the VMs all run in a different Fault Domain.

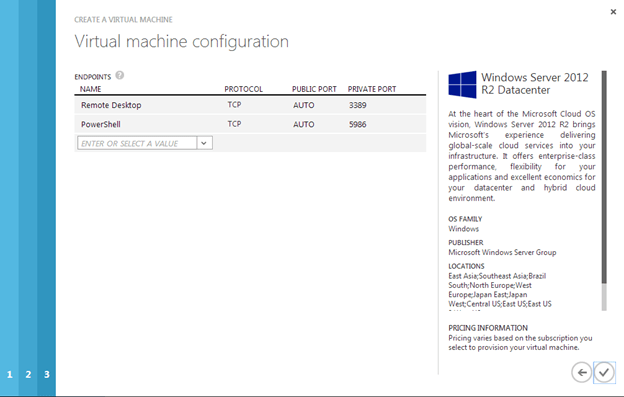
The last page shows the ports where this VM can be reached.
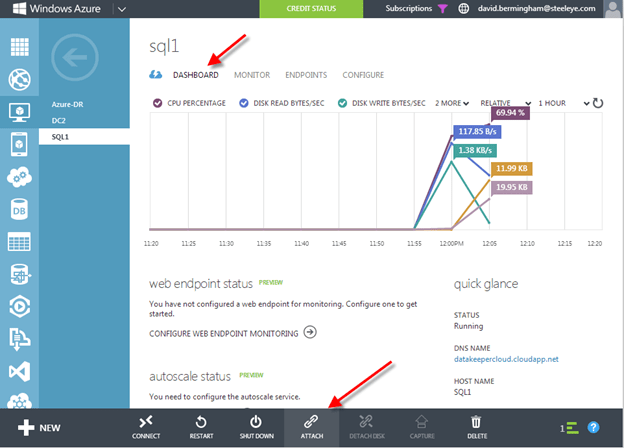
Once the VM is created you will see it as a new VM in the Azure Portal

The next step is to add additional storage to the VM. Azure best practices would have you put your databases and log files on the same volume, otherwise you must disable the Geo-replication feature that is enabled by default. The following article describes this issue in more detail: http://msdn.microsoft.com/en-us/library/jj870962.aspx#BKMK_GEO
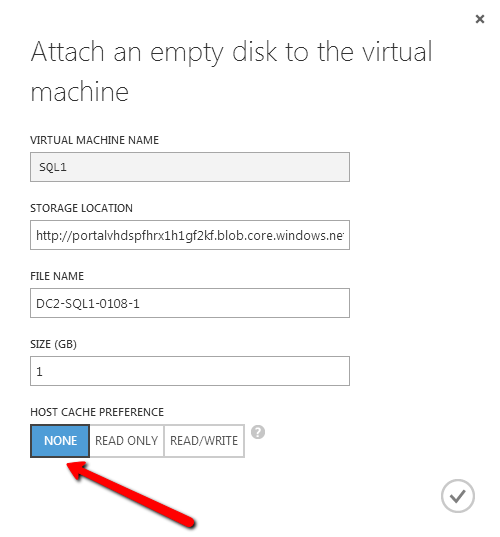
To add additional storage to your VM, click on the VM and then Dashboard to get to the VMs dashboard. Once there, click on Attach.
There are lots of things to consider when considering storage options for SQL Server. The safest and easiest method is the one we will use in this post. We will use a single volume for our data and log files and have caching disabled. You will want to read this article for the latest information on SQL Server Performance Considerations and best practices for Azure.
http://msdn.microsoft.com/en-us/library/windowsazure/dn133149.aspx
After you add this additional volume, you will need to open each VM and use Disk Management to initialize and format the volumes. For the purpose of this demo we will format this volume as the “F:\” drive.
You now have one VM called SQL1. You will want to complete the same process as described about to provision another VM and call it SQL2, making sure you put it in the same Cloud Service, Availability Set and Storage Account. Also make sure to attach another volume to SQL2 just as you have done for SQL1 and format it as the F:\ drive.
When you have finished provisioning both VMs we will move forward to the next step, adding them to the domain.
Add them to domain
Adding SQL1 and SQL2 to the domain is a simple process. Assuming you have been following along with my previous posts, you have already created your domain and have a DC called DC2 provisioned in the same Cloud Service as SQ1 and SQL2. Adding them to the domain is as simple as connecting to the VMs and adding the VMs to the domain just as you would for in a regular on-premise network. If you configured the Virtual Network properly the new VMs should boot with an IP address assigned by DHCP which specifies the local DC2 and the domain controller.
Click Connect to open an RDP session to SQL1 and SQL2

IPconfig /all shows the current IP configuration. Windows Azure requires that you leave the addresses set to use the DHCP server, however the IP address will not change for the life of the VM. You should notice that your DNS server is set to the local DNS server that you created in the previous article previously.

Add SQL1 and SQL2 to the domain and continue with the next steps.
Enable Failover Clustering feature
On both SQL1 and SQL2 you will enable the Failover Clustering feature

Create Cluster
If you are familiar with clustering then the following steps should be very familiar to you with just a few exceptions, so pay close attention to avoid problems that are specific to deploying clusters in Windows Azure.
We will start by creating a single node cluster, this will allow us to make the necessary adjustment to the cluster name resource before we add the second node to the cluster. Use Failover Cluster Manager and start by choosing Create Cluster. Add SQL1 to the selected servers and click Next.


In order for us to install SQL Server 2014 into the cluster at the later steps, we will need to complete cluster Validation


Step through the rest of the cluster creation process as shown below. We will call this cluster SQLCLUSTER, which is simply the name we use to manage the cluster. This is NOT the name that you client applications will eventually connect to.


Once the cluster create process completes, you will notice that the cluster name resource fails to come online, this is expected.

The name resource failed to come online because the IP resource failed to come online. The IP address failed to come online because the address that the DHCP server handed out is the same as the physical address of the server, in this case 10.10.11.5, so there is a duplicate IP address conflict.
In order to fix this, we will need to go into the properties of the IP Address resource and change the address to another address in the same subnet that is not currently in use. I would select an address that is at the higher end of the subnet range in order to reduce the possibility that in the future you might deploy a new VM and Azure will hand out that cluster IP address, causing an IP address conflict. In order to eliminate this possibility, Microsoft will have to allow us more control over the DHCP address pool. For now, the only way to completely eliminate that possibility is to create a new subnet in the Virtual Private Network for any new VMs that you might deploy later, so only this cluster resides in this subnet. If you DO plan to deploy more VMs in this subnet, you might as well deploy them all at the same time so you know which IP addresses they will use, that way you can use whatever IP addresses are left of for the cluster(s).
To change the IP address, choose the Properties of the IP Address cluster resource and specify the new address.

Once the address is changed, right click on the Cluster Name resource and tell it to come online.

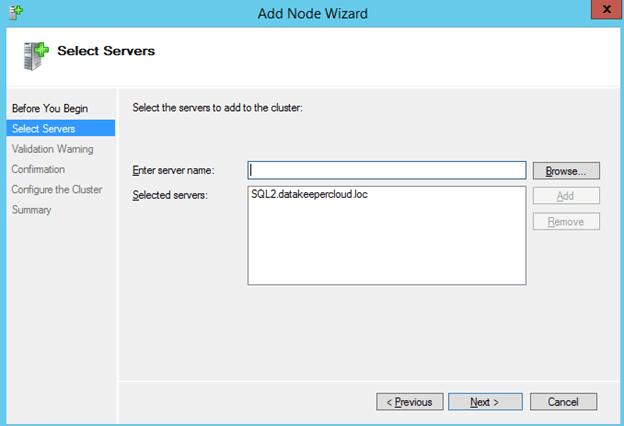
We are now ready to add the the second node to the cluster. In the Failover Cluster Manager, select Add Node

Browse out to your second node and click Add.
Run all the validation tests once again.


When you click finish, you will see that the node was added successfully, but because there is no shared storage in Azure, no disk witness for the quorum could be created. We will fix that next.

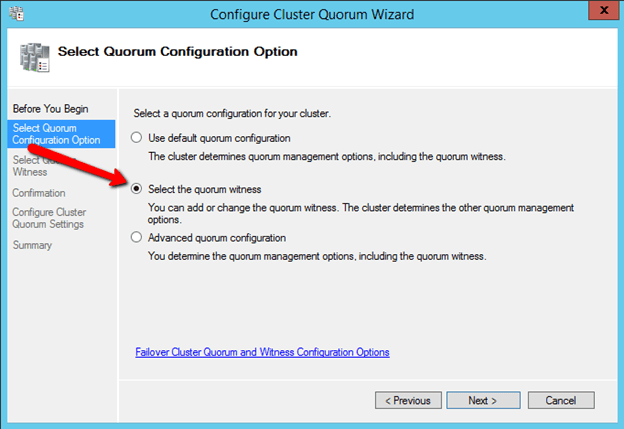
We now need to add a File Share Witness to our cluster to ensure the quorum requirements for two node cluster are satisfied. The file share witness will be configured on the DC2 server, the domain controller that is also running in the Azure Cloud.
Open up a RDP session to the domain controller in your Azure Private Cloud
Connect to your domain controller and create a file share called “Quorum”. You will need to give the Cluster Computer Name Object (which we called SQLCluster in this example) read/write permissions at both the Share level and Security (NTFS) level. If you are not familiar with creating a file share witness, you may want to review my previous post for more detail.


Once the file share witness folder is created on the domain controller, we need to add the witness in the cluster configuration using the Failover Cluster Manager on SQL1

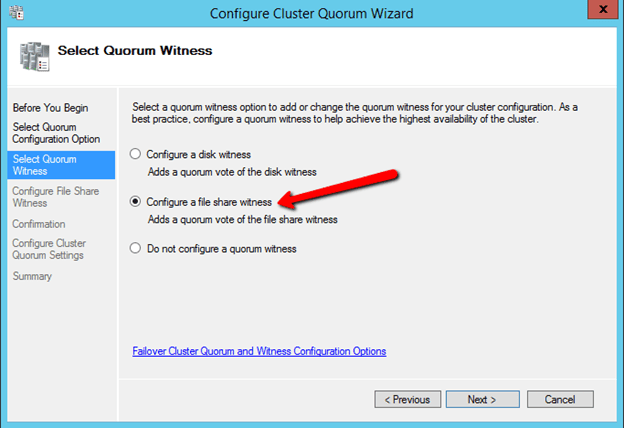


The File Share Witness should now be configured as shown below.

Create Replicated Volume Cluster Resource with DataKeeper Cluster Edition
A traditional failover cluster requires a shared storage device, like a SAN. The Azure IaaS cloud does not offer a storage solution that is capable of being used as a cluster disk, so we will use the 3rd party data replication solution called DataKeeper Cluster Edition which will allow us to create a replicate volume resource which can be used in place of a shared disk. A 14-day trial license is generally available for testing upon request.
Once you download DataKeeper, install it and license it on both SQL1 and SQL2 and reboot the servers. Once the servers reboot, connect to SQL1, launch the DataKeeper UI and complete the steps below.
“Connect” to both SQL1 and SQL2
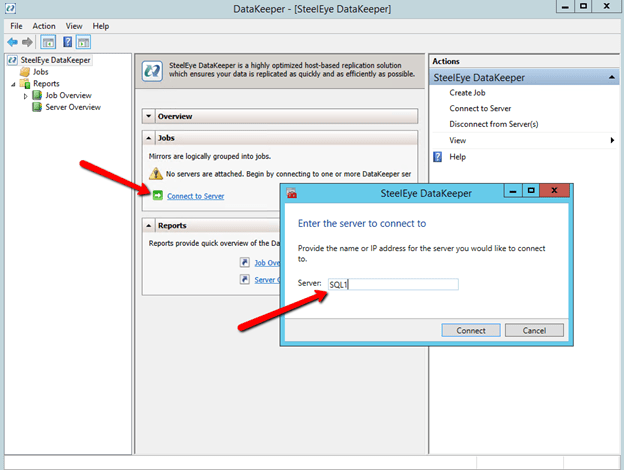

Now click on “Create Job” and follow the steps illustrated below to create the mirror and DataKeeper Volume cluster resource.

Choose the source of the mirror. When you choose the IP Address for the source and target, be sure to choose IP address of the server itself, DO NOT CHOOSE THE CLUSTER IP ADDRESS!


For this implementation where both nodes are in the Azure Cloud, choose synchronous replication with no compression, as shown below.

Click Done and you will be asked if you want to register this mirror in Windows Server Failover Clustering. Click Yes.

You will now see there is DataKeeper Volume Resource in Available Storage when you open the Windows Server Failover Cluster GUI

You are now ready to install SQL Server into the cluster.
Install SQL 2014 Failover Cluster Instance
To start the SQL Server 2014 cluster installation, you must download the SQL 2014 ISO to SQL1 and SQL2. You can use SQL Server 2014 Standard Edition for a simple two node cluster. If you want to extend this cluster to a 3rd site for disaster recovery as we will discuss in the next post, then you will need the Enterprise Edition because the Standard Edition only supports a 2-node cluster. If you are only looking for a simple two node solution than SQL Server Standard Edition can be a much more economical solution.
Once SQL Server 2014 is downloaded to the servers, mount the ISO and run the setup. The option that we want is to open is in the Advanced tab. Open the Advanced tab and run the “Advanced cluster preparation“. My good friend and fellow Cluster MVP, Robert Smit, told me about using the Advanced option. Basically, the Advanced option lets you split the install into two different processes, preparation and completion. Many things can go wrong with cluster installations, usually related to active directory and privileges. If you use the standard install method you may wait 20 minutes or longer for the installation to complete, only to find out that at the last minute the cluster was unable to register the CNO in active directory and the whole installation fails. Not only did the whole installation fail, now you may have a partially installed SQL Server cluster and you have a mess to clean up. By using the Advanced method you are able to minimize the risk by putting the risky section just at the end during cluster completion. If cluster completion fails, you simply need to diagnose the problem and re-run just the cluster completion process once again.
If you really want to save some time, check out Robert’s article on installing SQL Cluster with a configuration file, it is pretty easy to do and saves a bunch of time if you are doing multiple installations. However, for our purposes we will walk through the SQL install with the GUI as shown below.


For demo purposes, I just used the administrator account for each of the services. In production you will want to create separate accounts for each service as a best practice.


Once the install completes it looks like this.

Now we are ready to move forward with part two of the installation, Advanced Cluster Completion.


Give the SQL instance a name. This is the name the clients will connect to. In this case I called it SQLINSTANCE1.


This is where the magic happens. If you configured the mirror in DataKeeper as described earlier, you will see the DataKeeper Volume listed here as an Available Shared Disk, when actually it is simply a replicated volume pair.

One the Cluster Network Configuration page, it is important to choose IPv4 and to specify an address that is not in use in your subnet. As stated before, this address should be at the higher end of the DHCP range to help minimize the risk that Azure will assign that address to another VM in the future. I highly suggest that you have a subnet that is dedicated to your cluster to avoid possible conflicts until Windows Azure offers us greater control over the IP addresses and DHCP ranges. Later, after the cluster is created, you will need to delete this client access point and add the client access point as described in http://blogs.msdn.com/b/sqlalwayson/archive/2013/08/06/availability-group-listener-in-windows-azure-now-supported-and-scripts-for-cloud-only-configuration.aspx. I will publish a blog post in the future that describes this process in detail.


On this page make sure you Click Add Current User, or specify the accounts you wish to use to administer SQL Server.
Starting with SQL Server 2012, tempdb no longer needs to be part of the SQL Server Cluster. If you move the tempdb to a non-replicated volume, you will need to make sure that directory structure exists on each node. To change the location of the tempdb, click on the Data Directories tab and change the location where the tempdb is located.


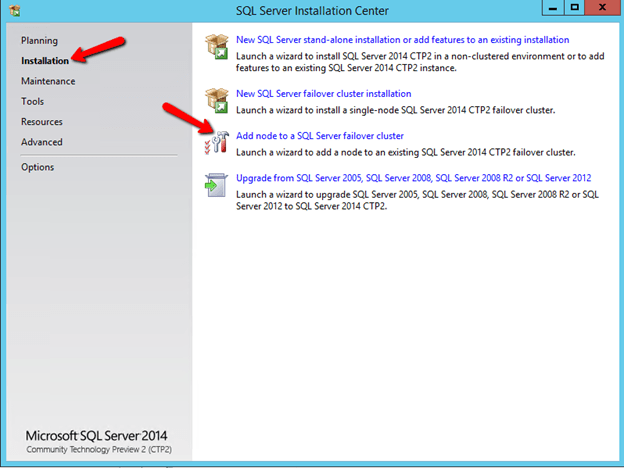
When the installation completes on SQL1, it is time to run the SQL installer on SQL2 and add the second node to the cluster. Run the Setup on SQL2 and choose Add node to a SQL Server failover cluster.


After the installation completes, you now have a fully functional SQL Server AlwaysOn Failover Cluster Instance (FCI) running on the Azure Cloud. Each instance is in a different Fault Domain providing a high level of resiliency. Be sure to replace the client access point with a client access point as described in my post…

In the next post in this series I will show you how to extend this two node cluster to a third node for a multi-site cluster. This third-node will be located in my on-premise data center, which will give us the ultimate in both high availability and disaster recovery.

[…] Creating a SQL Server 2014 AlwaysOn Failover Cluster (FCI) Instance in Windows Azure IaaS #Azure #Cl… […]
[…] to a single rack of servers, AKA, Fault Domain. I’ve written a step-by-step article entitled Creating a SQL Server 2014 AlwaysOn Failover Cluster (FCI) Instance in Windows Azure IaaS which should help in your endeavor to build resiliency within the Azure cloud for your SQL […]
Windows Server Failover Clustering in Azure IaaS is not supported except for AlwaysOn Availability Groups. AlwaysON Failover Cluster Instances is not supported yet 😦 Of course for test environments it might be an option, however I would not use it for production environments.
Not true, DataKeeper is an Azure Certified solution and available in the Azure Marketplace. Documentation is always the last thing to be updated but I can assure you we are supported and in many cases the Microsoft recommended solution.
[…] off all of my VMs and sleep easy at night knowing that my addresses won’t change, breaking my SQL Server Failover Cluster demo. Also, I can be pretty sure that now I won’t exceed my $200 MSDN Azure credit, which is […]
This is a great article and I really appreciate your covering it. One question. Can I use the azure pre-built IAAS machines that include SQL, or do I need to buy SQL separately and use that license on the azure machines?
You will need to reinstall SQL, so I think you will need you own license. However, if you price it out its not long before it pays for itself.
Your article is very good… until the second to the last paragraph. You say to follow instructions in blog for client access point. I have read that article several time and reviewed the downloadable script. Unless there’s some “trick” to it, this article applies ONLY to availability groups. My FCI (using SQL standard, as described in this article), cannot have an availability group. I am confused.
It works with FCI as well. Here is an updated guide. https://clusteringformeremortals.com/2015/01/01/step-by-step-how-to-configure-a-sql-server-failover-cluster-instance-fci-in-microsoft-azure-iaas-sqlserver-azure-sanless/ If you need help tweet me @daveberm, I check that more often then these comments.
[…] you are joined to the domain you will have to complete steps described in my blog article Creating a SQL Server 2014 AlwaysOn Failover Cluster (FCI) Instance in Windows Azure IaaS #Azure #Cl…. You will need to substitute the proper IP address; in our case we will use […]
[…] Creating a SQL Server 2014 AlwaysOn Failover Cluster (FCI) Instance in Windows Azure IaaS #Azure&nbs… […]