Not long ago I set out to build a multisite SQL Server cluster where one my nodes resides in my local data center and the other node resides in Microsoft’s Infrastructure as a Service (IaaS) offering, the Windows Azure Cloud. The Azure Cloud has an offering where you can deploy VMs and pay for just the resources you utilize, much like Amazon’s EC2. My goal was to create a proof of concept where I would use the Azure Cloud as an inexpensive disaster recovery site. My configuration is shown in Figure 1.
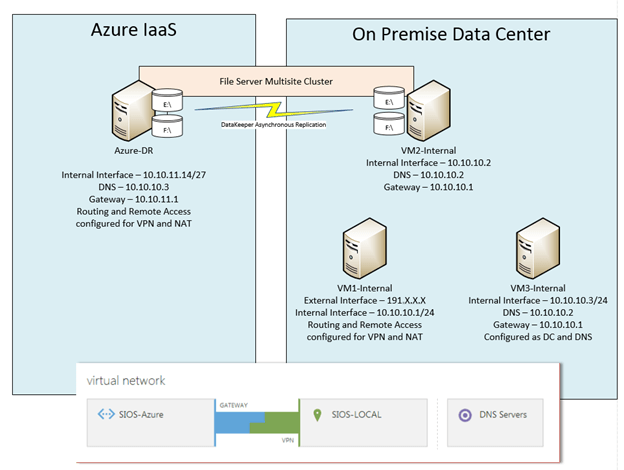
1. An example of the simple DR configuration I used in my POC
My on premise VMs are used as follows:
- VM1-internal – Routing and Remote Access Server for NAT and VPN connectivity to the Azure Cloud
- VM2-internal – The primary node in my cluster
- VM3-internal – My domain controller
For this POC I only deployed on server in the Azure cloud, Azure-DR. Azure-DR is the secondary node in my cluster. If this were an actual production site, I certainly would also want to deploy another domain controller in the Azure cloud to ensure that my Active Directory was available in the DR site. Your actual DR configuration will vary greatly depending upon your needs. I will use the server name depicted in my illustration as I describe the configuration steps below.
The scope of this post
For the purpose of this post, I am going to focus on what you need to do to get to the point where you have configured your virtual network in Azure and you create a site to site VPN connection to your primary data center. My next article will discuss the steps required to actually create a multisite cluster for disaster recovery. As with most cloud related services, the interfaces and options tend to change rapidly; the screen shots and directions you see below are relevant as of January 2nd, 2014. Your experience may vary, but these directions should get you pretty darn close. If you encounter difference, please send me a comment and what you did to make it work so other users can benefit from your experience.
Create your Local Network
I’m not going to walk you through this step-by-step, but essentially you should have a Windows Server 2012 R2 DC configured (VM3-internal) and two additional Windows Server 2012 R2 servers in the domain (VM1-internal and VM2-internal). Each server should use the DC server as their primary DNS server and on VM2-internal and VM3-internal the gateway should be configured to point to VM1-internal, which will eventual be configure with Routing and Remote Access (RRAS). The RRAS (VM1-internal) should be dual homed, with one NIC connected to the internal network and one NIC connected directly to the Public network. Generally this will be the biggest obstacle in deploying this in your lab, as you must have a spare public IP address that you can use for your RRAS server. This configuration will not work if your RRAS server sits behind a NAT’s firewall, it must be directly connected to the internet. The RRAS Server should be configured with just the IP address, subnet mask and DNS server, no gateway should be defined. DO NOT enable Routing and Remote Access, this will be done automatically via a script at a later step.
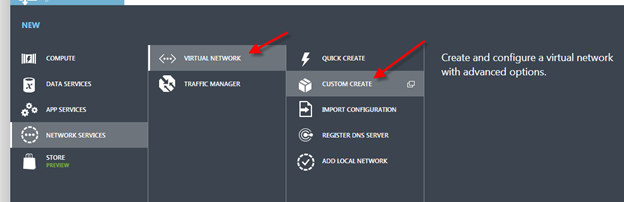
Create a Virtual Network
Log in to the Windows Azure Management Portal and create a new Virtual Network following the steps illustrated below.
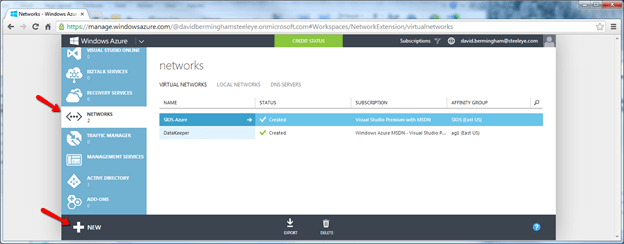


When you click the check box you should now see the new virtual network you just created.

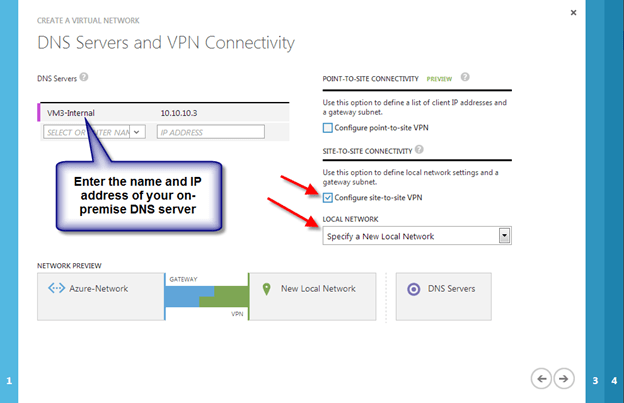
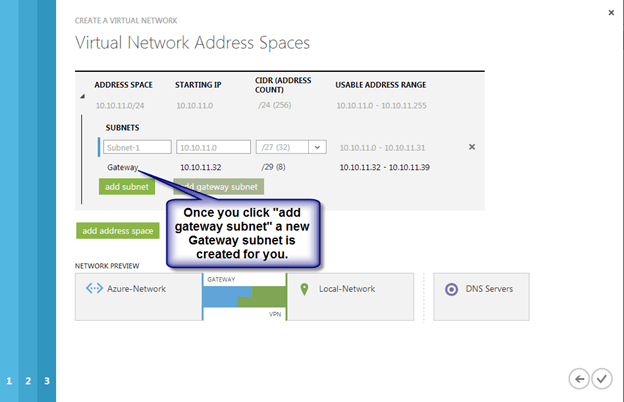
Create the Gateway
Once the virtual network is created, you will need to create the Gateway. From the Dashboard of the newly created virtual network, you will be able to create a Gateway as shown below. As of April 25th, 2013, Static Routing with RRAS is not supported in the Azure VPN connection, so be sure to choose Dynamic Routing.

It could take 30 minutes or longer before your gateway is finished being created, be patient…

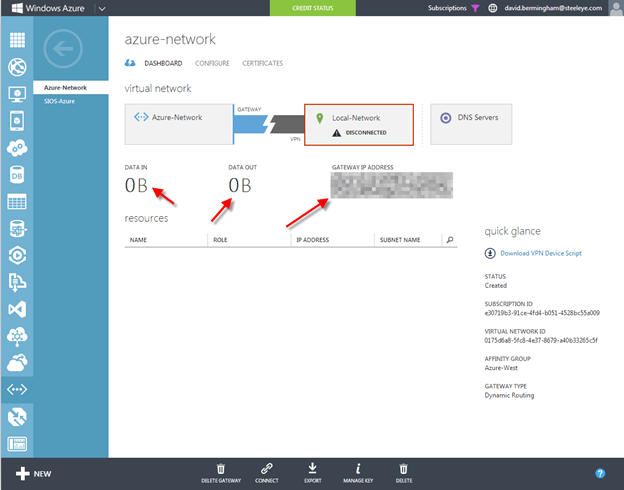
Once the gateway is finished creating, you will see your Gateway IP Address and the amount of Data In and Data Out as shown below.
Configure your local RRAS Server
At this point you are ready to configure your on-premise RRAS Server (VM1-internal) to create a site-to-site VPN to the Gateway that you just created. Microsoft has made this very easy, so don’t worry if networking and configuring VPNs are not your specialty. You will just need click on “Download VPN Device Script” and run it on your RRAS server. Microsoft also supports a bunch of Juniper and Cisco VPN routers as well, so if you want to move to a hardware based VPN device in the future you can always come back and download the configuration script specific to your device.

Choose Microsoft Corporation as the Vendor, RRAS as the Platform and Windows Server 2012 as the Operating System and click the checkbox to download the Powershell script. In my case, this same script worked just fine when run on Windows Server 2012 R2.

As of the date of this writing, it seems as if Microsoft has made the script creation process even more intelligent than it was just last month. The script that it just created for me was pre-populated with all the information required; I did not have to edit anything at all.
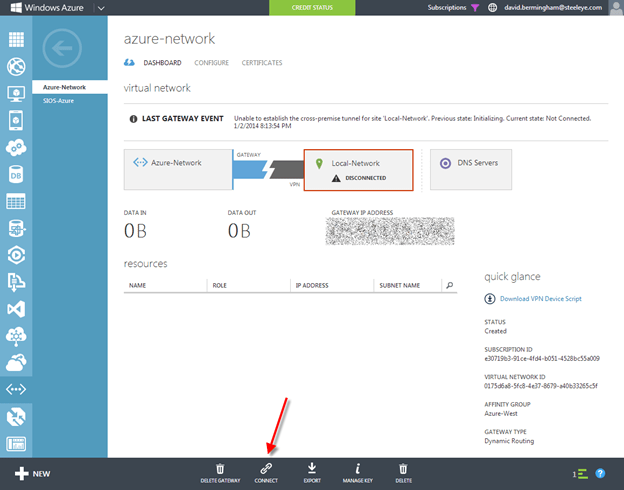
At this point, all you need to do is copy the script file on to your RRAS Server (VM1-internal) and save it as a .ps1 and run the PowerShell script. This script will install Routing and Remote Access and configure the Site-to-Site VPN to connect to the Windows Azure Virtual Network you just created. Once you have finished with the RRAS installation go back to the Azure Portal and click Connect to complete the VPN site-to-site connection.
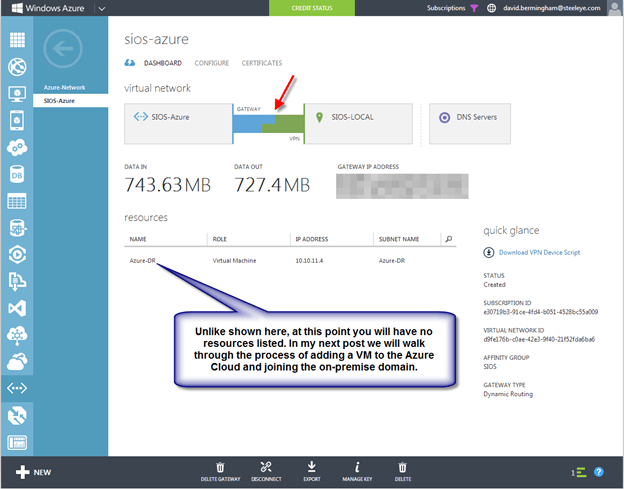
When connected, the Azure Portal should look something like the following.
Enable NAT on the RRAS Server
The final step I had to take to have a usable network was to enable NAT on my RRAS Server. Without having NAT enabled none of my servers could reach the internet. The basic steps for enabling NAT on RRAS are as follows:
- Open the Routing and Remote Access MMC
- Expand IPv4, right-click General, and then click New Routing Protocol.
- In Routing protocols, click NAT, and then click OK.
- Right-click NAT, and then click New Interface.
- Select the interface that connects to your private intranet, and then click OK.
- Select Private interface connected to private network, and then click OK.
- Right-click NAT, and then click New Interface again.
- Select the interface that connects to the public Internet, and then click OK.
- Select both Public interface connected to the Internet and Enable NAT on this interface, and then click OK.
Now What?
The fun can now begin. In my next post I will walk you through the process of provisioning a Windows VM in Azure and joining it to your on-premise domain.

Great cookbook – thanks for this, Dave
If your fiddling around with this an can’t seem to make it work, I suggest you try disabling IPv6 on your NICs. During my first run through I had IPv6 disabled on all my NICs and didn’t have any problems. Second time around I had IPv6 still enabled on my NICs and when I ran the VPN config script I got this message in the output…
“WARNING: IPv6 has not been enabled. To enable IPv6, specify a valid prefix or FE80::/64 for the IPv6Prefix parameter in
the Set-VpnIpAddressAssignment cmdlet.”
I just ignored it since I didn’t plan on using IPv6. However, I couldn’t get the VPN to connect. After scratching my head and redoing everything a few times with no luck, I decided to disable IPv6 on my NICs. As soon as I did that my Gateway seemed to connect immediately. However, I re-enabled IPv6 on my NICs just to verify that that was actually the problem and my Gateway stayed up and was able to reconnect if I dropped the connect.
I’ll keep an eye on this and update you should I get to the bottom of the issue.
[…] part 1 of my series on using Windows Azure as a disaster recovery site, I explained how to create a […]
[…] How to Create a Site-to-Site VPN Tunnel to the Windows Azure Cloud Using a Window Server 2012 R2 Rou… […]
[…] In my book I will publish a step by step instruction how to configure this. In this post I will provide the basic steps. There are many other posts explaining how to setup a site-to-site VPN connection. For example this one. […]
[…] In my book I will publish a step by step instruction how to configure this. In this post I will provide the basic steps. There are many other posts explaining how to setup a site-to-site VPN connection. For example thisone. […]
[…] the only way to connect your on-premise site was to configure a site-to-site VPN to your virtual network. While this is a nice option, having a direct connection that bypasses the […]
Update, since this post Microsoft has release ExpressRoute, which is another option for connecting your DataCenter to Azure. https://clusteringformeremortals.com/2014/02/21/windows-azure-disaster-recovery-options-just-got-better-with-expressroute/
[…] View RRAS Setup Guide 1, View RRAS Setup Guide 2 […]
Hi,
I followed your guide and while connected, I can’t ping from Azure back to my on-prem setup, while I can go from my on-prem to Azure.
do you have any advice?
I’ve posted a question on Stackoverflow.
http://stackoverflow.com/questions/22068971/connecting-site-to-site-vpn-on-azure-via-rras-help-connected-but-only-1-way-p
Check Windows firewall? Default gateway configuration?
Doubt its Windows Firewall since the connection was already made. it should be due to internal route table on the RRAS server.
I was playing around with the settings and now my Azure can ping my local, but my RRAS server can’t ping Azure (the opposite of what happened)… argh.
ok, just a stupid mistake.
I’ve forgotten to enable ICMPv4 on the Azure VM.
All’s working now. 😀
Reblogged this on My Cloud – Christian 'Biks' and commented:
Very good desription to create s2s vpn for rras and azure.
Awesome article! Thanks a ton for the details and the corresponding pictures. Helped me set up the connection quickly.
Praveen
[…] How to Create a Site-to-Site VPN Tunnel to the Windows Azure Cloud Using a Window Server 2012 R2 Rou… […]
I am following this guide and it’s extremely simple but on my setting I am trying to create a VPN between a VM machine on Azure and another VM on AWS. I already created the VPC on AWS and associated it with my instance and have RRAS installed but can’t work. Not sure of having my instance on AWS an preventing me from connecting to Azure VPN.
Assuming you can provision a VM in Amazon that has two NICs with one directly connected to the public internet and one on your private vLan it should work. There are other blogs that detail configurations that span AWS and Azure, you might want to look at them for more details.