Introduction
If you are reading this article you probably are still using SQL Server 2008/2008 R2 and want to take advantage of the extended security updates that Microsoft is offering if you move your SQL Server 2008/2008 R2 into Azure. I previously wrote about this topic in this blog post.
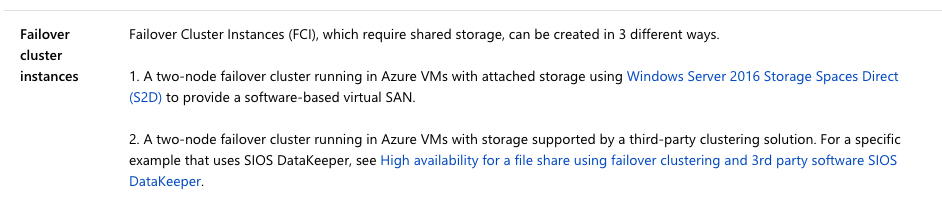
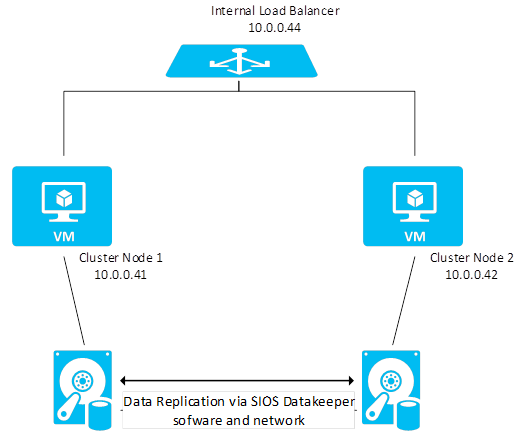
You may be wondering how to make sure your SQL Server instance remains highly available once you make the move to Azure. Today, most people have business critical SQL Server 2008/2008 R2 configured as a clustered instance (SQL Server FCI) in their data center. When looking at Azure you have probably come to the realization that due to the lack of shared storage it might seem that you can’t bring your SQL Server FCI to the Azure cloud. However, that is not the case thanks to SIOS DataKeeper.
SIOS DataKeeper enables you to build a SQL Server FCI in Azure, AWS, Google Cloud, or anywhere else where shared storage is not available or where you wish to configure multi-site clusters where shared storage doesn’t make sense. DataKeeper has been enabling SANless clusters for WIndows and Linux since 1999. Microsoft documents the use of SIOS DataKeeper for SQL Server FCI in their documentation: High availability and disaster recovery for SQL Server in Azure Virtual Machines.
I’ve written about SQL Server FCI’s running in Azure before, but I never published a Step-by-Step Guide specific to SQL Server 2008/2008 R2. The good news is that it works just as great with SQL 2008/2008 R2 as it does with SQL 2012/2014/2016/2017 and the soon to be released 2019. Also, regardless of the version of Windows Server (2008/2012/2016/2019) or SQL Server (2008/2012/2014/2016/2017) the configuration process is similar enough that this guide should be sufficient enough to get you through any configurations.
If your flavor of SQL or Windows is not covered in any of my guides, don’t be afraid to jump in and build a SQL Server FCI and reference this guide, I think you will figure out any differences and if you ever get stuck just reach out to me on Twitter @daveberm and I’ll be glad to give you a hand.
This guide uses SQL Server 2008 R2 with Windows Server 2012 R2. As of the time of this writing I did not see an Azure Marketplace image of SQL 2008 R2 on Windows Server 2012 R2, so I had to download and install SQL 2008 R2 manually. Personally I prefer this combination, but if you need to use Windows Server 2008 R2 or Windows 212 that is fine. If you use Windows Server 2008 R2 don’t forget to install the kb3125574 Convenience Rollup Update for Windows Server 2008 R2 SP1. Or if you are stuck with Server 2012 (not R2) you need the Hotfix in kb2854082.
Don’t be fooled by this article that says you must install kb2854082 on your SQL Server 2008 R2 instances. If you start searching for that update for Windows Server 2008 R2 you will find that only the version for Server 2012 is available. That particular hotfix for Server 2008 R2 is instead included in the rollup Convenience Rollup Update for Windows Server 2008 R2 SP1.
Provision Azure Instances
I’m not going to go into great detail here with a bunch of screenshots, especially since the Azure Portal UI tends to change pretty frequently, so any screenshots I take will get stale pretty quickly. Instead, I will just cover the important topics that you should be aware of.
Fault Domains or Availability Zones?
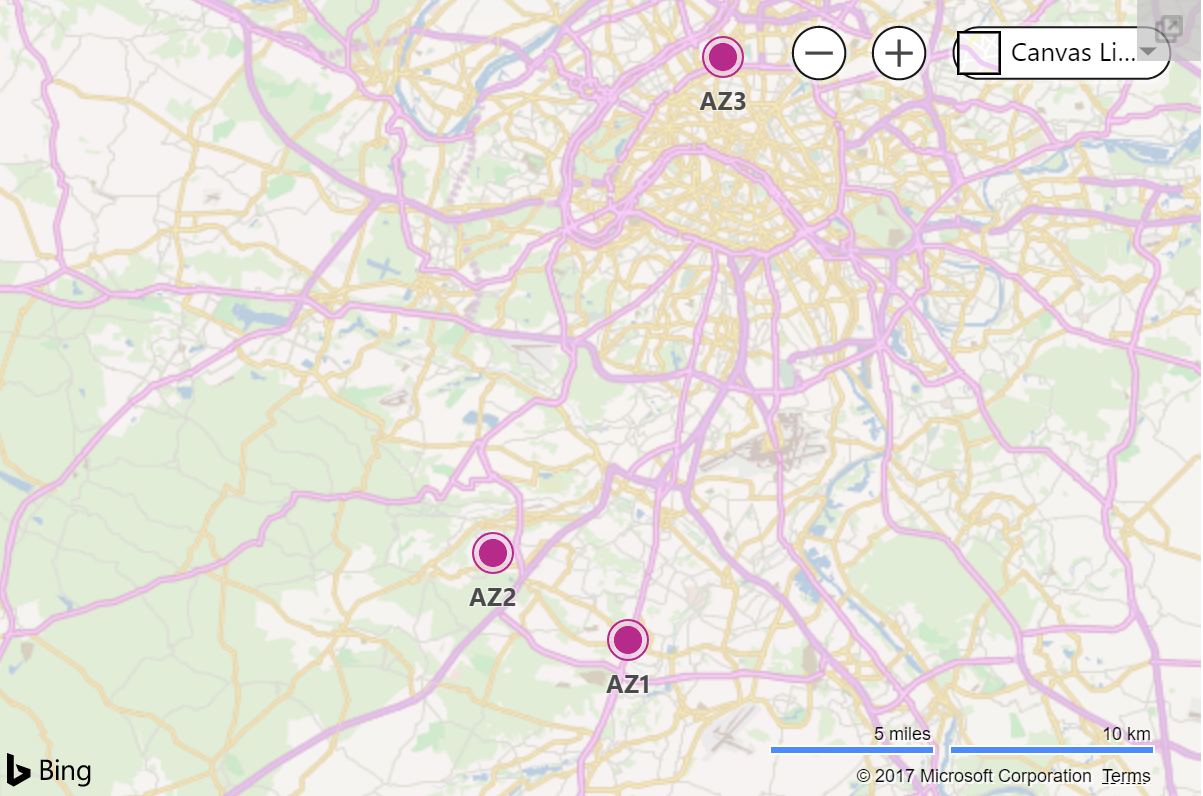
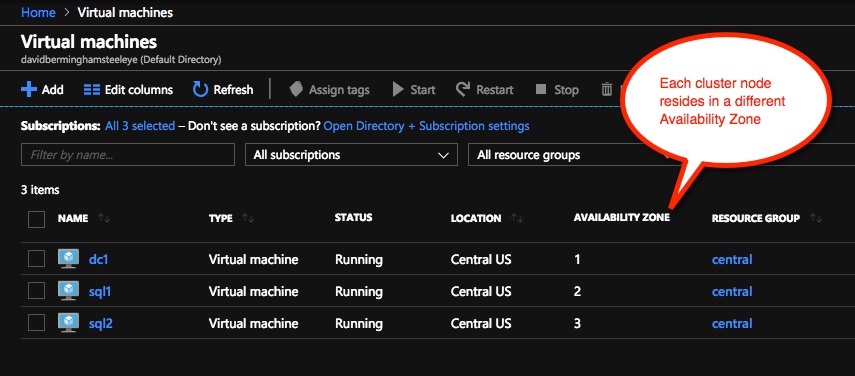
In order to ensure your SQL Server instances are highly available, you have to make sure your cluster nodes reside in different Fault Domains (FD) or in different Availability Zones (AZ). Not only do your instances need to reside in different FDs or AZs, but your File Share Witness (see below) also needs to reside in a FD or AZ that is different than that one your cluster nodes reside in.
Here is my take on it. AZs are the newest Azure feature, but they are only supported in a handful of regions so far. AZs give you a higher SLA (99.99%) then FDs (99.95%), and protect you against the kind of cloud outages I describe in my post Azure Outage Post-Mortem. If you can deploy in a region that supports AZs then I recommend you use AZs.
In this guide I used AZs which you will see when you get to the section on configuring the load balancer. However, if you use FDs everything will be exactly the same, except the load balancer configuration will reference Availability Sets rather than Availability Zones.
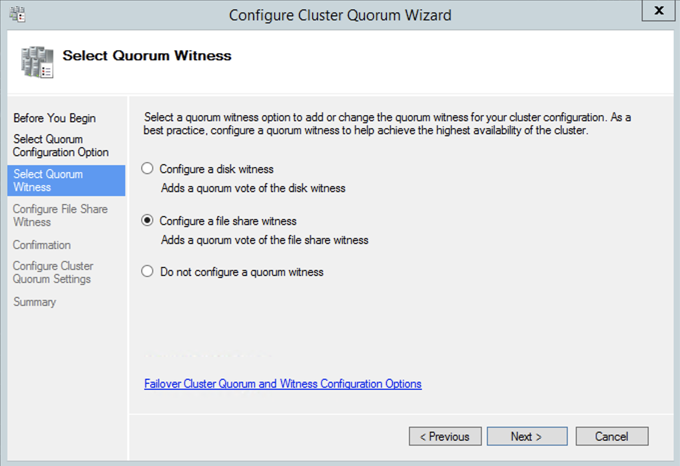
What is a File Share Witness you ask?
Without going into great detail, Windows Server Failover Clustering (WSFC) requires you configure a “Witness” to ensure failover behaves properly. WSFC supports three kinds of witnesses: Disk, File Share, Cloud. Since we are in Azure a Disk Witness is not possible. Cloud Witness is only available with Windows Server 2016 and later, so that leaves us with a File Share Witness. If you want to learn more about cluster quorums check out my post on the Microsoft Press Blog, From the MVPs: Understanding the Windows Server Failover Cluster Quorum in Windows Server 2012 R2
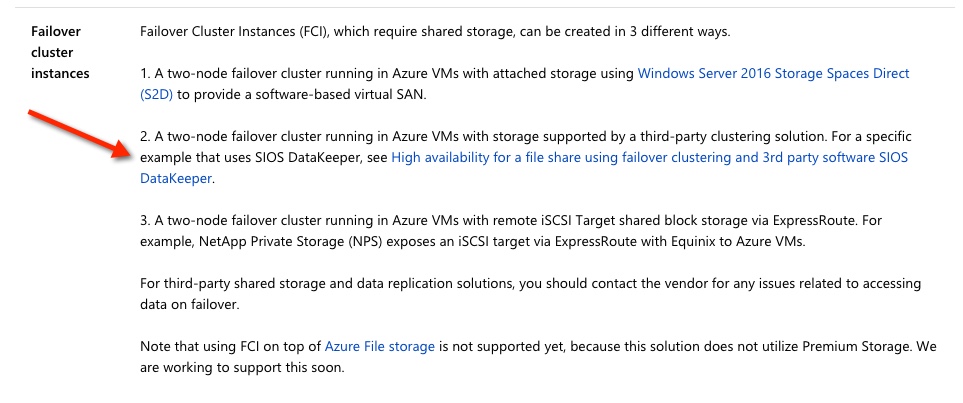
Add storage to your SQL Server instances
As you provision your SQL Server instances you will want to add additional disks to each instance. Minimally you will need one disk for the SQL Data and Log file, one disk for Tempdb. Whether or not you should have a seperate disk for log and data files is somewhat debated when running in the cloud. On the back end the storage all comes from the same place and your instance size limits your total IOPS. In my opinion there really isn’t any value in separating your log and data files since you cannot ensure that they are running on two physical sets of disks. I’ll leave that for you to decide, but I put log and data all on the same volume.
Normally a SQL Server 2008 R2 FCI would require you to put tempdb on a clustered disk. However, SIOS DataKeeper has this really nifty feature called a DataKeeper Non-Mirrored Volume Resource. This guide does not cover moving tempdb to this non-mirrored volume resource, but for optimal performance you should do this. There really is no good reason to replicate tempdb since it is recreated upon failover anyway.
As far as the storage is concerned you can use any storage type, but certainly use Managed Disks whenever possible. Make sure each node in the cluster has the identical storage configuration. Once you launch the instances you will want to attach these disks and format them NTFS. Make sure each instance uses the same drive letters.
Networking
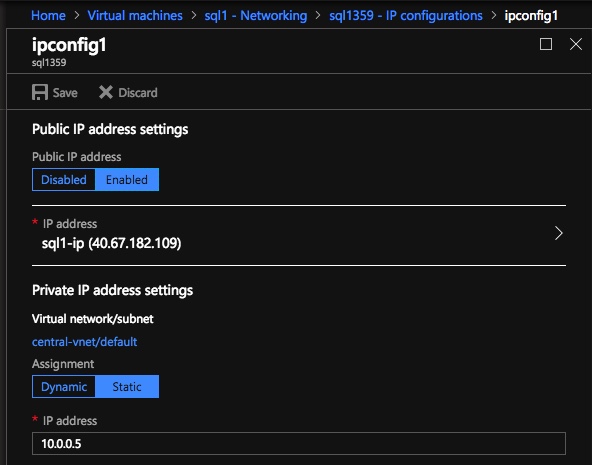
It’s not a hard requirement, but if at all possible use an instance size that supports accelerated networking. Also, make sure you edit the network interface in the Azure portal so that your instances use a static IP address. For clustering to work properly you want to make sure you update the settings for the DNS server so that it points to your Windows AD/DNS server and not just some public DNS server.
Security
By default, the communications between nodes in the same virtual network are wide open, but if you have locked down your Azure Security Group you will need to know what ports must be open between the cluster nodes and adjust your security group. In my experience, almost all the issues you will encounter when building a cluster in Azure are either caused by blocked ports.
DataKeeper has some some ports that are required to be open between the clustered instance. Those ports are as follows:
UDP: 137, 138
TCP: 139, 445, 9999, plus ports in the 10000 to 10025 range
Failover cluster has its own set of port requirements that I won’t even attempt to document here. This article seems to have that covered. http://dsfnet.blogspot.com/2013/04/windows-server-clustering-sql-server.html
In addition, the Load Balancer described later will use a probe port that must allow inbound traffic on each node. The port that is commonly used and described in this guide is 59999.
And finally if you want your clients to be able to reach your SQL Server instance you want to make sure your SQL Server port is open, which by default is 1433.
Remember, these ports can be blocked by the Windows Firewall or Azure Security Groups, so to be sure to check both to ensure they are accessible.
Join the Domain
A requirement for SQL Server 2008 R2 FCI is that the instances must reside in the same Windows Server Domain. So if you have not done so, make sure you have joined the instances to your Windows domain
Local Service Account
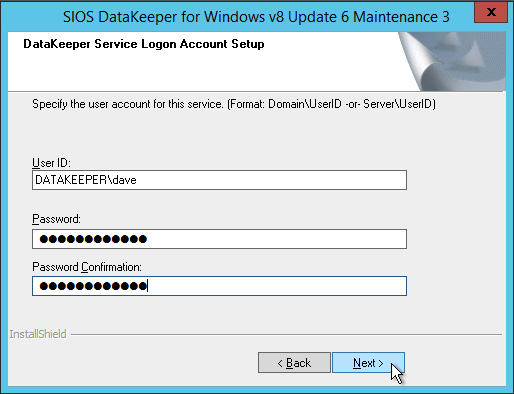
When you install DataKeeper it will ask you to provide a service account. You must create a domain user account and then add that user account to the Local Administrators Group on each node. When asked during the DataKeeper installation, specify that account as the DataKeeper service account. Note – Don’t install DataKeeper just yet!
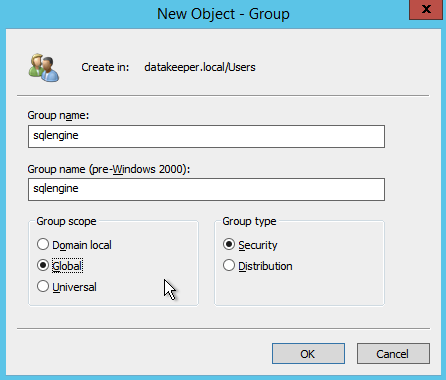
Domain Global Security Groups
When you install SQL 2008 R2 you will be asked to specify two Global Domain Security Groups. You might want to look ahead at the SQL install instructions and create those groups now. You will also want to create a domain user account and place them in each of these security accounts. You will specify this account as part of the SQL Server Cluster installation.
Other Pre-Requisites
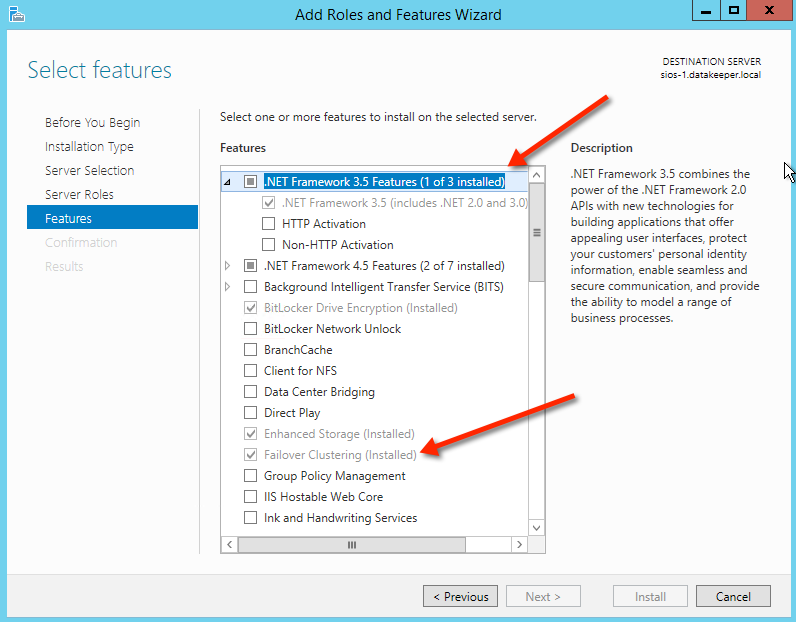
You must enable both Failover Clustering and .Net 3.5 on each instance of the two cluster instances. When you enable Failover Clustering, also be sure to enable the optional “Failover Cluster Automation Server” as it is required for a SQL Server 2008 R2 cluster in Windows Server 2012 R2.

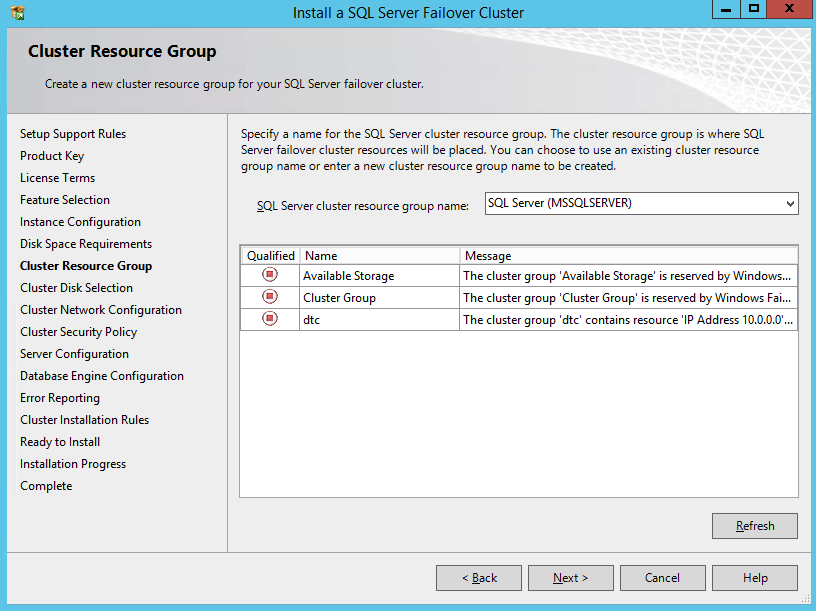
Create the Cluster and DataKeeper Volume Resources
We are now ready to start building the cluster. The first step is to create the base cluster. Because of the way Azure handles DHCP, we MUST create the cluster using Powershell and not the Cluster UI. We use Powershell because it will let us specify a static IP address as part of the creation process. If we used the UI it would see that the VMs use DHCP and it will automatically assign a duplicate IP address, so we we want to avoid that situation by using Powershell as shown below.
New-Cluster -Name cluster1 -Node sql1,sql2 -StaticAddress 10.0.0.100 -NoStorage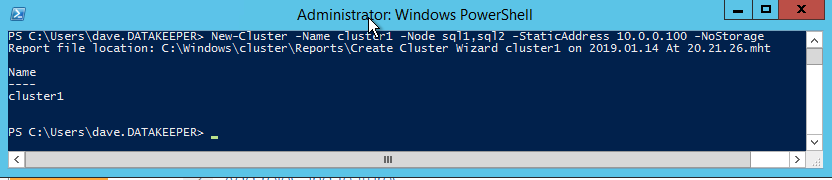
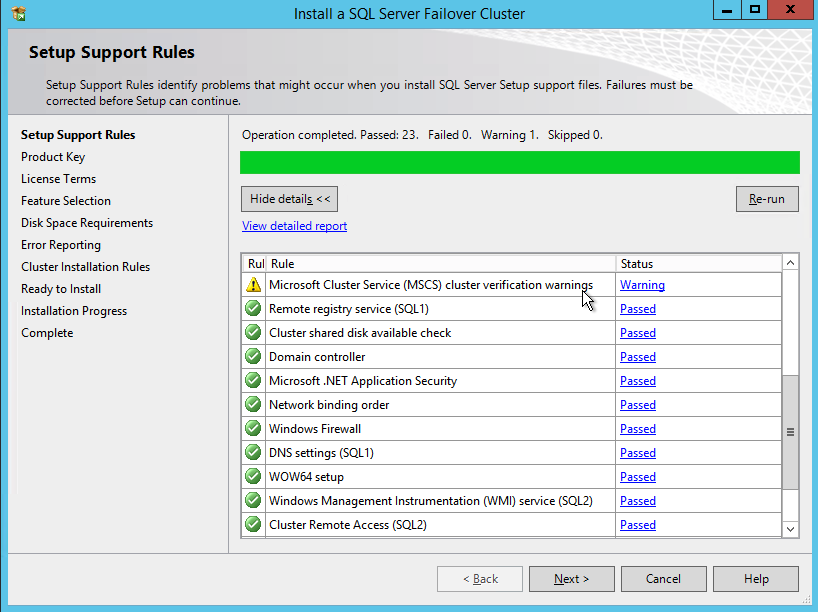
After the cluster creates, run Test-Cluster. This is required before SQL Server will install.
Test-Cluster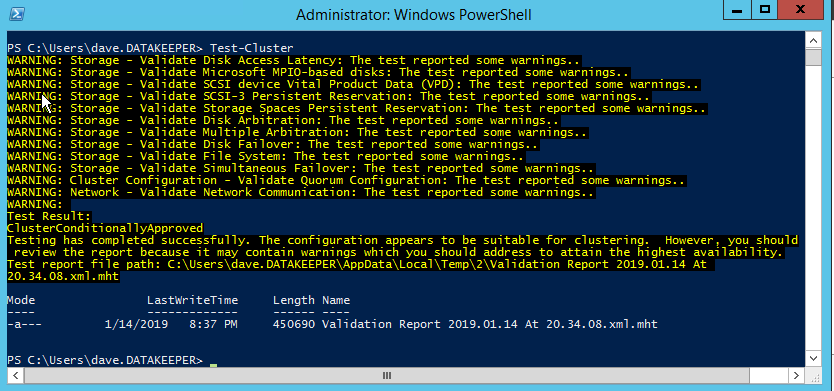
You will get warnings about Storage and Networking, but you can ignore those as they are expected in a SANless cluster in Azure. If there are any other warnings or errors you must address those before moving on.
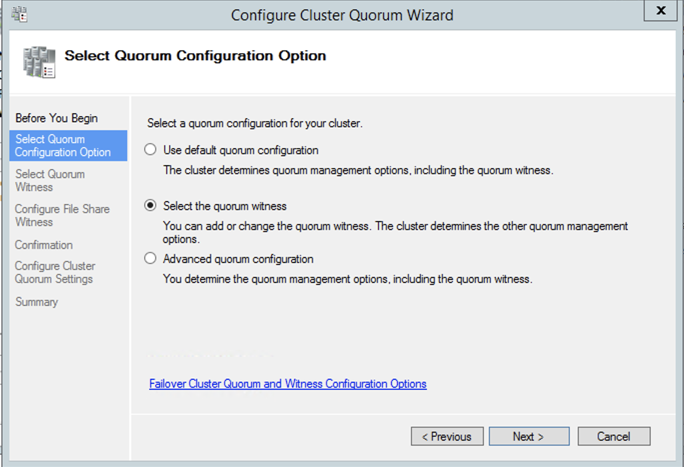
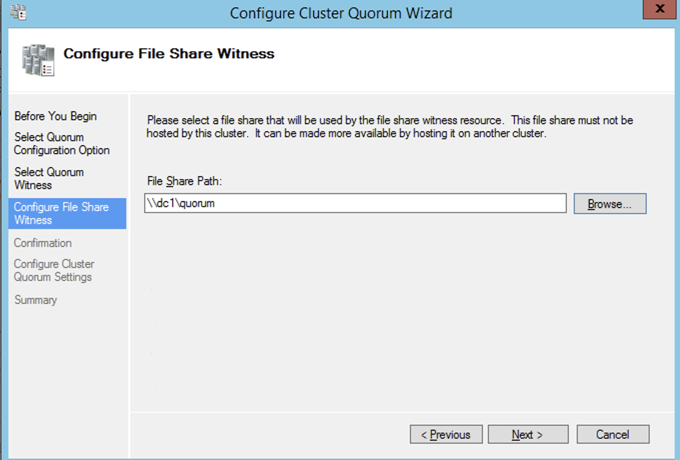
After the cluster is created you will need to add the File Share Witness. On the third server we specified as the file share witness, create a file share and give Read/Write permissions to the cluster computer object we just created above. In this case $Cluster1 will be the name of the computer object that needs Read/Write permissions at both the share and NTFS security level.
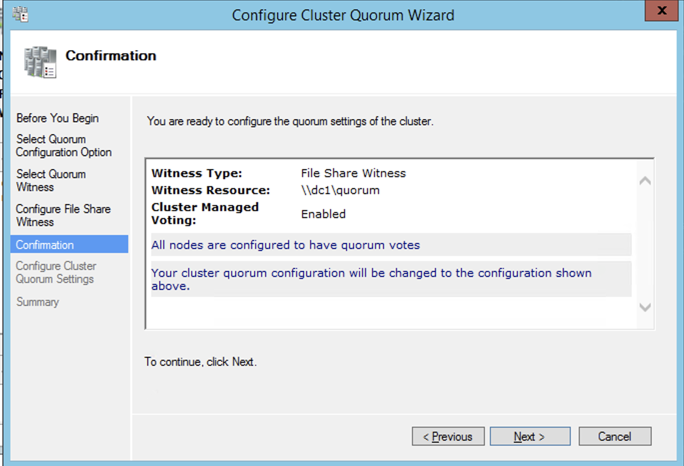
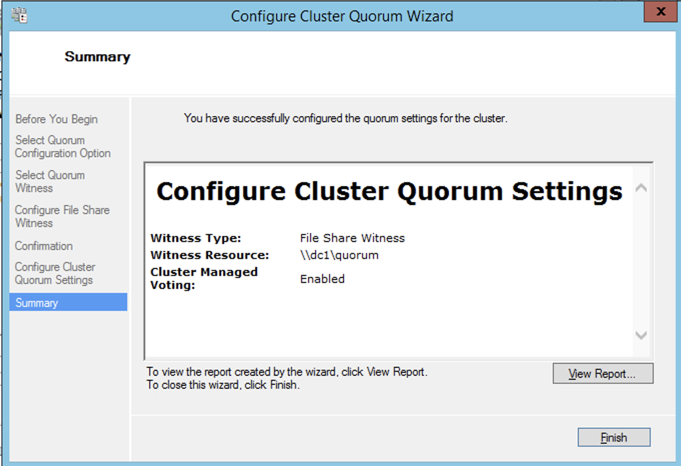
Once the share is created, you can use the Configure Cluster Quorum Wizard as shown below to configure the File Share Witness.

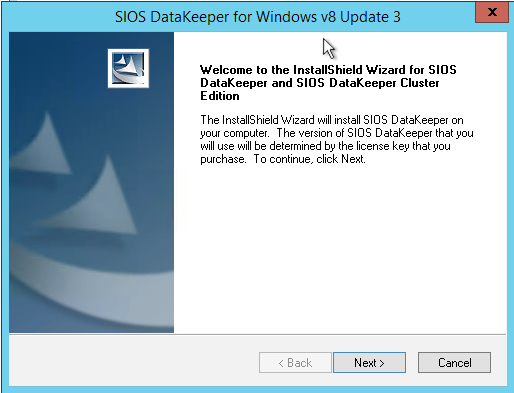
Install DataKeeper
It is important to wait until the basic cluster is created before we install DataKeeper since the DataKeeper installation registers the DataKeeper Volume Resource type in failover clustering. If you jumped the gun and installed DataKeeper already that is okay. Simply run the setup again and choose Repair Installation.
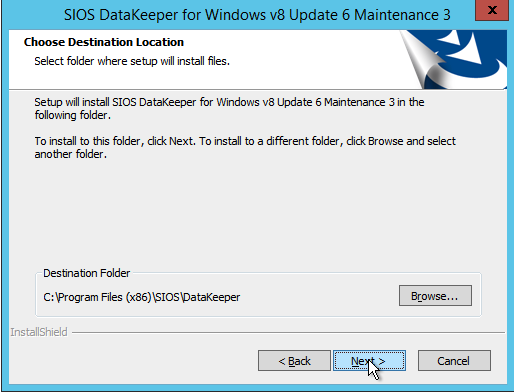
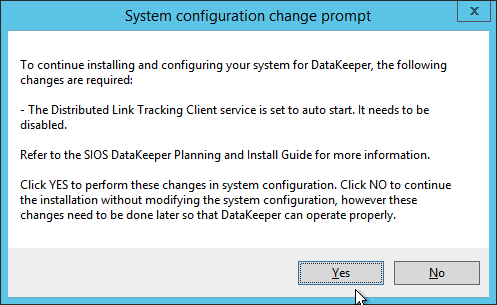
The screenshots below walk you through a basic installation. Start by running the DataKeeper Setup.
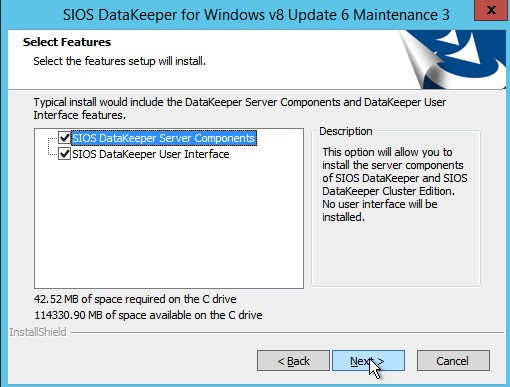
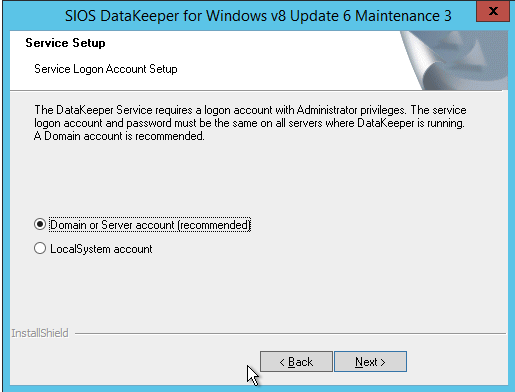
The account you specify below must be a domain account and must be part of the Local Administrators group on each of the cluster nodes.
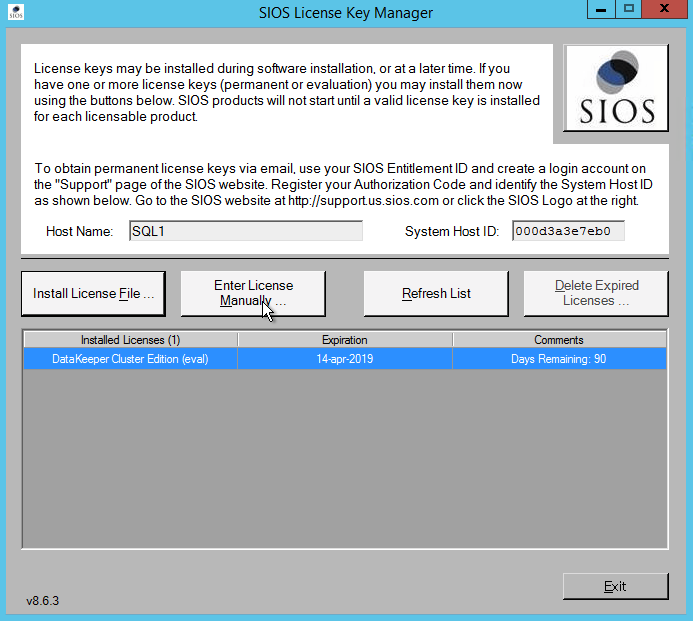
When presented with the SIOS License Key manager you can browse out to your temporary key, or if you have a permanent key you can copy the System Host ID and use that to request your permanent license. If you ever need to refresh a key the SIOS License Key Manager is a program that will be installed that you can run separately to add a new key.
Create DataKeeper Volume Resource
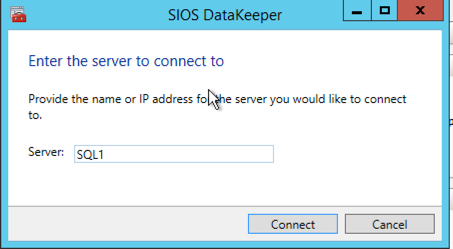
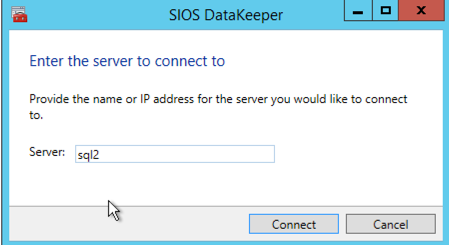
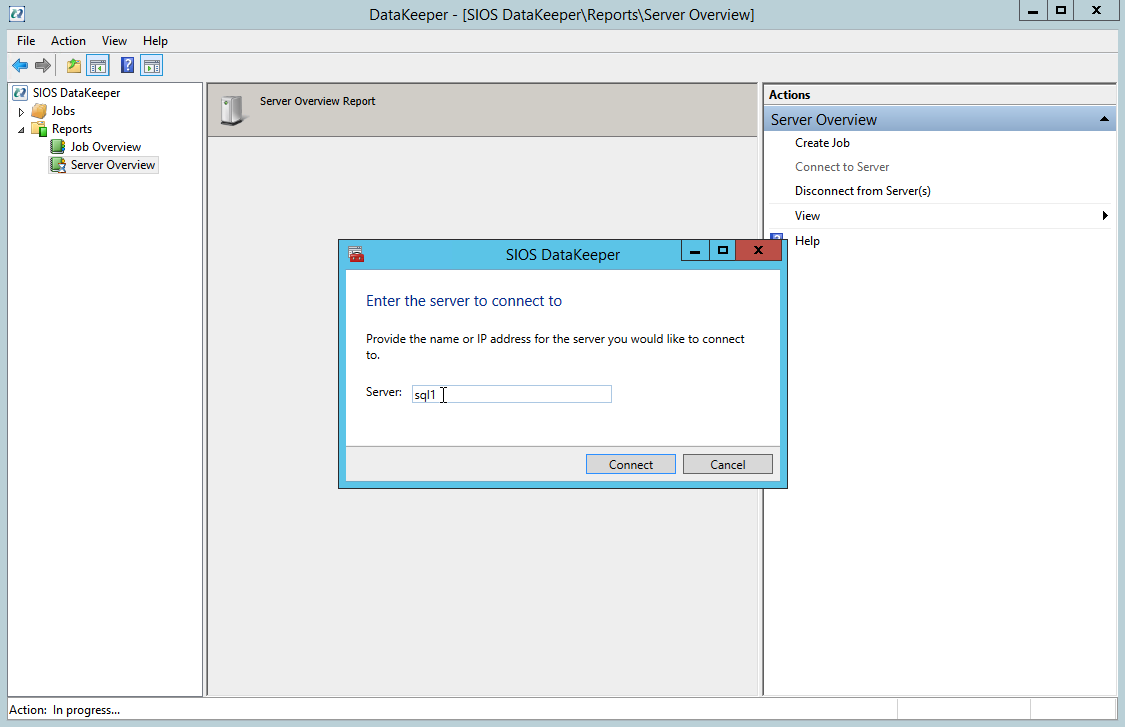
Once DataKeeper is installed on each node you are ready to create your first DataKeeper Volume Resource. The first step is to open the DataKeeper UI and connect to each of the cluster nodes.
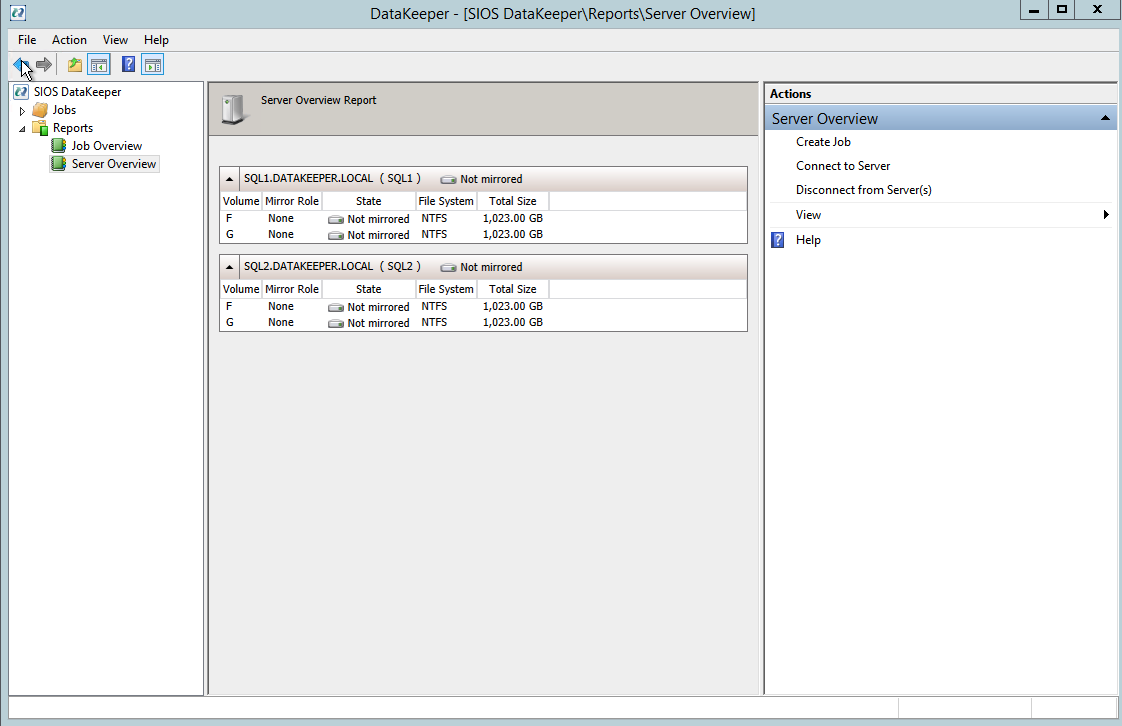
If everything is done correctly the Server Overview Report should look something like this.
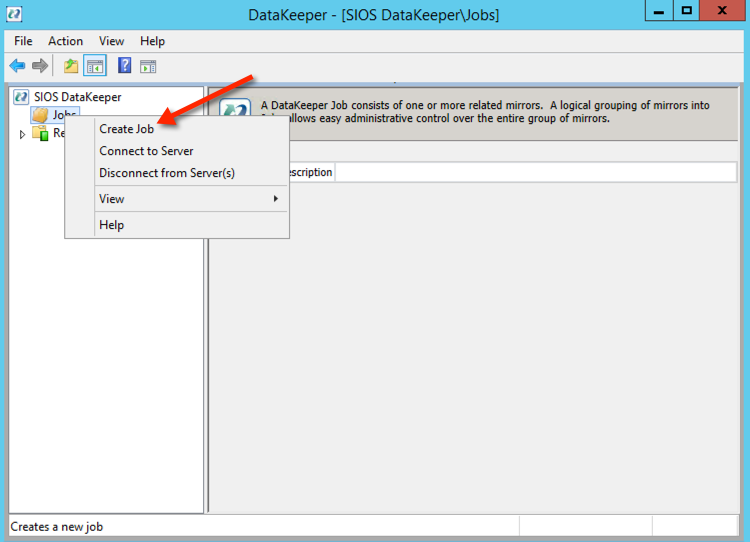
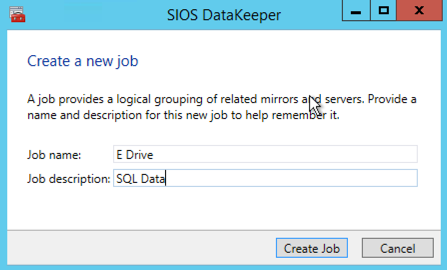
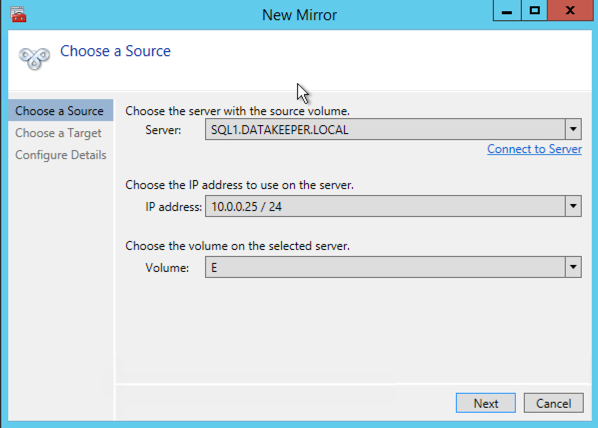
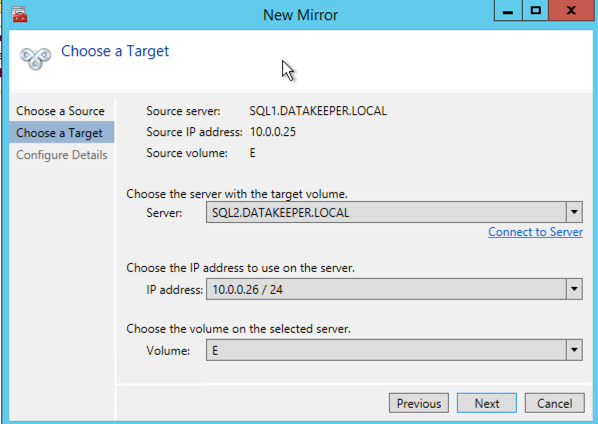
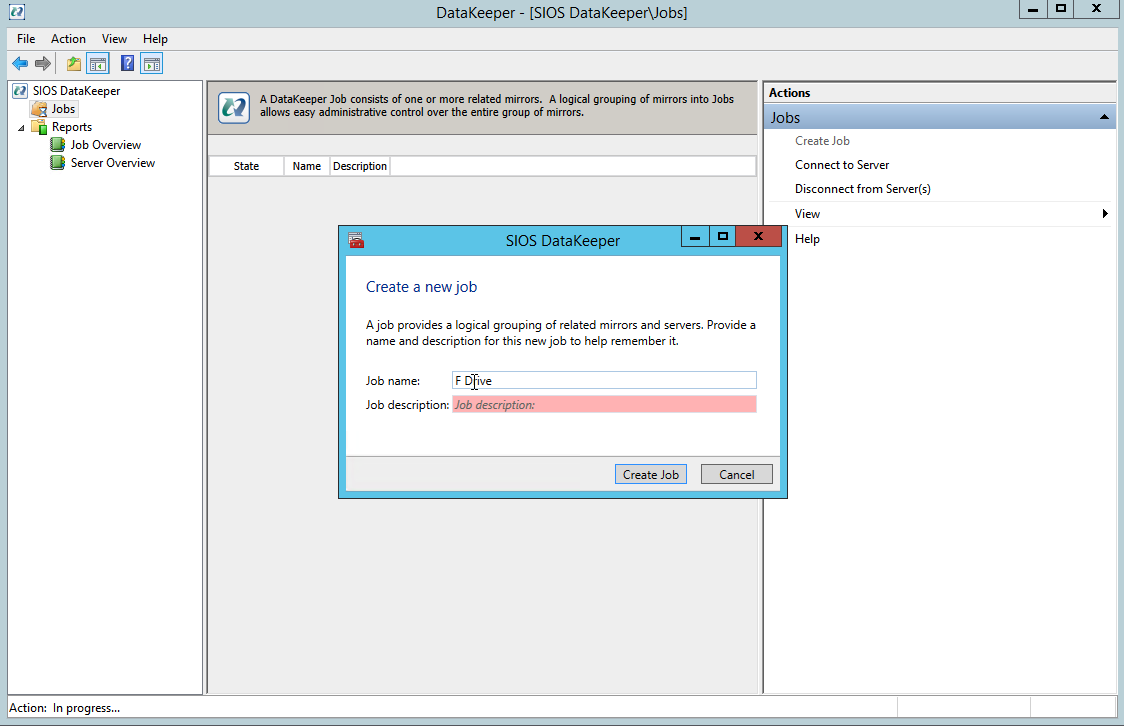
You can now create your first Job as shown below.
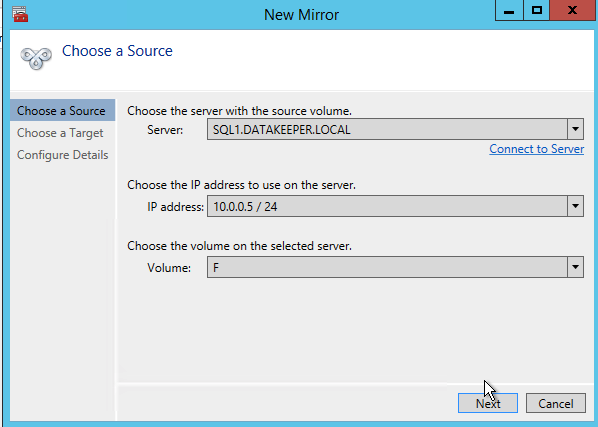
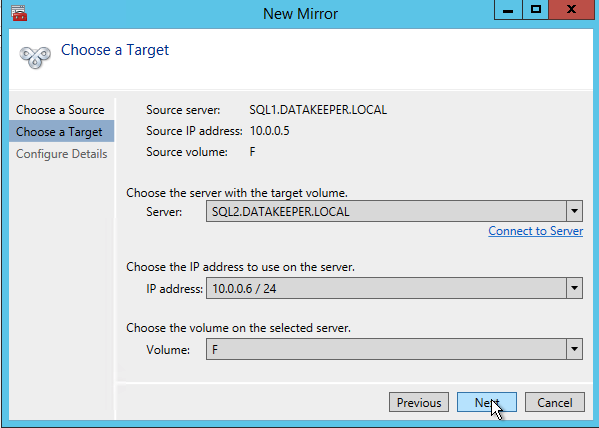
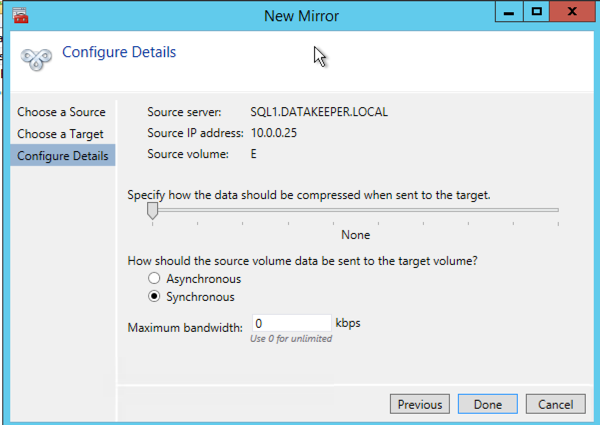
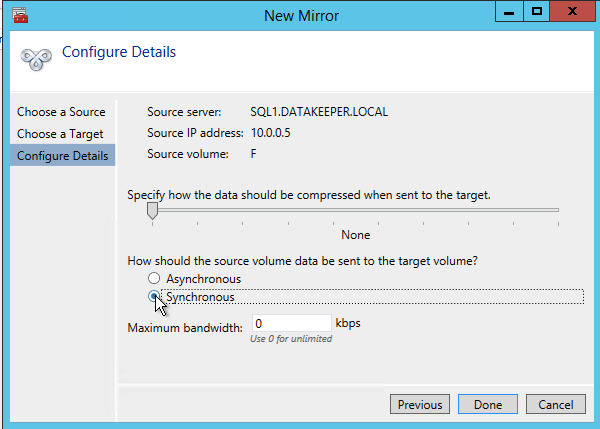
After you choose a Source and Target you are presented with the following options. For a local target in the same region the only thing you need to select is Synchronous.
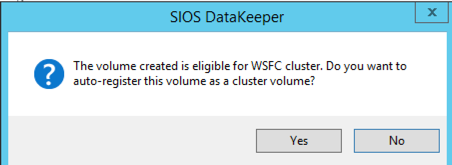
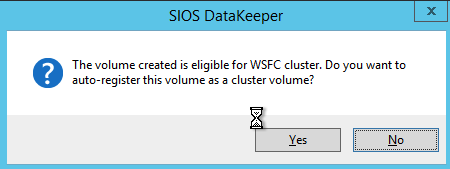
Choose Yes and auto-register this volume as a cluster resource.
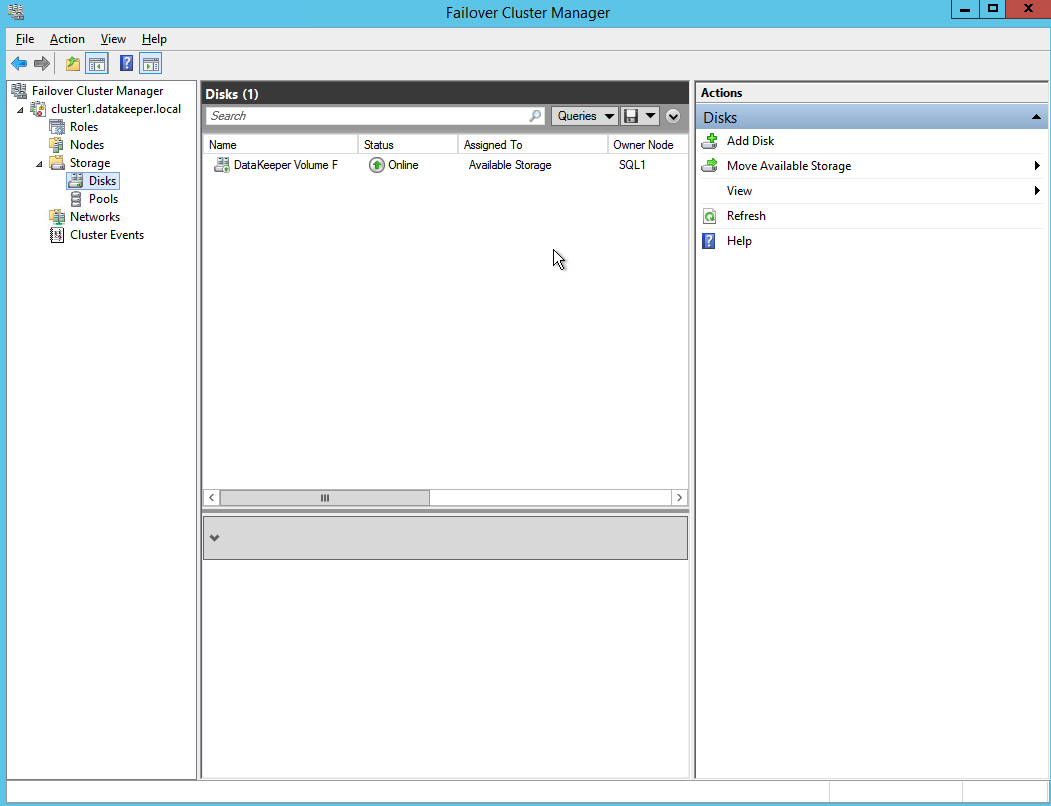
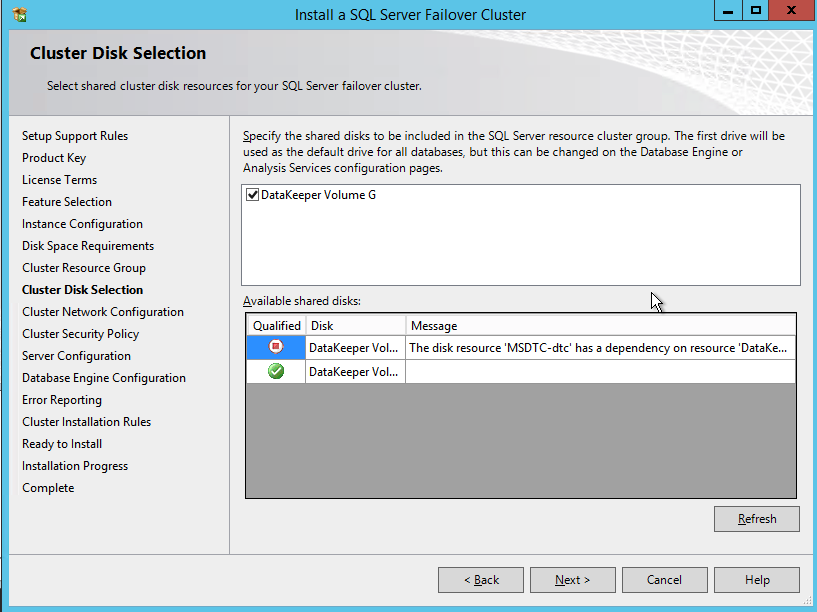
Once you complete this process open up the Failover Cluster Manager and look in Disk. You should see the DataKeeper Volume resource in Available Storage. At this point WSFC treats this as if it were a normal cluster disk resource.
Slipstream SP3 onto SQL 2008 R2 install media
SQL Server 2008 R2 is only supported on Windows Server 2012 R2 with SQL Server SP2 or later. Unfortunately, Microsoft never released a SQL Server 2008 R2 installation media that that includes SP2 or SP3. Instead, you must slipstream the service pack onto the installation media BEFORE you do the installation. If you try to do the installation with the standard SQL Server 2008 R2 media you will run into all kinds of problems. I don’t remember the exact errors you will see, but I do recall they didn’t really point to the exact problem and you will waste a lot of time trying to figure out what went wrong.
As of the date of this writing, Microsoft does not have a Windows Server 2012 R2 with SQL Server 2008 R2 offering in the Azure Marketplace, so you will be bringing your own SQL license if you want to run SQL 2008 R2 on Windows Server 2012 R2 in Azure. If they add that image later, or if you choose to use the SQL 2008 R2 on Windows Server 2008 R2 image you must first uninstall the existing standalone instance of SQL Server before moving forward.
I followed the guidance in Option 1 of this article to slipstream SP3 on onto my SQL 2008 R2 installation media. You will of course have to adjust a few things as this article references SP2 instead of SP3. Make sure you slipstream SP3 on the installation media we will use for both nodes of the cluster. Once that is done, continue to the next step.
Install SQL Server on the First Node
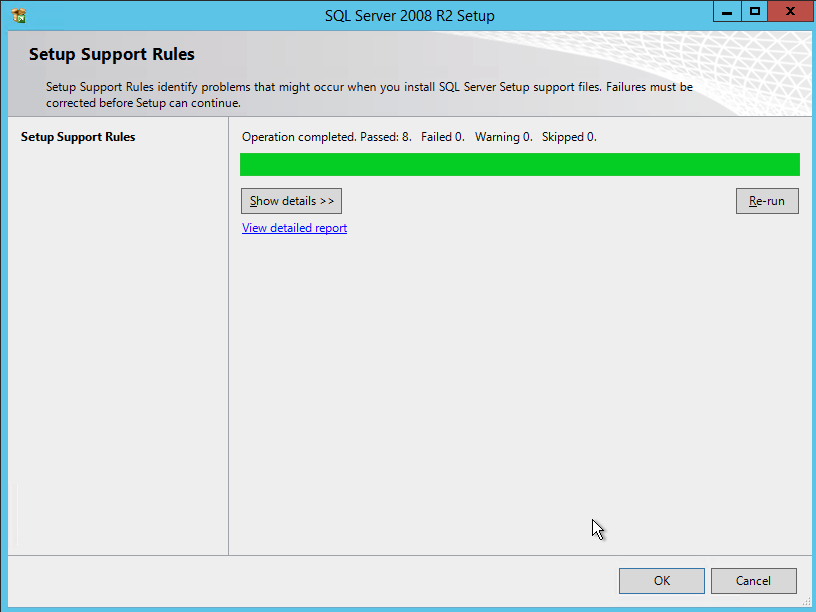
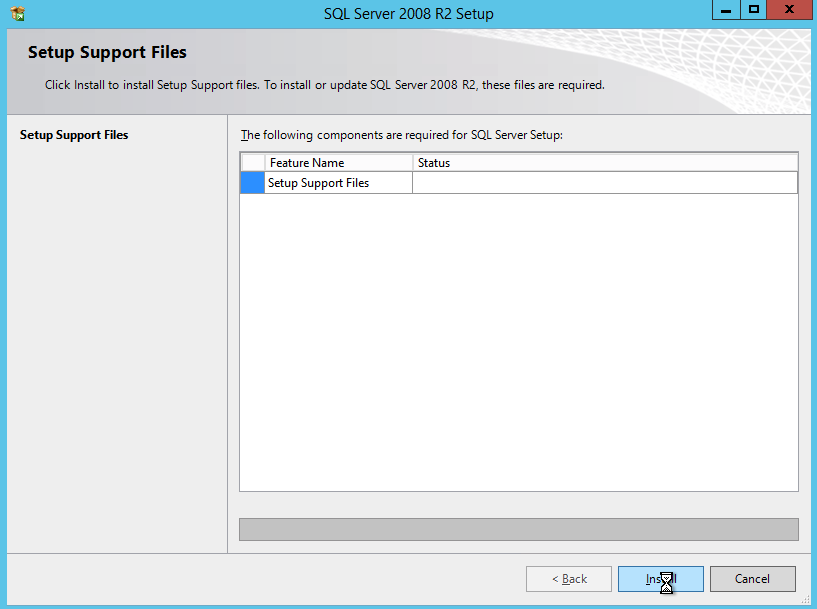
Using the SQL Server 2008 R2 media with SP3 slipstreamed, run setup and install the first node of the cluster as shown below.


If you use anything other than the Default instance of SQL Server you will have some additional steps not covered in this guide. The biggest difference is you must lock down the port that SQL Server uses since by default a named instance of SQL Server does NOT use 1433. Once you lock down the port you also need to specify that port instead of 1433 whenever we reference port 1433 in this guide, including the firewall setting and the Load Balancer settings.

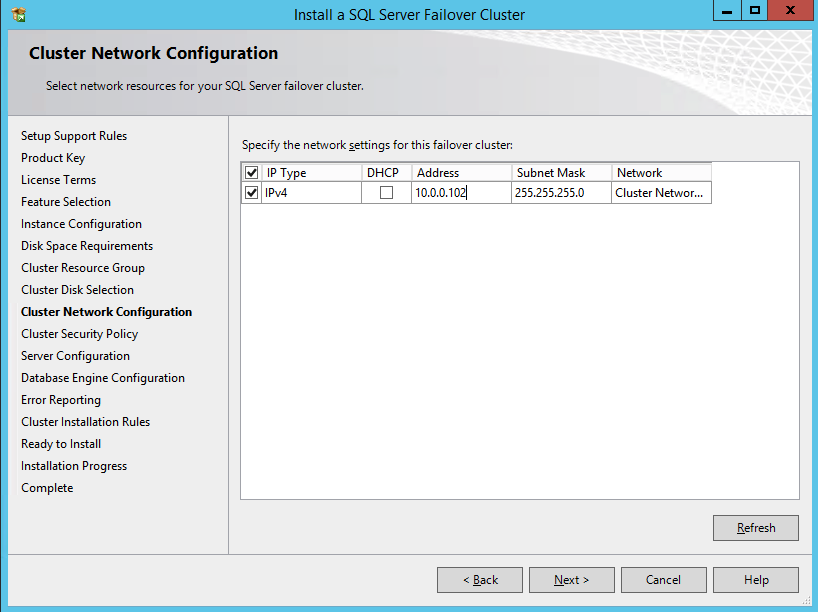
Here make sure to specify a new IP address that is not in use. This is the same IP address we will use later when we configure the Internal Load Balancer later.
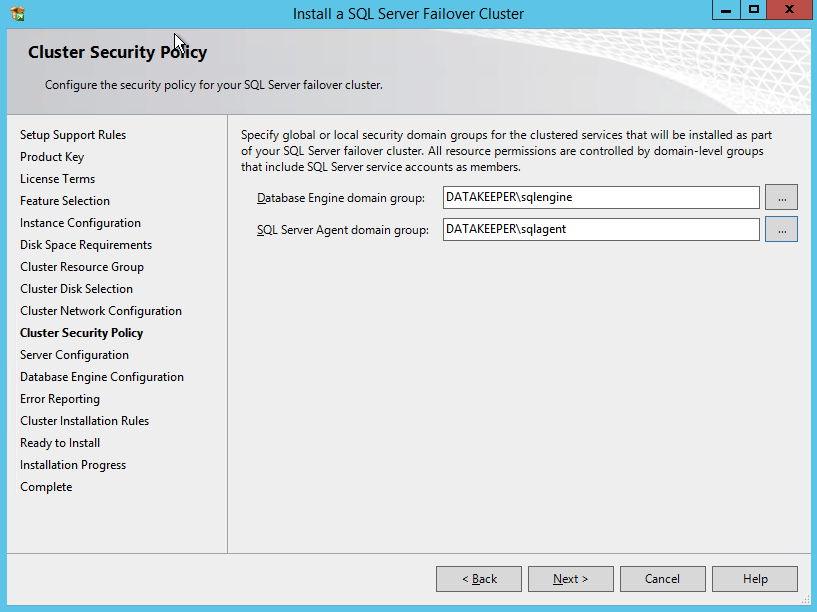
As I mentioned earlier, SQL Server 2008 R2 utilizes AD Security Groups. If you have not already created them, go ahead and create them now as show below before you continue to the next step in the SQL install
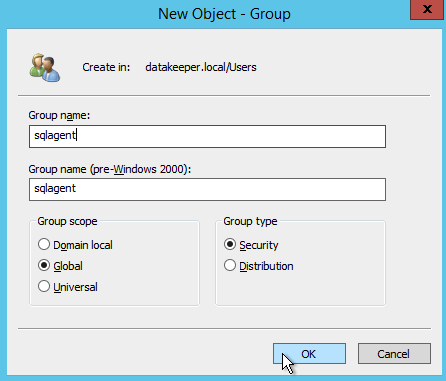
Specify the Security Groups you created earlier.
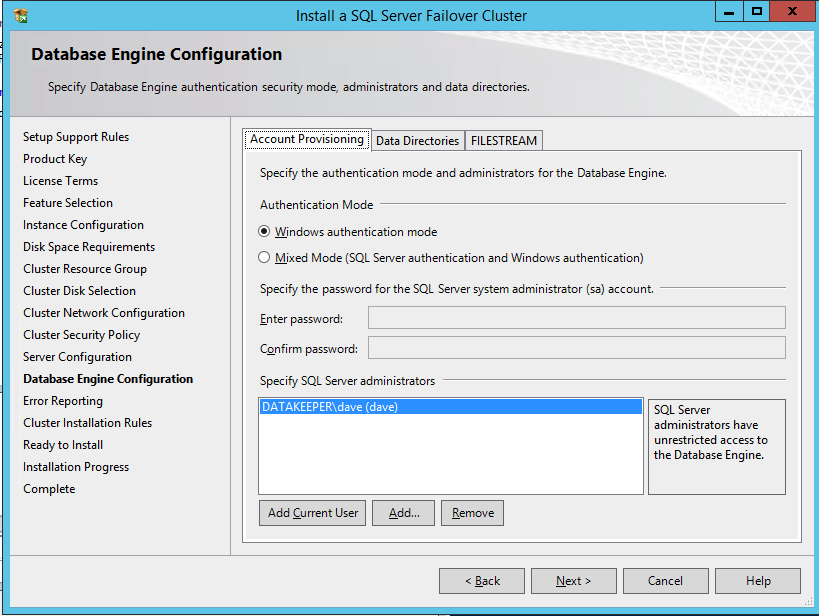
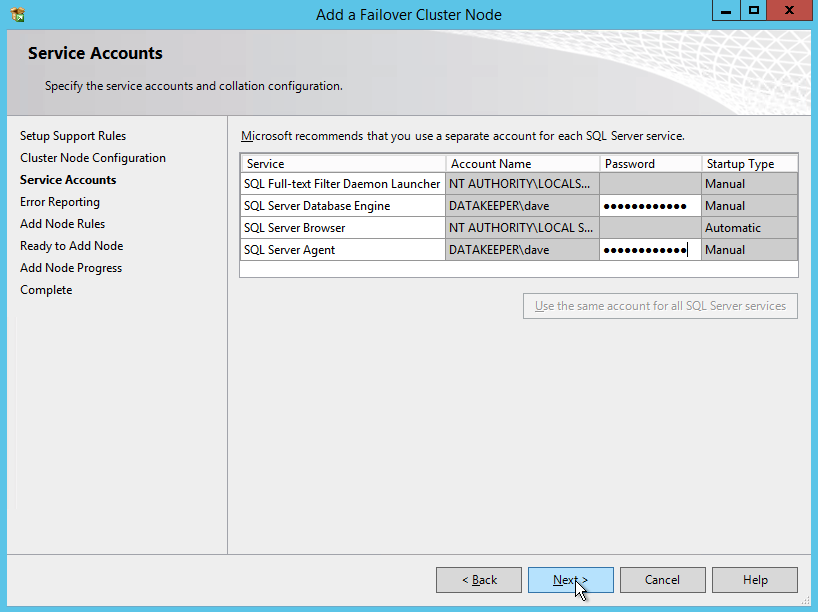
Make sure the service accounts you specify are a member of the associated Security Group.

Specify your SQL Server administrators here.


If everything goes well you are now ready to install SQL Server on the second node of the cluster.
Install SQL Server on the Second Node
One the second node, run the SQL Server 2008 R2 with SP3 install and select Add Node to a SQL Server FCI.
Proceed with the installation as shown in the following screenshots.

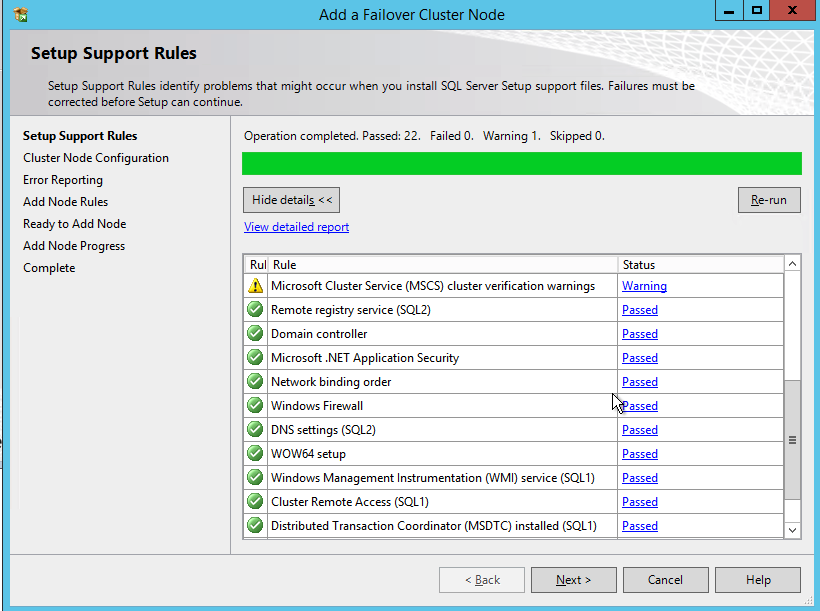
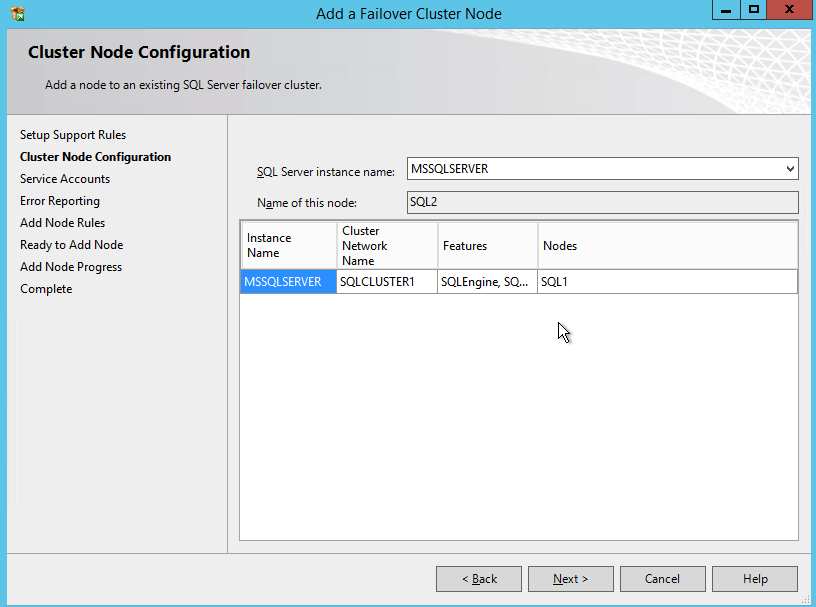
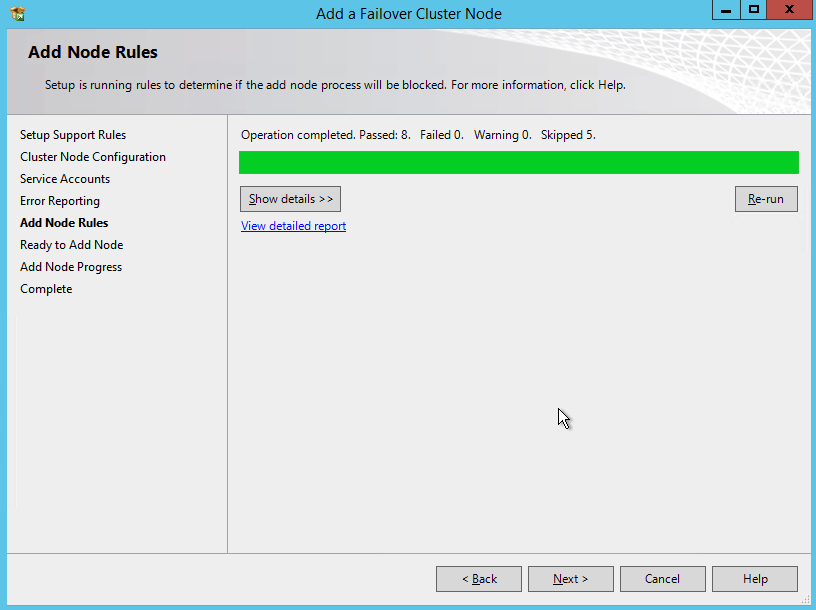
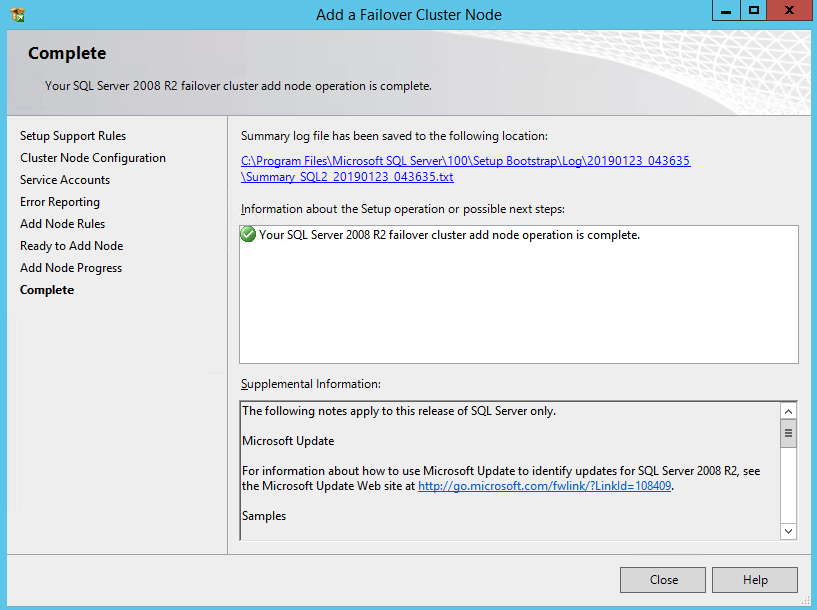
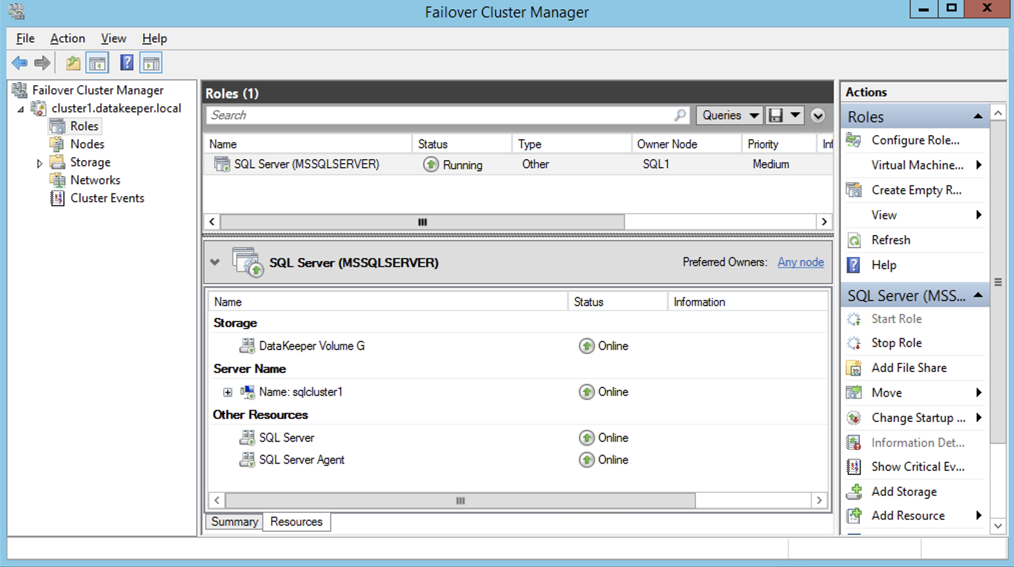
Assuming everything went well, you should now have a two node SQL Server 2008 R2 cluster configured that looks something like the following.
However, you probably will notice that you can only connect to the SQL Server instance from the active cluster node. The problem is that Azure does not support gratuitous ARP, so your clients cannot connect directly to the Cluster IP Address. Instead, the clients must connect to an Azure Load Balancer, which will redirect the connection to the active node. To make this work there are two steps: Create the Load Balancer and Fix the SQL Server Cluster IP to respond to the Load Balancer Probe and use a 255.255.255.255 Subnet mask. Those steps are described below.
Before you continue, run cluster validation one more time. The Cluster Validation report should return just the same network and storage warnings that it did the first time you ran it. Assuming there are no new errors or warnings, your cluster is configured correctly.
Edit sqlserv.exe Config File
include the below lines in the sqlservr.exe.config file. This forces SQL Server to use the right CLR integration.
<configuration>
  <startup>
    <supportedRuntime version="v2.0.50727"/>
  </startup>
</configuration>
The file, by default, will not exist and may be created. If this file already exists for your installation, the <supportedRuntime version=”v2.0.50727″/> line simply needs to be placed with the <startup>…</startup> sub-section of the <configuration>…</configuration> section.
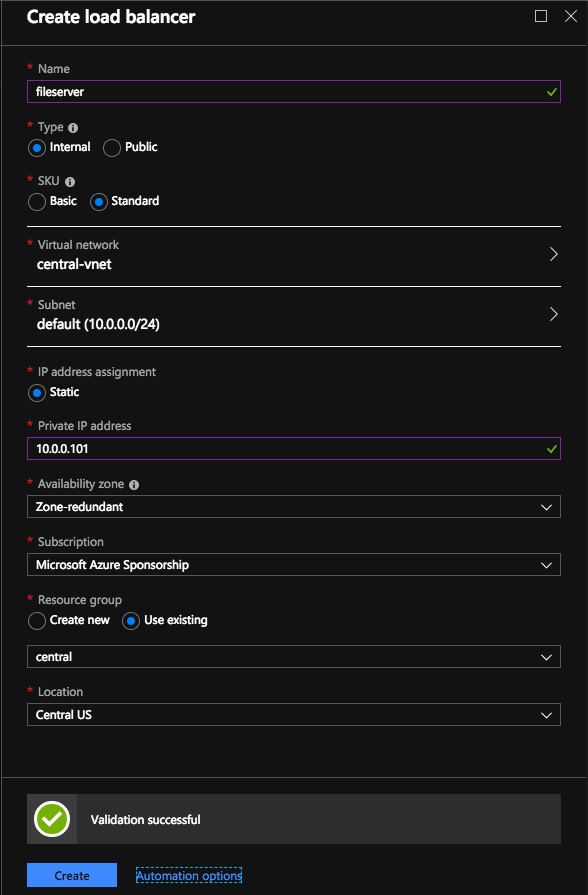
Create the Azure Load Balancer
I’m going to assume your clients can communicate directly to the internal IP address of the SQL cluster so we will create an Internal Load Balancer (ILB) in this guide. If you need to expose your SQL Instance on the public internet you can use a Public Load Balancer instead.
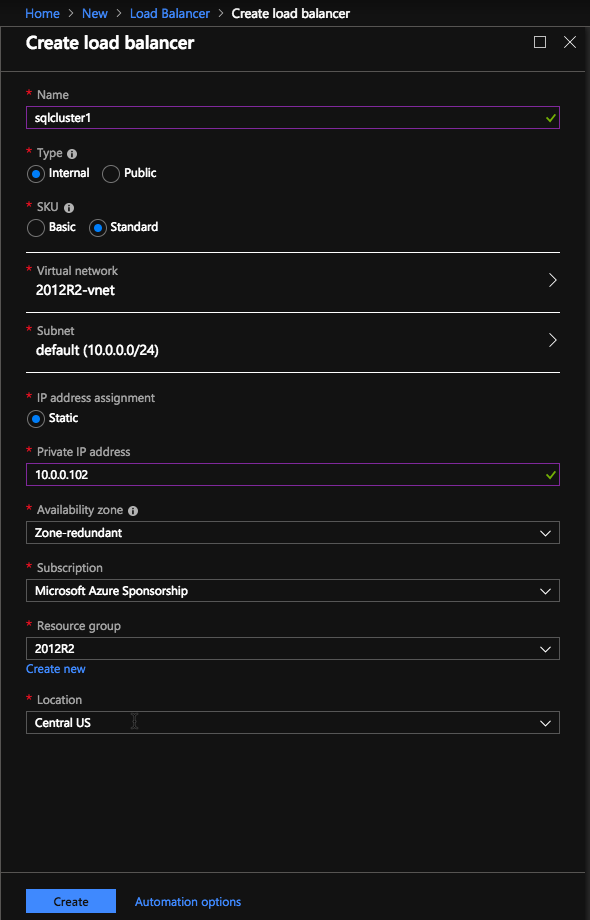
In the Azure portal create a new Load Balancer following the screenshots as shown below. The Azure portal UI changes rapidly, but these screenshots should give you enough information to do what you need to do. I will call out important settings as we go along.
Here we create the ILB. The important thing to note on this screen is you must select “Static IP address assignment” and specify the same IP address that we used during the SQL Cluster installation.
Since I used Availability Zones I see Zone Redundant as an option. If you used Availability Sets your experience will be slightly different.
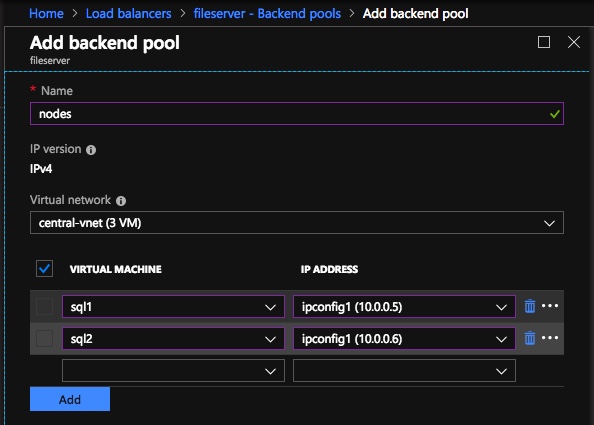
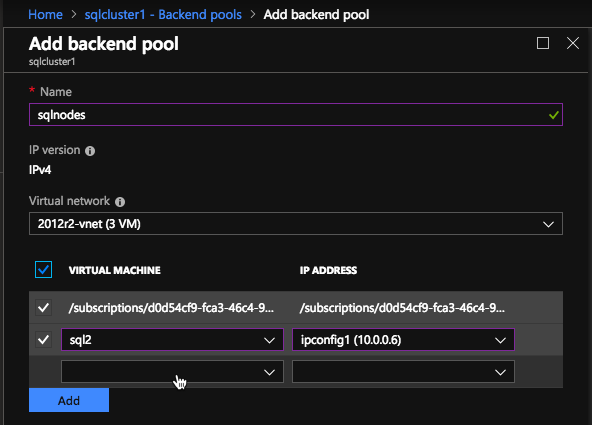
In the Backend pool be sure to select the two SQL Server instances. You DO NOT want to add your File Share Witness in the pool.
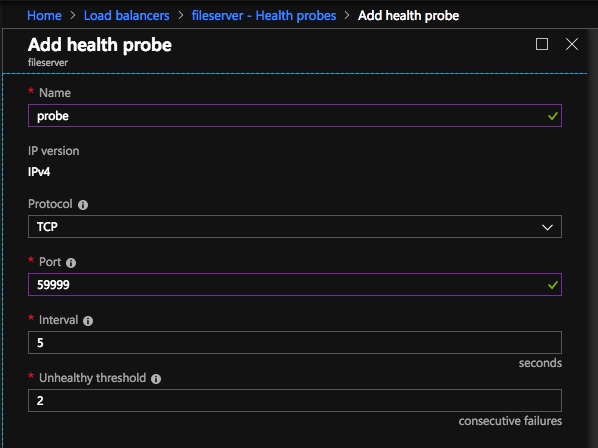
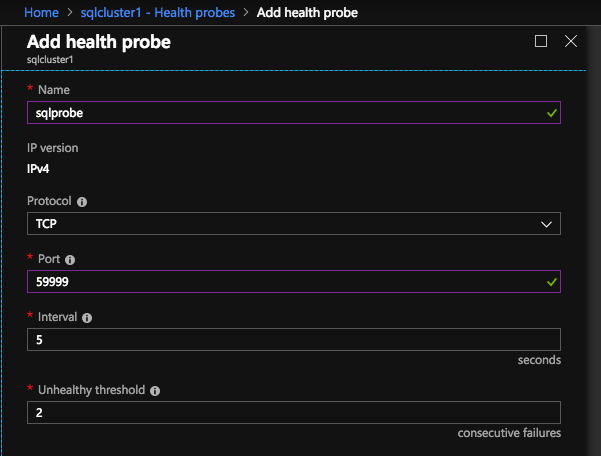
Here we configure the Health Probe. Most Azure documentation has us using port 59999, so we will stick with that port for our configuration.
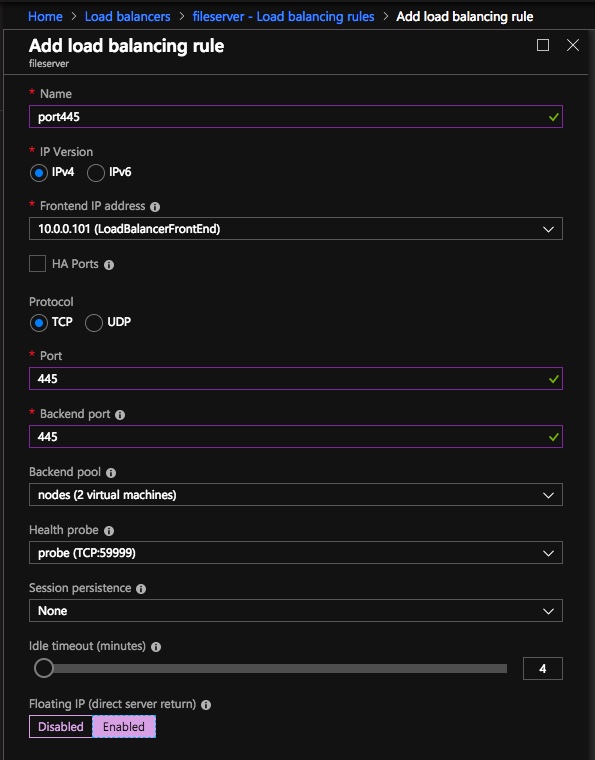
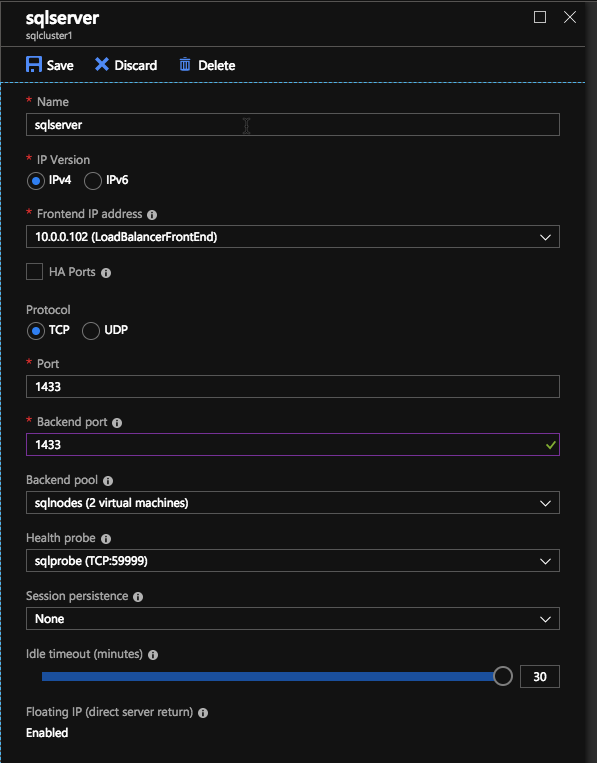
Here we will add a load balancing rule. In our case we want to redirect all SQL Server traffic to TCP port 1433 of the active node. It is also important that you select Floating IP (Direct Server Return) as Enabled.
Run Powershell Script to Update SQL Client Access Point
Now we must run a Powershell script on one of the cluster nodes to allow the Load Balancer Probe to detect which node is active. The script also sets the Subnet Mask of the SQL Cluster IP Address to 255.255.255.255.255 so that it avoids IP address conflicts with the Load Balancer we just created.
# Define variables
$ClusterNetworkName = “”
# the cluster network name (Use Get-ClusterNetwork on Windows Server 2012 of higher to find the name)
$IPResourceName = “”
# the IP Address resource name
$ILBIP = “”
# the IP Address of the Internal Load Balancer (ILB) and SQL Cluster
Import-Module FailoverClusters
# If you are using Windows Server 2012 or higher:
Get-ClusterResource $IPResourceName | Set-ClusterParameter -Multiple @{Address=$ILBIP;ProbePort=59999;SubnetMask="255.255.255.255";Network=$ClusterNetworkName;EnableDhcp=0}
# If you are using Windows Server 2008 R2 use this:
#cluster res $IPResourceName /priv enabledhcp=0 address=$ILBIP probeport=59999  subnetmask=255.255.255.255
This is what the output will look like if run correctly.

You probably notice that the end of that script has a commented line of code to use if you are running on Windows Server 2008 R2. If you are running Windows Server 2008 R2 make sure you run the code specific for Windows Server 2008 R2 at a Command prompt, it is not Powershell.
Next Steps
If you get to this point and you still cannot connect to the cluster remotely you wouldn’t be the first person. There are a lot of things that can go wrong in terms of security, load balancer, SQL ports, etc. I wrote this guide to help troubleshoot connection issues.
In fact, in this very installation I ran into some strange issues in terms of my SQL Server TCP/IP Properties in SQL Server Configuration Manager. When I looked at the properties I did not see the SQL Server Cluster IP address as one of the addresses it was listening on, so I had to add it manually. I’m not sure if that was an anomaly, but it certainly was an issue I had to resolve before I could connect to the cluster from a remote client.
As I mentioned earlier, one other improvement you can make to this installation is to use a DataKeeper Non-Mirrored Volume Resource for TempDB. If you set that up please be aware of the following two configuration issues people commonly run into.
The first issue is if you move tempdb to a folder on the 1st node, you must be sure to create the exact same folder structure on the second node. If you don’t do that when you try to failover SQL Server will fail to come online since it can’t create TempDB
The second issue occurs anytime you add another DataKeeper Volume Resource to a SQL Cluster after the cluster is created. You must go into the properties of the SQL Server cluster resource and make it dependent on the new DataKeeper Volume resource you added. This is true for the TempDB volume and any other volumes you may decide to add after the cluster is created.
If you have any questions about this configuration or any other cluster configurations please feel free to reach out to me on Twitter @DaveBerm.
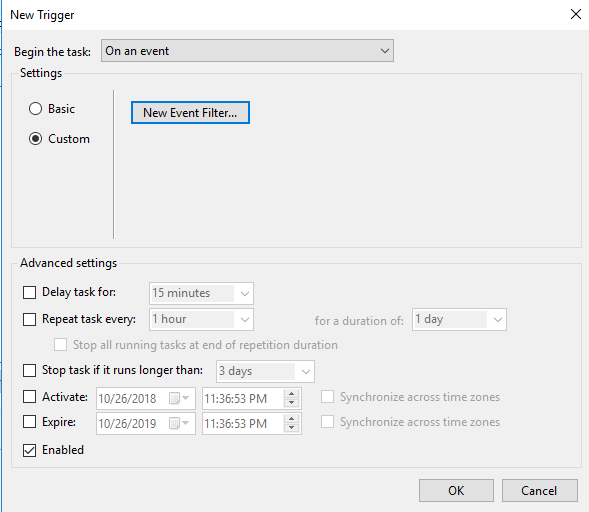
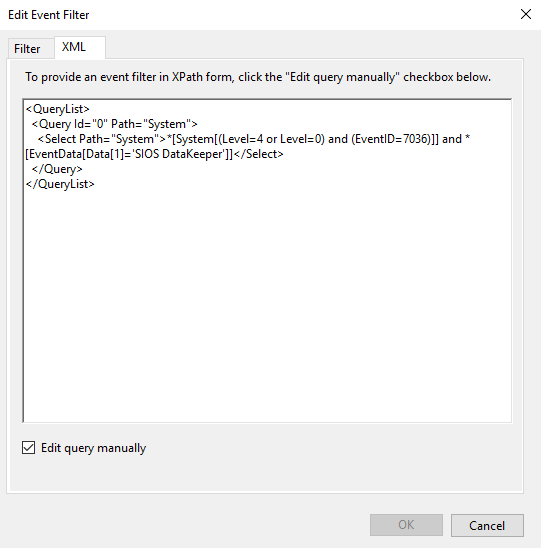
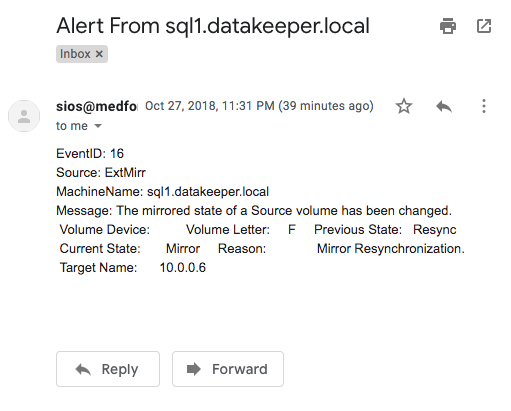
Troubleshooting #Azure ILB connection issues in a SQL Server AlwaysOn FCI Cluster
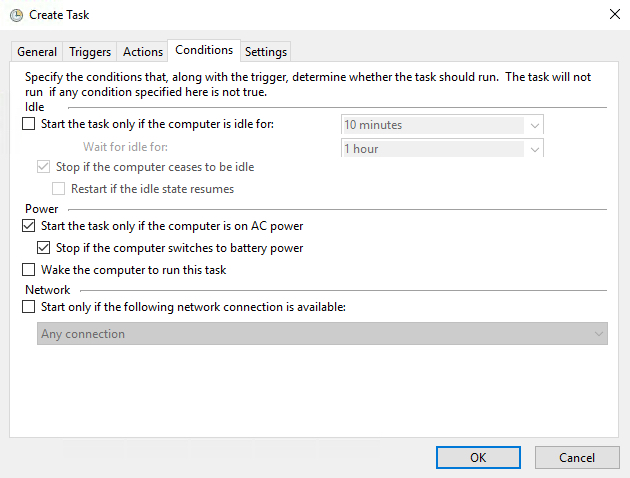
 Make sure the task is set to Run whether the user is logged on or not.
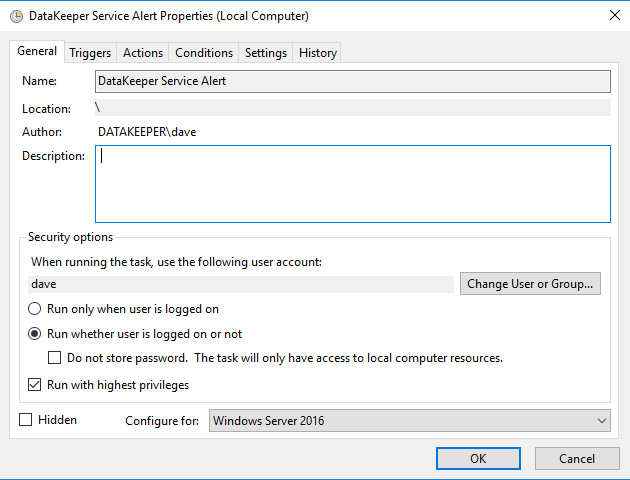


 Connect to SQL1