It is official, I passed exam 70-652 today and I am now a MCTS: Windows Server Virtualization, Configuration. It was 11 years ago that I sat for my first NT 4 exam and now about a dozen exams later I am just now embarking on updating my credentials to the latest and greatest, once again. I think certifications are a good thing, but certainly don’t replace real world experience and good Google skills when it comes to diagnosing a problem or planning a new project. I’ll keep you posted on my progress; hopefully I’ll be able to complete MCITP: Enterprise Administrator before my kids get out of school in June so I can enjoy the summer.
DataKeeper
Microsoft SQL Server 2005/2008 Multi-Site Cluster for Disaster Recovery
|

Microsoft End-to-End Cross-Site Disaster Recovery Solution
Microsoft has recently updated their Virtualization Continuity page with some good information…
Cross-Site Disaster Recovery Solutions
Implementing a reliable, rapid-recovery strategy can be time-consuming to implement and expensive to manage. Because of the complexity and cost, many companies simply don’t have comprehensive business continuity plans to protect their data and ensure application availability.
Virtualization has been a game changer for many companies. With virtualization based Site Recovery solutions, you can ensure higher availability and business continuity options. Windows Server provides support for a wide range of industry leading, shared storage solutions to deliver Quick and Live Migration. Combined with partner cross-site data management and replication technologies, Microsoft is offering complete Site Recovery solutions.
In summary, Microsoft Site Recovery solutions provide these key benefits:
- Bullet proof application and data availability across a range of applications
- Site-wide disaster recovery that can help you gain immediate and long-term operational and capital benefits
- Automated fail-over and fail back based on clustering and data resynchronization delivering superior application and data availability, for planned and unplanned downtime
Also, they have recently published a white paper entitled “Microsoft End-to-End Cross-Site Disaster Recovery Solutions“. This is a must read for anyone deploying SteelEye DataKeeper in a Cross-Site Disaster Recovery configuration.
Replicate and Protect – my interview with Virtual Strategy Magazine
Check out this podcast where Carryl Roy from Virtual Strategy Magazine interviews me about virtualization availability.
http://www.virtual-strategy.com/VSM-Podcasts/20091209-SteelEye.html
DHCP cluster without shared storage and/or across data centers
Look for a Step-by-Step article on how to configure a DHCP across data centers and/or without shared storage in the very near future using Windows Server Failover Clustering and SteelEye DataKeeper Cluster Edition. In the meantime, check out this video that demonstrates a DHCP cluster that uses a replicated DHCP database instead of a shared disk in the cluster.
SteelEye DataKeeper Cluster Edition wins Windows IT Pro Best High Availability/Disaster Recovery awards
I am pleased to announce that Windows IT Pro has awarded SteelEye DataKeeper Cluster Edition the Best High Availability and Disaster Recovery Product in two categories; Community Choice Gold Award and Editors’ Best Silver Award.
I am really proud to be a part of the SteelEye DataKeeper team and I appreciate all of the Windows IT Pro community that voted for us in the Community Choice award!
Step-by-Step: Configuring a 2-node multi-site cluster on Windows Server 2008 R2 – Part 3
SQL Server 2008 multi-site cluster on Windows Server 2008 R2
In Part 1 of this series, I showed you how to prepare your multi-site cluster, including setting up the Node and File Share Majority Quorum. In Part 2, we saw a video example of how to integrate SteelEye DataKeeper, one of the available cluster replication solutions, with failover clustering to configure a multi-site Hyper-V failover cluster. In Part 3, we will examine how Microsoft SQL Server 2008 can be configured in a multi-site cluster with Windows Server 2008 Failover Clustering and SteelEye DataKeeper Cluster Edition.
First, why would you want to deploy a multi-site SQL server cluster? SQL Server comes with a variety of high availability options, including log shipping, replication (transactional, merge, snapshot), database mirroring and failover clusters. There is a great article that talks about the High Availability options in SQL Server 2008, so I won’t re-invent the wheel here. If you want to learn more about all of the options, have a look at this article by Ross Mistry, High Availability Options in SQL Server 2008.
If you read the article, Ross’ summary makes the following statement…
“Clearly, failover clustering is the best choice to reduce system downtime and provide higher application availability for the whole instance of SQL Server within a site; however, a failover cluster does not protect against disk failure and requires a SAN.”
What if you could have all of the benefits that Ross outlines and also protect against disk failure and eliminate the need for a SAN? Well, the good news is that is exactly what you can do by implementing a Microsoft SQL Server 2008 multi-site cluster on Windows Server 2008. SQL Server 2008 multi-site cluster may be a little bit of a misnomer. It does not necessarily need to be deployed across geographically dispersed locations. The servers could be located in the same rack, same room, same building or across continents; it really doesn’t matter. The important thing is that you are eliminating your storage as a single point of failure and if you choose to locate your cluster nodes in different physical locations then you also have built in site resiliency.
One of the most common questions and points of confusion about SQL Server 2008 and Windows Server 2008 failover clustering is support for failing across subnets. Yes, Windows Server 2008 Failover Clustering does support failing between subnets for most applications, however, SQL Server 2008 is not one of those applications. As far as I know, SQL Server 2008 R2 will also not support failing between subnets when it is released. My understanding is that the SQL team is working on support for cross-subnet failover, but it will be supported sometime after SQL Server 2008 R2 is released. So, for the time being, you will have to span your subnet if you wish to separate your nodes geographically.
Now that you have determined to deploy a multi-node SQL server cluster, here are the steps you will need to follow.
Configure you basic cluster
Follow the steps in Part 1 of this series to configure a basic 2-node cluster with a Node and File Share Majority Quorum.
Configure your replication
Deploying a multi-site cluster will require that you work very closely with your replication vendor during this part of the configuration. Each vendor will have very specific instructions on how to set up the replication and create the storage resources to be used in your cluster. For the purposes of this demonstration, I will use SteelEye DataKeeper Cluster Edition to replicate the E drive from the server named PRIMARY to the server named SECONDARY. The E drive on PRIMARY and SECONDARY are just local attached volumes and not part of any SAN. As long as the E drive shows up as a local attached disk, DataKeeper can replicate it from one server to another. You can mix and match SAS, iSCSI, SAN, VHD, or any other storage type as DataKeeper is storage agnostic.
After you have configured your basic cluster as described in Part 1 of my series, run the DataKeeper setup.exe to install SteelEye DataKeeper Cluster Edition on both nodes of the cluster. You will be prompted to enter your license key at the end of the install. Enter your license and reboot your servers when prompted. You are now ready to create your mirror. Launch the DataKeeper GUI and follow the instructions below to create your mirror.
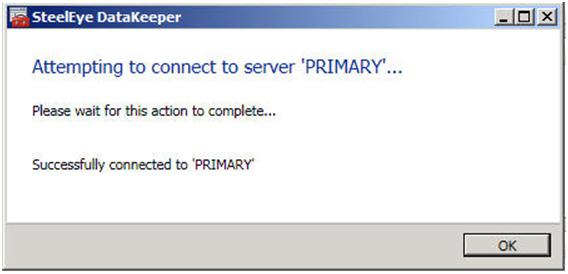
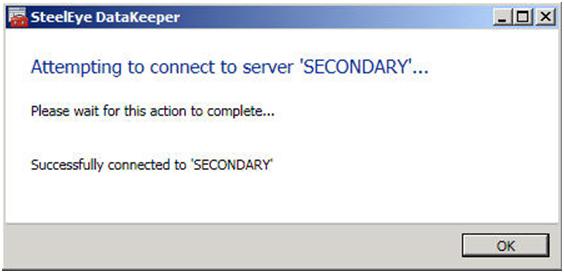
Click on “Connect to Server”.

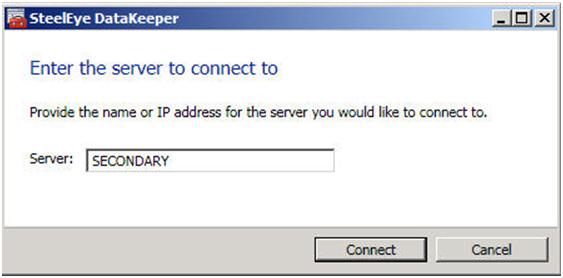
Figure 1 – Connect to your source and target servers
Enter the name of the first server. Click Connect.

Enter the name of the second server, click Connect
Now click Create Job. That will launch the Create Job wizard.
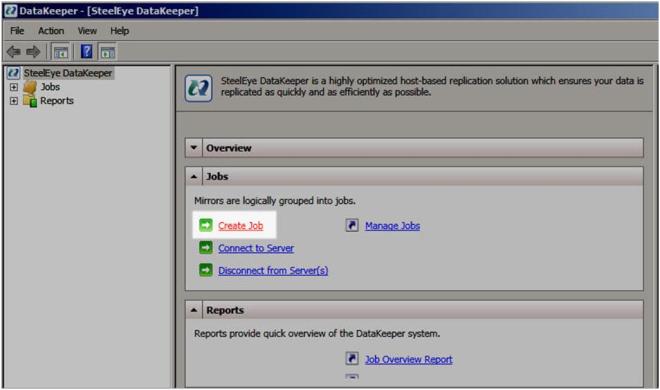
Figure 2 – Create your Job
Give your job a name and description. These can be anything you like.

Figure 3 – Give your Job a name and description
Choose the following:
- Source Server – where the data will be replicated from
- Network adapter – the network where the replication traffic will travel
- Volume – the volume you want to replicate
Click Next to continue.

Figure 4 – Choose you source server and network to use for replication
Choose the following:
- Target Server – where the data will be replicated to
- Network adapter – the network where the replication traffic will travel
- Volume – the volume you want to replicate
Click Next to continue.

Figure 5 – Choose your target server
Choose the following:
- Compression Level – If you have a 100 Mbps or faster network for replication, leave it set to none. If you have a WAN that is less that 100 Mbps, you may benefit from enabling compression. Settings somewhere in the middle tend to give you the best performance of compression vs. CPU overhead associated with enabling compression.
- Asynchronous vs. Synchronous – Asynchronous replication is generally acceptable in most environments and is definitely required in high-latency WAN environments. I wrote a whole blog post on this topic, so if you have any questions, check out my article on Asynchronous vs. Synchronous replication.
- Maximum bandwidth – you can think of this as a “poor man’s” QOS. If you want to ensure that replication never exceeds a certain threshold of your WAN capacity, you can put a limiter on the amount of bandwidth it can consume. Unless you have a good reason to set it, it is better off leaving it set to 0.
Click Done to create your mirror.
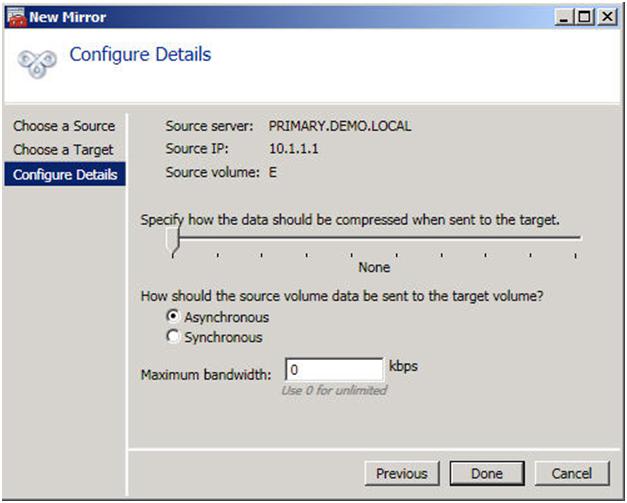
Figure 6 – Choose your mirror settings
Now if you take a look at your DataKeeper GUI, it will look similar to the following.

Figure 7 – Your mirror is now created
Once you have created your mirror, you need to make your mirror available in the Microsoft Cluster “Available Storage”. There are a few ways to do this, but the most straight forward way is to use the Windows PowerShell CLI. Below is an example that shows how to take the existing mirror we just created on the E drive and add it to the cluster “Available Storage”, move it to the PRIMARY node and bring it in-service
Import-Module FailoverClusters
Add-ClusterResource -Name “DataKeeper Volume E” -ResourceType “DataKeeper Volume” -Group “Available Storage”
Get-ClusterResource “DataKeeper Volume E” | Set-ClusterParameter VolumeLetter E
Move-ClusterGroup “Available Storage” -Node primary
Start-ClusterResource “DataKeeper Volume E”
For more information on PowerShell and the available commands for use with Failover Clustering, check out this great blog post from Symon Perriman of the Microsoft Failover Clustering Team.
http://blogs.msdn.com/clustering/archive/2008/12/20/9243367.aspx
You are now going to repeat the above steps to add any additional mirrors that you will use in your cluster. In our case, we are going to create a mirror of the F drive and use it to cluster the MSDTC. After you have added your additional mirrors and added them to Available Storage, your DataKeeper GUI should look something like this.
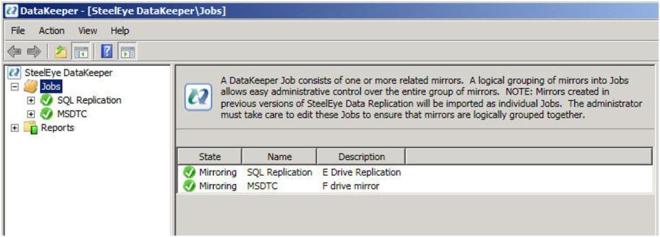
Figure 8 – After adding the second Job for the MSDTC resource
And your Failover Cluster Manager GUI should look like this.
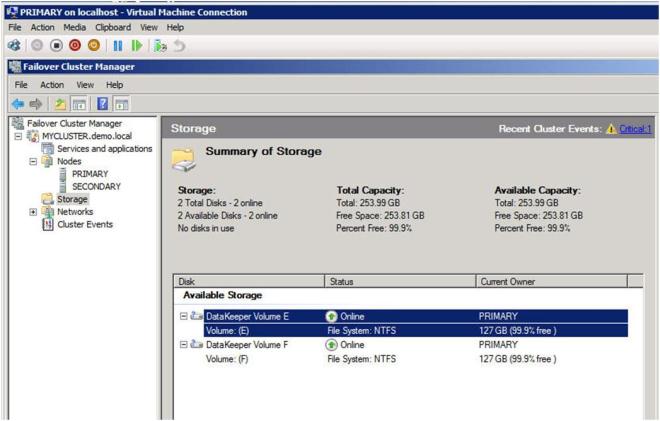
Figure 9 – After adding the second DataKeeper resource
Clustering MSDTC
IMPORTANT NOTE – There is a hotfix that is required in order to support DTC with 3rd party disk resources. Please see the following KB article and apply the howfix to all cluster nodes. http://support.microsoft.com/kb/978476
SQL 2008 is very dependent upon MSDTC, so it is highly recommended that you cluster the MSDTC resource before you cluster your SQL resource. The following articles are provided for your reference for configuration and management of your MSDTC resource.
http://technet.microsoft.com/en-us/library/cc770748(WS.10).aspx
http://technet.microsoft.com/en-us/library/cc771540(WS.10).aspx
You will start by opening the Failover Cluster Manager GUI and then choose “Configure a Service or Application”.
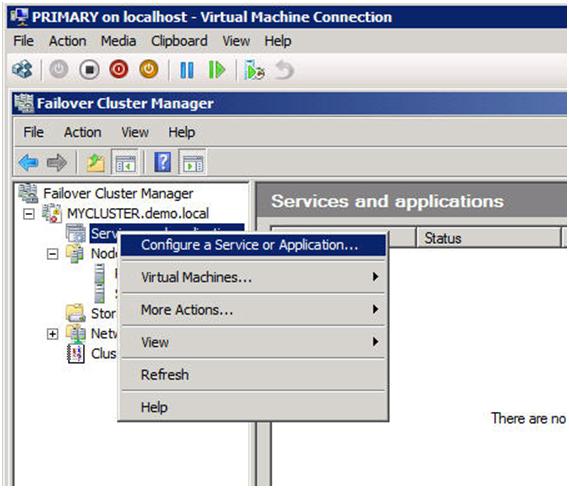
Figure 10 – Creating a MSDTC resource
You will then choose “Distributed Transaction Coordinator” and click Next

Figure 11 – Choose your Service or Application
Give the MSDTC resource a name and unique IP address. These should be unique to MSDTC and not the same as you will use later when you create your SQL resource.
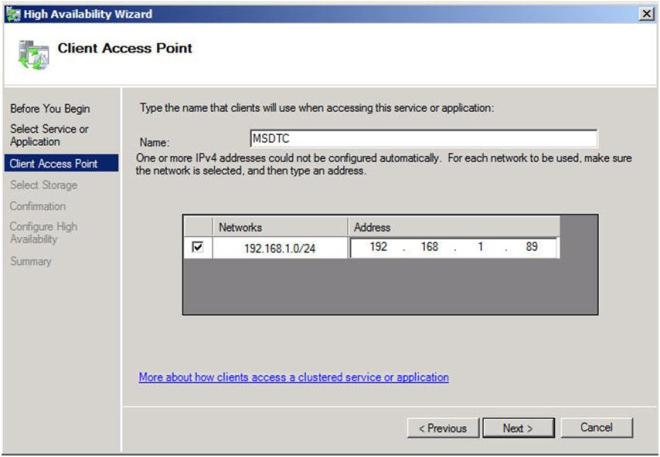
Figure 12 – Choose a name and IP address
Choose the volume where you will store the data for the MSDTC resource. In our case we are choosing the replicated F drive.
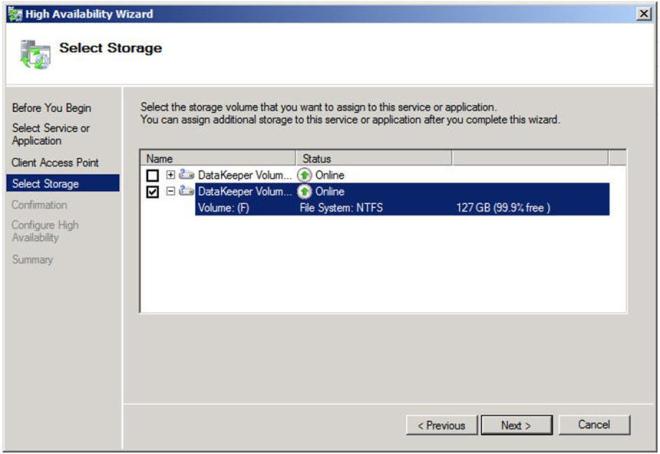
Figure 13 – Choose a dedicated volume for the MSDTC resource
Confirm your information and click Next to continue.
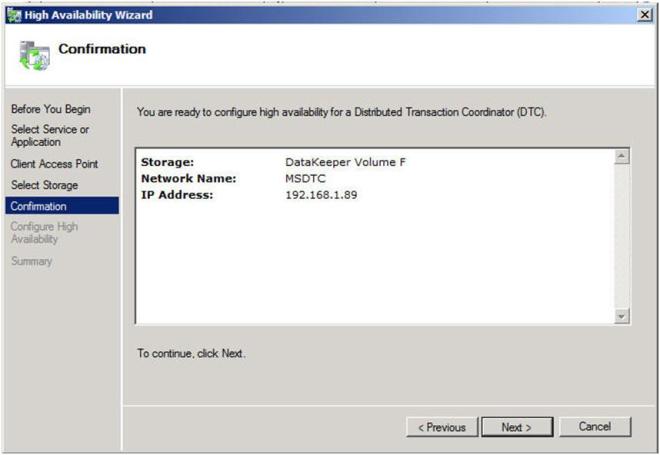
Figure 14 – Click Next to configure the DTC resource
Congratulations, you have succesfully configured the DTC resource. Click Finish.

Figure 15 – A successfully configured DTC resource
We are just about ready to begin the installation of the first node of the SQL Server Cluster, however, there is one thing we need to do in preparation – Slip Stream SQL 2008 SP1 onto the SQL Server 2008 RTM install media.
Slip stream SQL SP1 onto your SQL 2008 install media
What I have discovered is that SQL Server 2008 will not install on Windows Server 2008 R2 without first slipstreaming SQL Server 2008 SP1 onto your SQL 2008 install media. Here is a great article that describes how to slipstream SQL Server 2008 RTM and Service Pack 1. After I read that article and successfully slipstream SP1 onto SQL 2008 RTM, I found the following Microsoft KB article that describes the same procedure. You may get an error that looks like the following if you try to install SQL without first slipstreaming SP1 onto the media.
There was an error setting private property ‘RequireKerberos’ to value ‘1’
I followed the instructions detailed in the first article and copied my SQL 2008 with SP1 install to the C:\ drive of both nodes in my cluster. In the instructions below, I will do the installation from the local disk of each cluster node.
Installing your first cluster node
Now that you have your SQL Server 2008 SP1 installation media ready to go, you are ready to install your first SQL node. There is one major “gotcha” when it comes to installing SQL on a multi-node cluster. In order for you to install SQL on a multi-node cluster, you must first pass the Windows Server 2008 Failover Cluster validate process. Unfortunately, a multi-site cluster is exempt from passing the storage related test, so you never are able to actually “pass” the validation as far as SQL is concerned. It took a little investigation on my part, but what I have come to find is that there is a command line parameter that allows you to skip the validation test on the SQL 2008 installation. Here is the command line.
Setup /SkipRules=Cluster_VerifyForErrors /Action=InstallFailoverCluster
To launch the SQL setup, open a Command window, browse to your SQL 2008 with SP1 install directory and type the command as shown below.

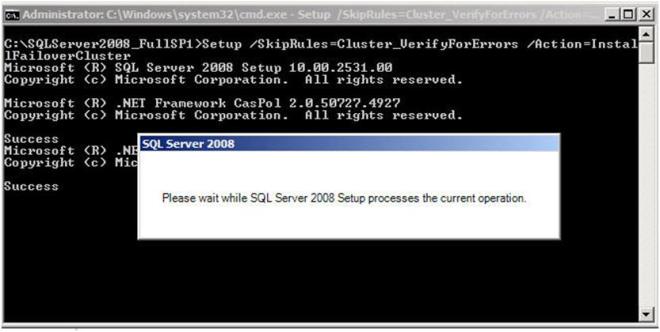
If everything goes as planned, you should see the screen below. Click OK to continue.
Enter your product key and click Next
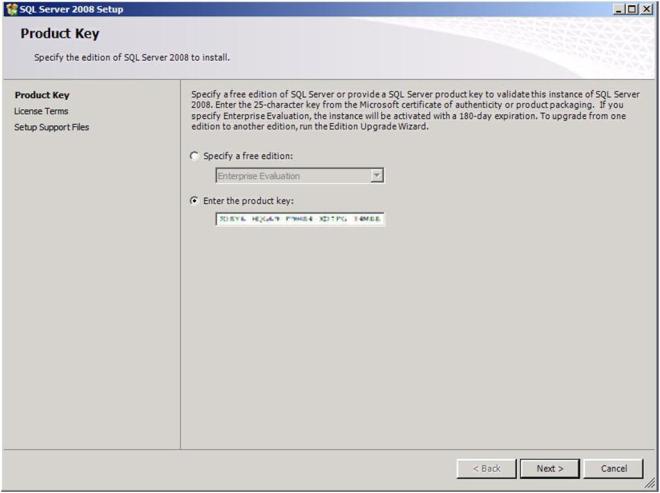
Figure 17 – Enter your product key
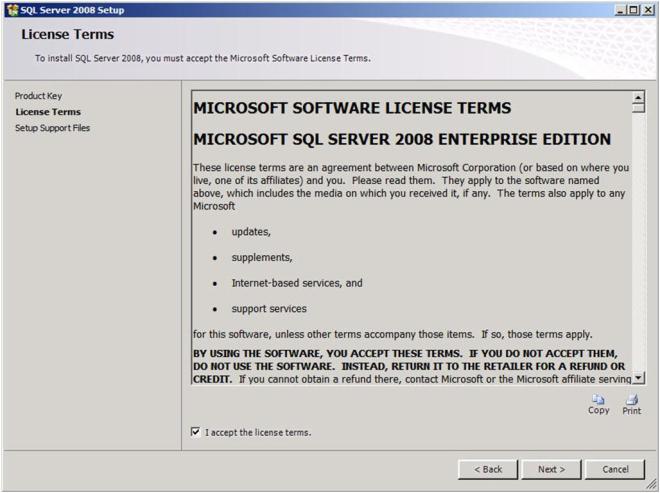
Accept the license agreement and click Next
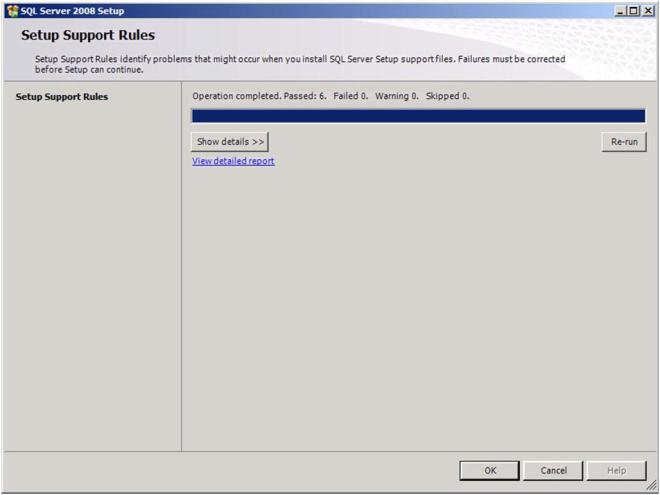
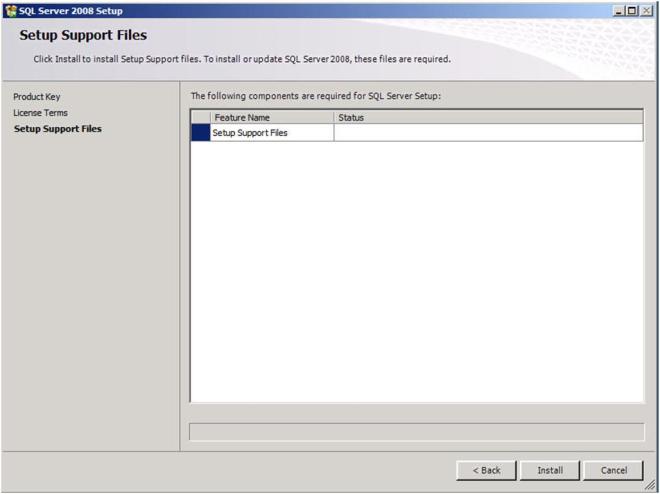
Click Install to install the Setup Support Files
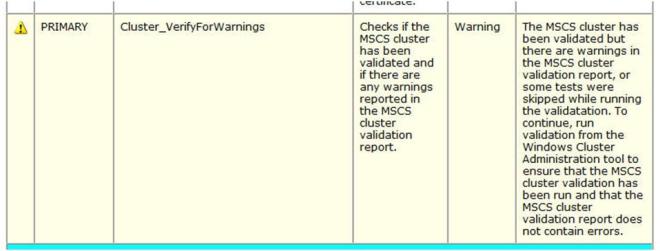
At the end of the Setup for the Support Files you will receive a warning. Click on Show details and you will see the message below. You can click Next, ignoring this message since it is expected in a multi-site or non-shared storage cluster.
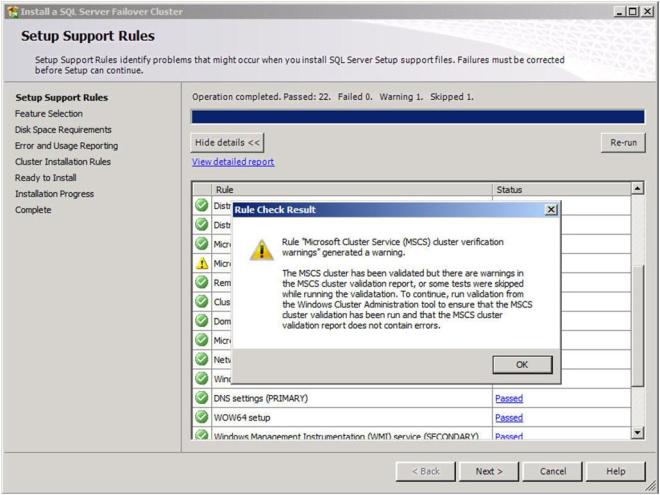
Figure 18 – The warning is expected in a multi-site or non-shared storage cluster
Choose the features you would like to install and click Next. Leave the “Shared Feature” directory set to the C drive as the SQL binaries should not be installed on the replicated volume.
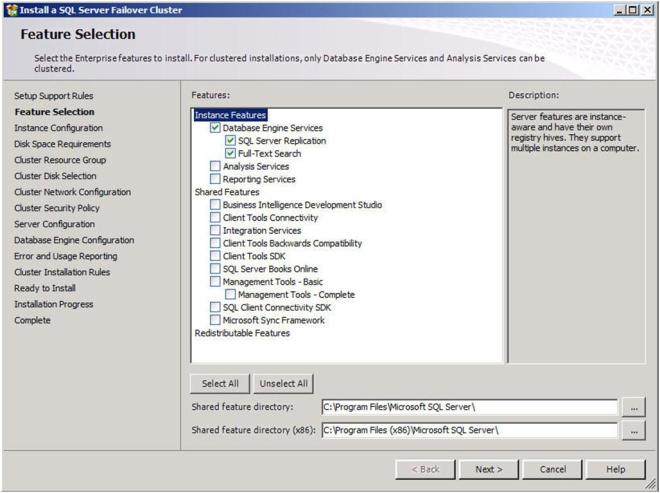
Figure 19 – Choose your features
On the next screen, you will choose a network name for your SQL Server. This will be the name that all of the clients will connect to. Assuming this is the default instance, leave the Instance ID and Instance root directory set to the defaults. Do not move the instance root directory to the replicated volume.

Figure 20 – Choose your SQL Network Name
It is recommended that you have separate domain accounts for SQLServer and SQLAgent. You can take the time to create these accounts now if you have not already done so. These accounts require no special permissions, as this install process will give them the permissions that they require.
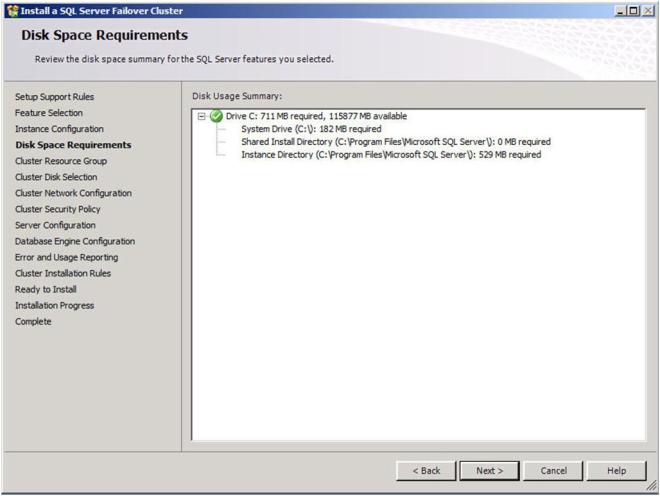
Confirm you have enough disk space and click Next to continue.
Choose the default settings to allow a new cluster resource group named “SQL Server (MSSQLSERVER)” to be created.

Figure 21 – Allow the wizard to create a new cluster resource group for you
Choose a replicated volume that is still available, in our case the E:\ drive. Click Next to continue.
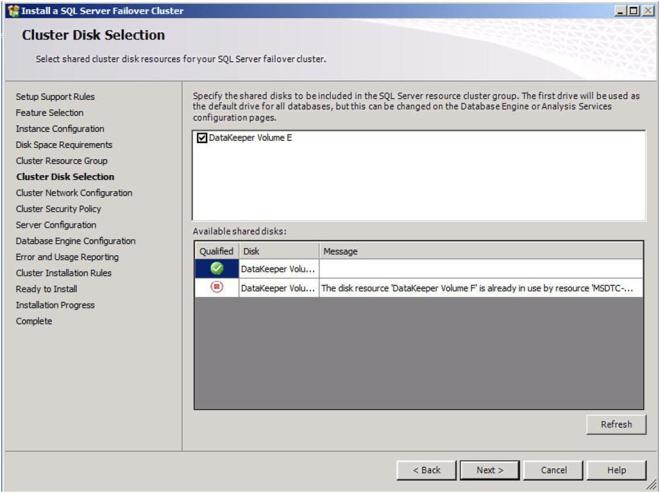
Figure 22 – Choose your replicated volume
Now you will choose the IP address you want associated with the SQL cluster resource. You could leave it set to use DHCP if you wish.
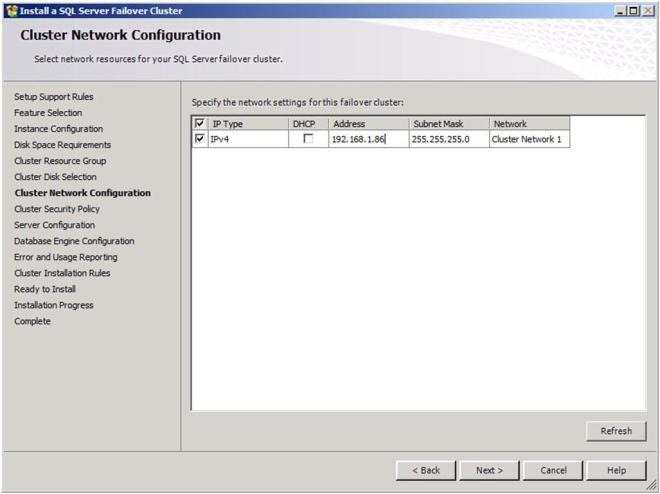
Figure 23 – Choose your SQL cluster IP address
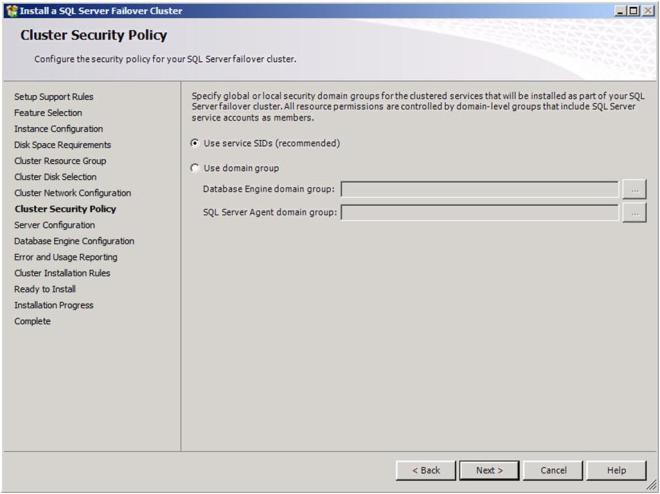
Choose your security settings and click Next
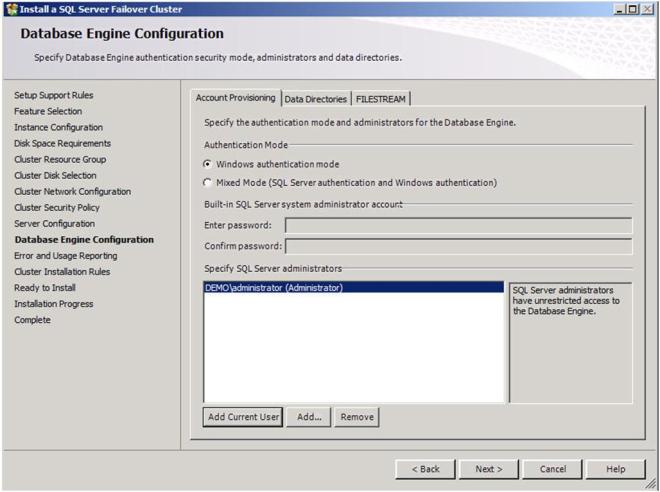
Add any SQL Server administrators and choose your authentication mode and then click Next
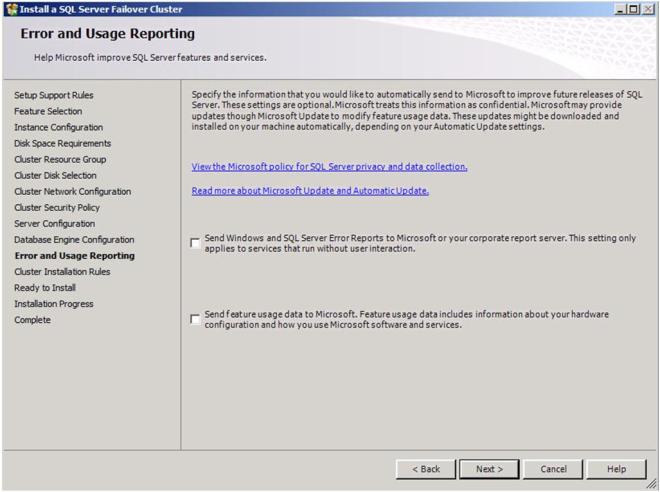
Choose your Error and Usage Reporting options and click Next
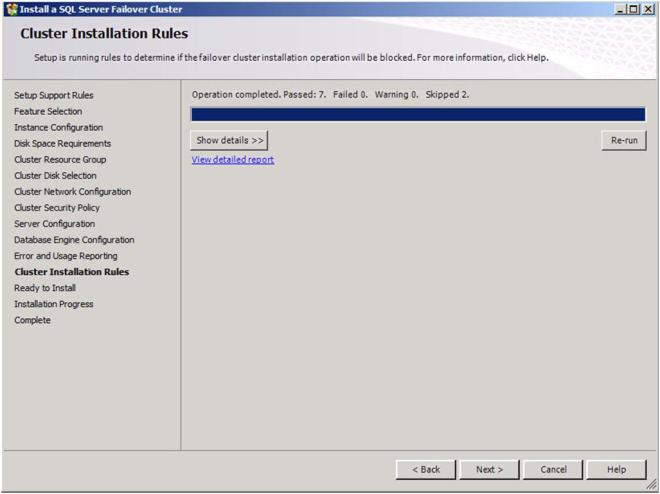
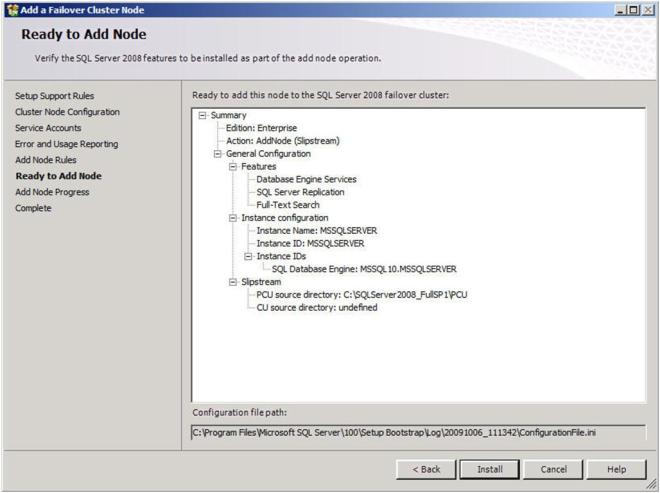
You will once again see some warnings related to the validation process. You can ignore those messages as they are to be expected in a multi-site SQL Server cluster.
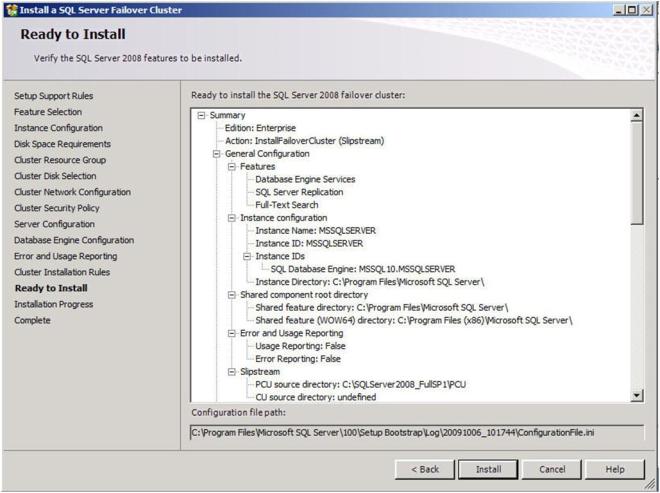
Click Install to begin the installation process
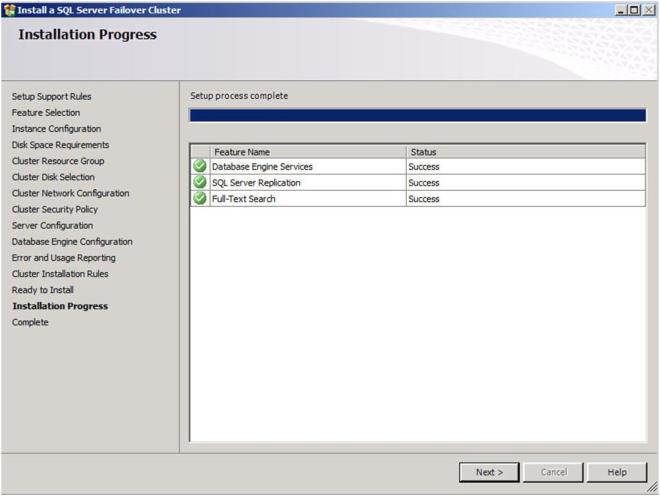
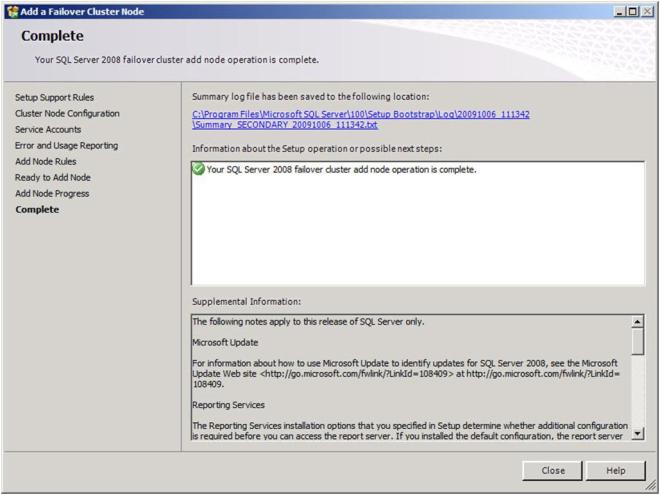
If everything installs as expected, you should see the following screens. Click Next then Close to finish the installation.
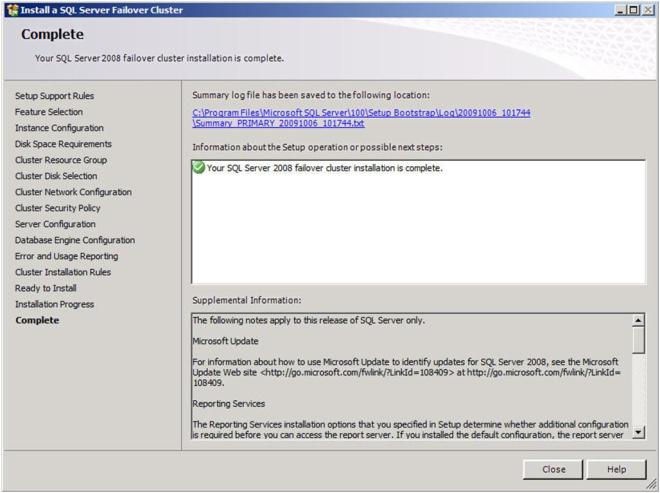
Congratulations, you have successfully installed the first node of your multi-site SQL Server Cluster. Now we will install the second node of the cluster.
Install the second cluster node
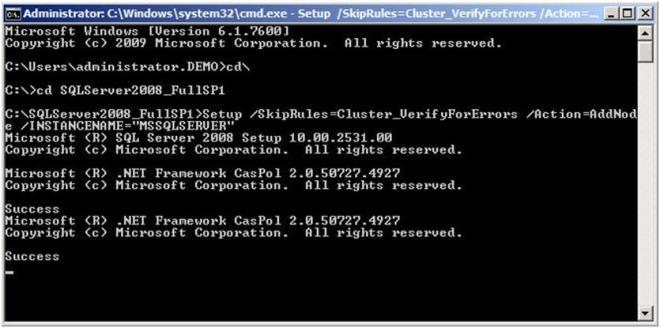
Installing the second cluster node is similar to installing the first node. We need to run SQL Setup once again from the command line so that we can skip the Validate process. So, from the 2nd node, open up your command prompt and run the following command.
-
Install SQL 2008 SP1 (merged setup) on the 2nd node using the following command:
Setup /SkipRules=Cluster_VerifyForErrors /Action=AddNode /INSTANCENAME=”MSSQLSERVER”
*Note: This assumes you installed the default instance on the 1st node
That will launch the install wizard as shown below. Click OK to continue.
Enter your product key and click next.

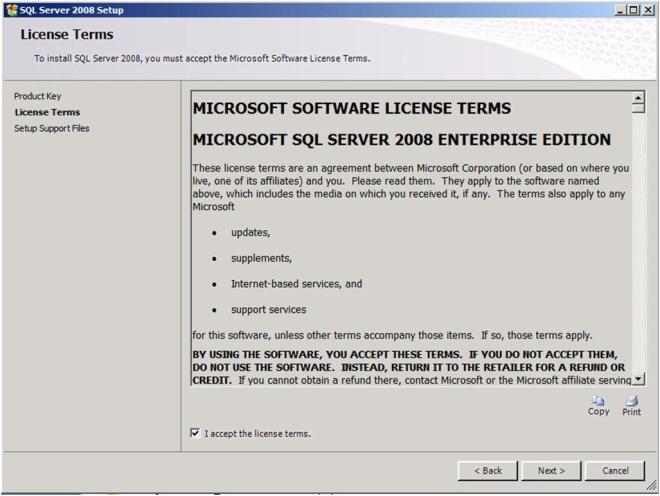
Accept the license terms and click Next
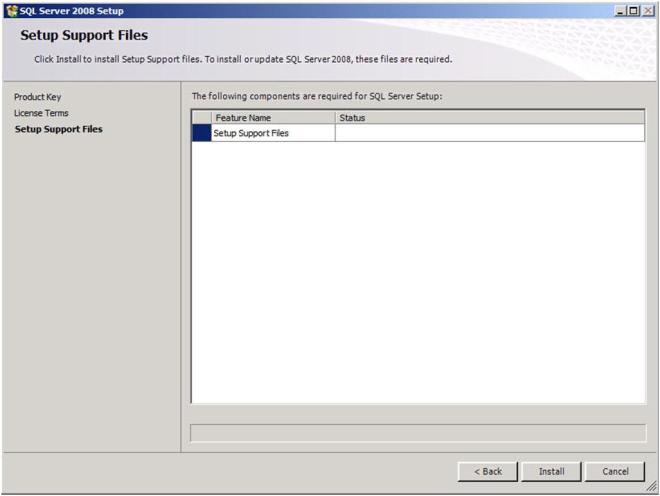
Click install to install the Setup Support files.
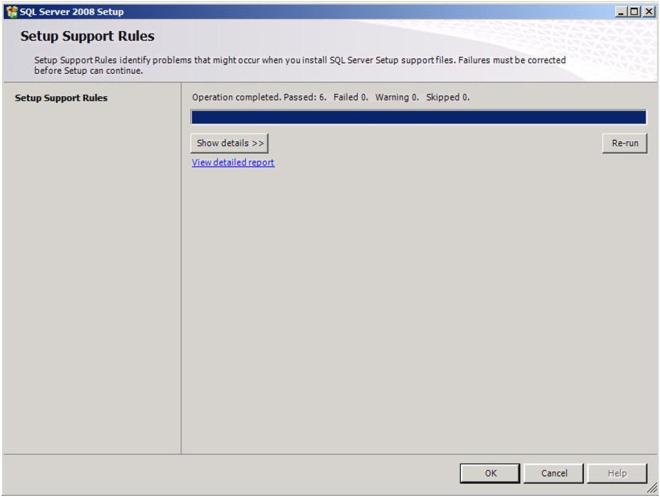
You can once again ignore the warning that some cluster validation tests have been skipped. This is to be expected in a multi-site cluster and non-shared storage clusters.
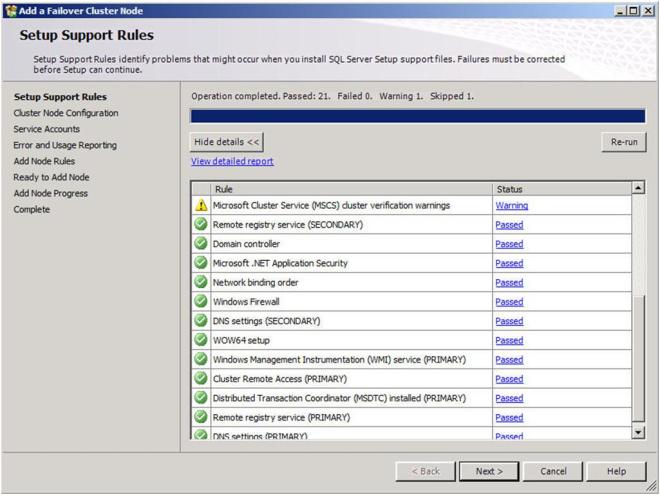
Verify you are adding the node to the righ instance and click Next.

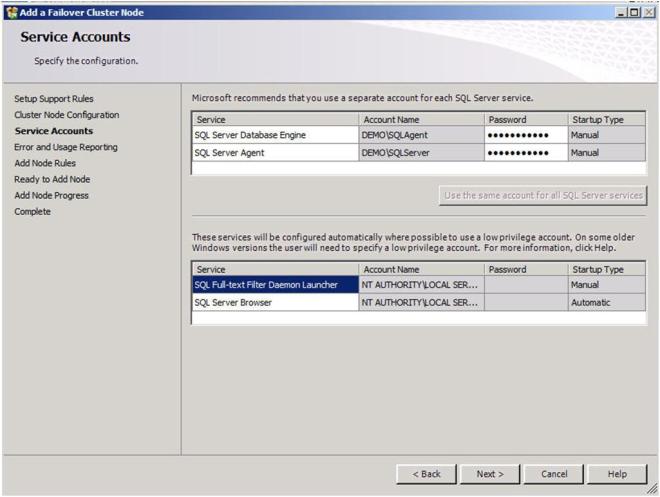
Add the passwords to the service accounts and click Next

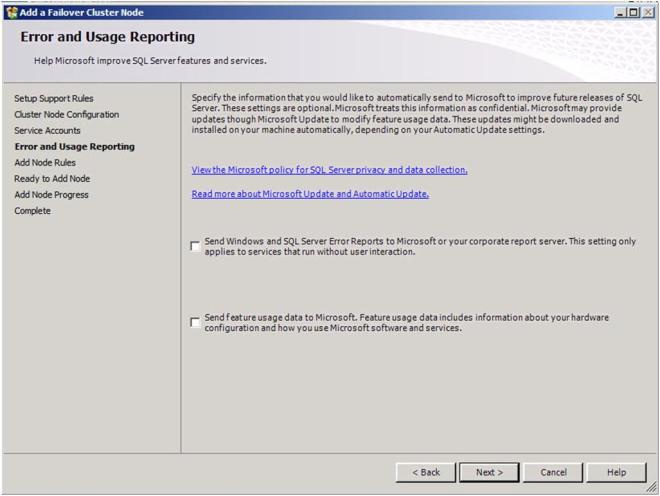
Choose your Error and Usage Reporting options and click Next
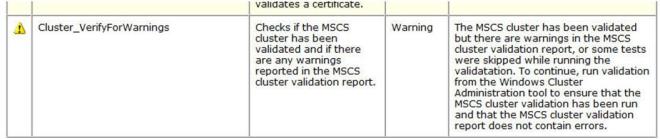
Once again, ignore the warning about the skipped operations.
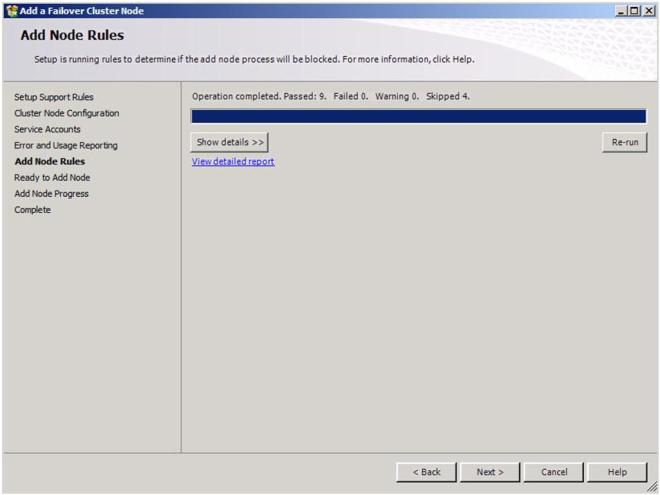
Click Install to begin the installation process.
If everything goes as expected, you should see the following screen.
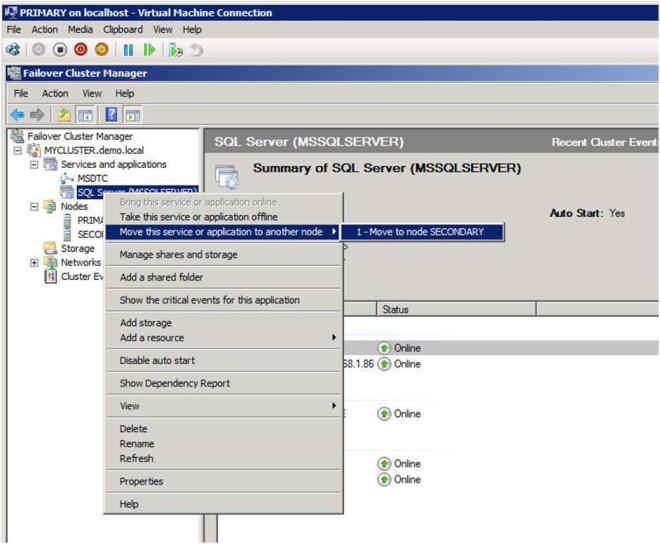
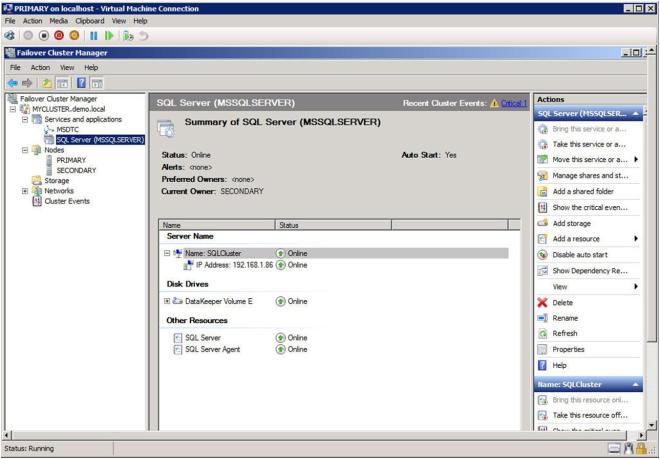
Now that you have a fully functional two node cluster, you probably should testing things out by doing some manual switchovers. Right click on the resource and choose “Move to node SECONDARY”.
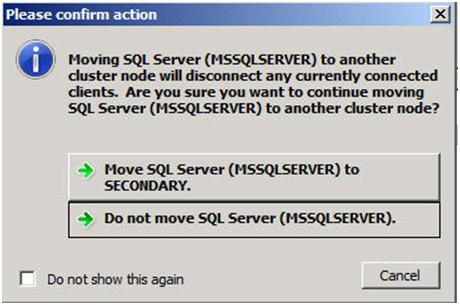
If everything is configured properly, your Failover Cluster GUI should look as follows.
Conclusion
I believe that SQL clusters with replicated storage make a lot of sense. Storage has always been a single point of failure of traditional clusters. You can eliminate that single point of failure by deploying a SQL Server cluster with replicated storage from SteelEye or any other Microsoft Multi-Site Cluster replication partner. I hope you found this article informative. If you have any questions or suggestions, please add your comments!
Step-by-Step: Configuring a 2-node multi-site cluster on Windows Server 2008 R2 – Part 2
Integrating your storage replication with Failover Clustering
Introduction
In Part 1 of this series, we took a look at the first steps required for building a multi-site cluster. We got to the point where we had a two node cluster that used a node and file share majority quorum, with no resources yet defined. In this section we will start where we left off and look at how your replication solution will integrate with your failover clustering. Because each vendor’s replication solution will be implemented differently, it is hard to have one document that describes them all. The important thing to remember is that you want to purchase a replication solution that integrates with failover clustering and is certified by Microsoft. Your choices are basically array based, appliance based or host based replication solutions. EMC makes both appliance-based and array-based replication solutions and seem to do a great job at both. EMC’s John Toner maintains a blog that is dedicated to Geographically Dispersed Clusters and if you are going the EMC route, I’m sure he could lead you in the right direction. All the major vendors have solutions, you will just need to contact them to get the details.
For this demonstration, I’m going to use a host based replication solution, SteelEye DataKeeper Cluster Edition, from my company, SteelEye Technology. It is so easy, that I thought instead of doing a long article, I would just record the steps and share it with you in a video. One of the advantages of host based replication is that you can utilize your existing storage, whether it is just some local attached disks, iSCSI or an expensive SAN. Host based replication can replicate across any storage devices.
Here is a summary of what you will see in the video.
-
Launch the SteelEye DataKeeper MMC Snap-in
- Create a new DataKeeper job, define mirror end points, network, compression, etc.
-
Launch the Failover Cluster MMC Snap-in
- Create a Hyper-V resource
- Add a DataKeeper Volume Resource
- Edit the properties of the DataKeeper Volume resource to associate it with the mirror created earlier
- Make the Virtual Machine configuration dependent upon the new DataKeeper volume resource
That’s it! You are now done. Sit back and enjoy your new Hyper-V multi-site cluster.
In Part 3 of this series, we will tackle SQL 2008 multi-site clusters on Windows Server 2008 R2. There are a few more steps and some tips and tricks you will definitely need to know, so make sure you check back to get all of the details. In the meantime, if you need assistance, leave me a comment or contact me through SIOS and I’d be glad to help you out.
Hyper-V Live Migration across Data Centers
There has recently been a lot of press heralding VMware’s limited support for vMotion across Data Centers, or “long-distance vMotion” as I have seen it called. The details of the solution can be found on Cisco’s website here. While I think that is just great, I’d like to remind people that Microsoft Hyper-V has this same functionality today and has a lot less requirements and restrictions than VMware’s long-distance vMotion.
Where VMware has VMwareHA, vMotion and Site Recovery Manager (SRM) to take care of virtual machine availability, Microsoft provides the same functionality with Windows Server Failover Clustering and in fact in some cases goes beyond what VMware can provide in terms of virtual machine availability as I described in a previous post.
What I’d like to focus on today is Microsoft’s competitive offering to “long-distance vMotion”. To achieve the same functionality in Hyper-V, you simply deploy a multi-site Hyper-V cluster using Windows Server Failover Clustering and your favorite host or storage based replication solution that is certified to work in a Windows Server 2008 multi-site cluster. By doing this, you can use your existing network infrastructure and your existing storage infrastructure to do Live Migrations across data centers. As far as requirements, they really are the same as any multi-site cluster, except I would recommend that you span your subnets to avoid client reconnection issues that occur when moving a virtual machine to a new subnet, as the clients could cache to old IP address until the TTL expires.
A demonstration video of Live Migration across data centers using Windows Server 2008 R2 Hyper-V and SteelEye DataKeeper Cluster Edition can be seen here.
Step-by-Step: Configuring a 2-node multi-site cluster on Windows Server 2008 R2 – Part 1
Creating your cluster and configuring the quorum: Node and File Share Majority
Introduction
Welcome to Part 1 of my series “Step-by-Step: Configuring a 2-node multi-site cluster on Windows Server 2008 R2”. Before we jump right in to the details, let’s take a moment to discuss what exactly a multi-site cluster is and why I would want to implement one. Microsoft has a great webpage and white paper that you will want to download to get you all of the details, so I won’t repeat everything here. But basically a multi-site cluster is a disaster recovery solution and a high availability solution all rolled into one. A multi-site cluster gives you the highest recovery point objective (RTO) and recovery time objective (RTO) available for your critical applications. With the introduction of Windows Server 2008 failover clustering a multi-site cluster has become much more feasible with the introduction of cross subnet failover and support for high latency network communications.
I mentioned “cross-subnet failover” as a great new feature of Windows Server 2008 Failover Clustering, and it is a great new feature. However, SQL Server has not yet embraced this functionality, which means you will still be required to span your subnet across sites in a SQL Server multi-site cluster. As of Tech-Ed 2009, the SQL Server team reported that they plan on supporting this feature, but they say it will come sometime after SQL Server 2008 R2 is released. For the foreseeable future you will be stuck with spanning your subnet across sites in a SQL Server multi-site cluster. There are a few other network related issues that you need to consider as well, such as redundant communication paths, bandwidth and file share witness placement.
Network Considerations
All Microsoft failover clusters must have redundant network communication paths. This ensures that a failure of any one communication path will not result in a false failover and ensures that your cluster remains highly available. A multi-site cluster has this requirement as well, so you will want to plan your network with that in mind. There are generally two things that will have to travel between nodes: replication traffic and cluster heartbeats. In addition to that, you will also need to consider client connectivity and cluster management activity. You will want to be sure that whatever networks you have in place, you are not overwhelming the network or you will have unreliable behavior. Your replication traffic will most likely require the greatest amount of bandwidth; you will need to work with your replication vendor to determine how much bandwidth is required.
With your redundant communication paths in place, the last thing you need to consider is your quorum model. For a 2-node multi-site cluster configuration, the Microsoft recommended configuration is a Node and File Share Majority quorum. For a detailed description of the quorum types, have a look at this article.
The most common cause of confusion with the Node and File Share Majority quorum is the placement of the File Share Witness. Where should I put the server that is hosting the file share? Let’s look at the options.
Option 1 – place the file share in the primary site.
This is certainly a valid option for disaster recovery, but not so much for high availability. If the entire site fails (including the Primary node and the file share witness) the Secondary node in the secondary site will not come into service automatically, you will need to force the quorum online manually. This is because it will be the only remaining vote in the cluster. One out of three does not make a majority! Now if you can live with a manual step being involved for recovery in the event of a disaster, then this configuration may be OK for you.
Option 2 – place the file share in the secondary site.
This is not such a good idea. Although it solves the problem of automatic recovery in the event of a complete site loss, it exposes you to the risk of a false failover. Consider this…what happens if your secondary site goes down? In this case, your primary server (Node1) will go also go offline as it is now only a single node in the primary site and will no longer have a node majority. I can see no good reason to implement this configuration as there is too much risk involved.
Option 3 – place the file share witness in a 3rd geographic location
This is the preferred configuration as it allows for automatic failover in the event of a complete site loss and eliminates any the possibility of a failure of the secondary site causing the primary node to go offline. By having a 3rd site host the file share witness you have eliminated any one site as a single point of failure, so now the cluster will act as you expect and automatic failover in the event of a site loss is possible. Identifying a 3rd geographic location can be challenging for some companies, but with the advent of cloud based utility computing like Amazon EC2 and GoGrid, it is well within the reach of all companies to put a file share witness in the clouds and have the resiliency required for effective multi-site clusters. In fact, you may consider the cloud itself as your secondary data center and just failover to the cloud in the event of a disaster. I think the possibilities of cloud based computing and disaster recovery configurations are extremely enticing and in fact I plan on doing a whole blog post on a just that in the near future.
Configure the Cluster
Now that we have the basics in place, let’s get started with the actual configuration of the cluster. You will want to add the Failover Clustering feature to both nodes of your cluster. For simplicity sake, I’ve called my nodes PRIMARY and SECONDARY. This is accomplished very easily through the Add Features Wizard as shown below.
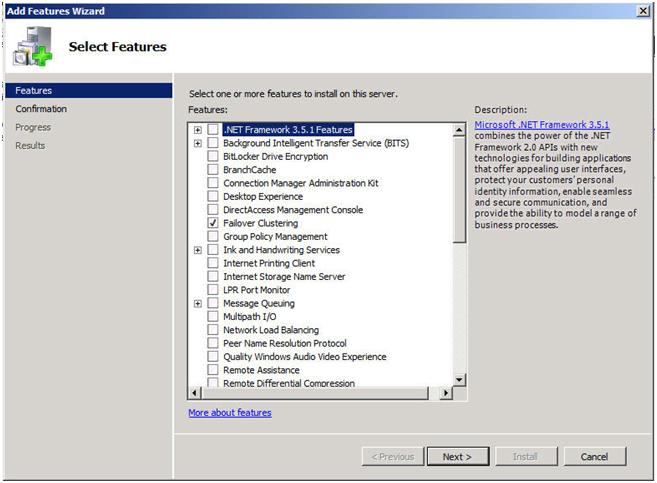
Figure 1 – Add the Failover Clustering Role
Next you will want to have a look at your network connections. It is best if you rename the connections on each of your servers to reflect the network that they represent. This will make things easier to remember later.
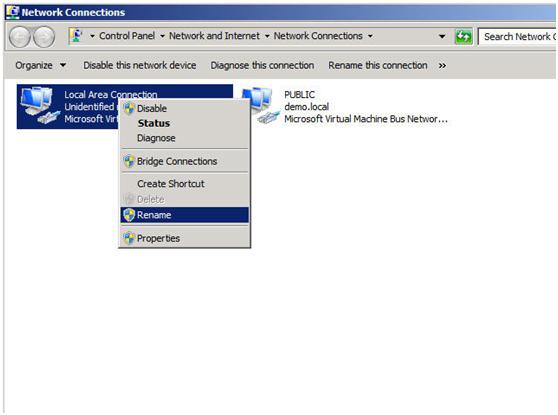
Figure 2- Change the names of your network connections
You will also want to go into the Advanced Settings of your Network Connections (hit Alt to see Advanced Settings menu) of each server and make sure the Public network is first in the list.
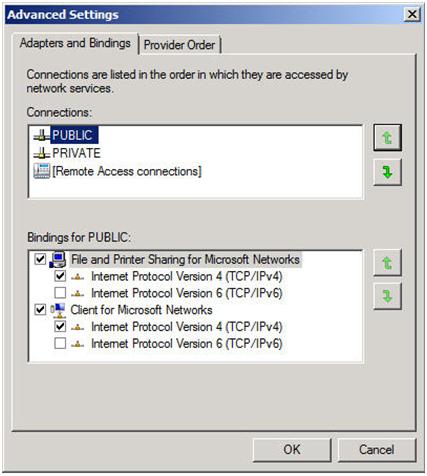
Figure 3- Make sure your public network is first
Your private network should only contain an IP address and Subnet mask. No Default Gateway or DNS servers should be defined. Your nodes need to be able to communicate across this network, so make sure the servers can communicate across this network; add static routes if necessary.
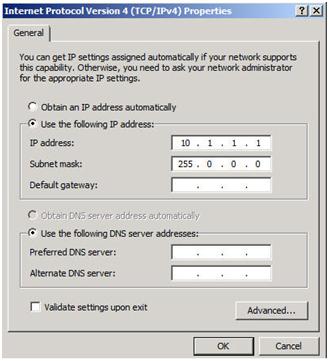
Figure 4 – Private network settings
Once you have your network configured, you are ready to build your cluster. The first step is to “Validate a Configuration”. Open up the Failover Cluster Manager and click on Validate a Configuration.
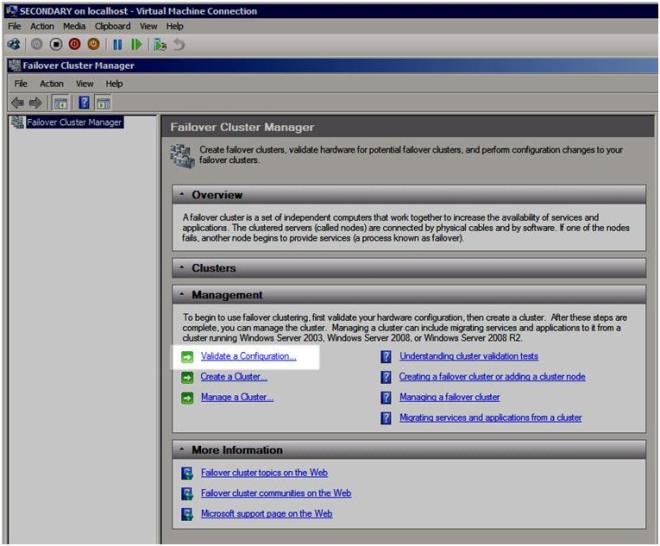
Figure 5 – Validate a Configuration
The Validation Wizard launches and presents you the first screen as shown below. Add the two servers in your cluster and click Next to continue.
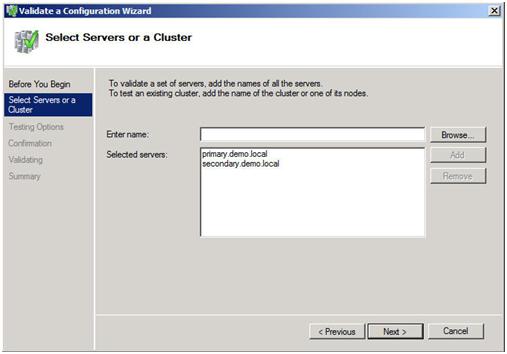
Figure 6 – Add the cluster nodes
A multi-site cluster does not need to pass the storage validation (see Microsoft article). Toskip the storage validation process,click on “Run only the tests I select” and click Continue.
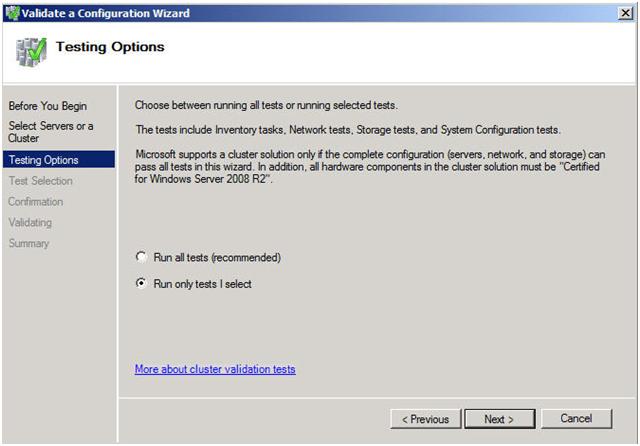
Figure 7 – Select “Run only tests I select”
In the test selection screen, unselect Storage and click Next
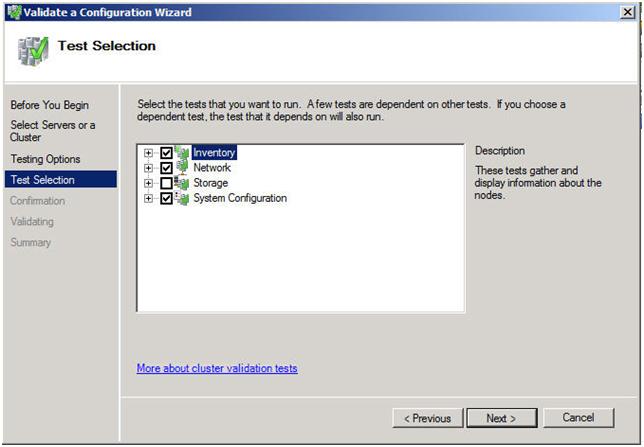
Figure 8 – Unselect the Storage test
You will be presented with the following confirmation screen. Click Next to continue.
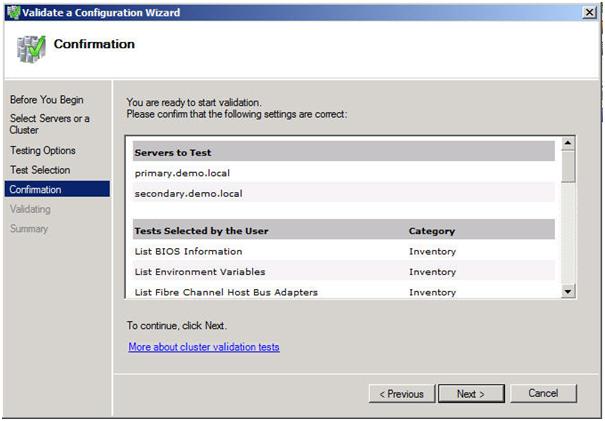
Figure 9 – Confirm your selection
If you have done everything right, you should see a summary page that looks like the following. Notice that the yellow exclamation point indicates that not all of the tests were run. This is to be expected in a multi-site cluster because the storage tests are skipped. As long as everything else checks out OK, you can proceed. If the report indicates any other errors, fix the problem, re-run the tests, and continue.
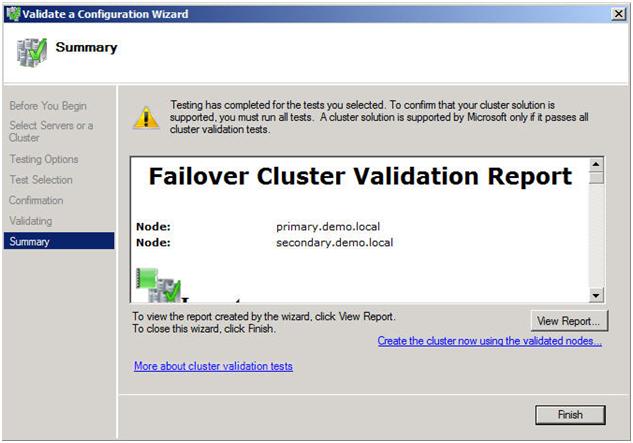
Figure 10 – View the validation report
You are now ready to create your cluster. In the Failover Cluster Manager, click on Create a Cluster.
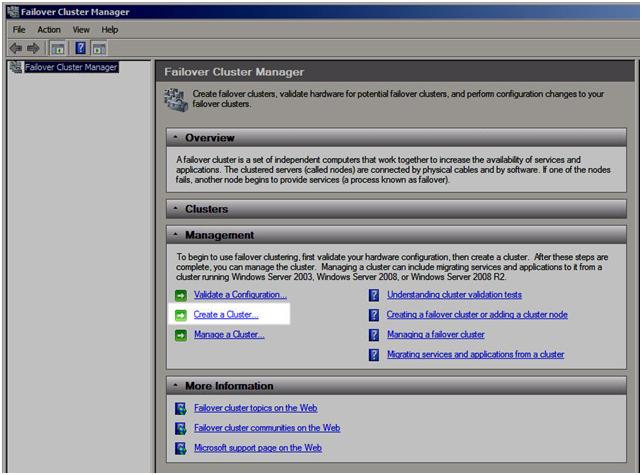
Figure 11 – Create your cluster
The next step asks whether or not you want to validate your cluster. Since you have already done this you can skip this step. Note this will pose a little bit of a problem later on if installing SQL as it will require that the cluster has passed validation before proceeding. When we get to that point I will show you how to by-pass this check via a command line option in the SQL Server setup. For now, choose No and Next.
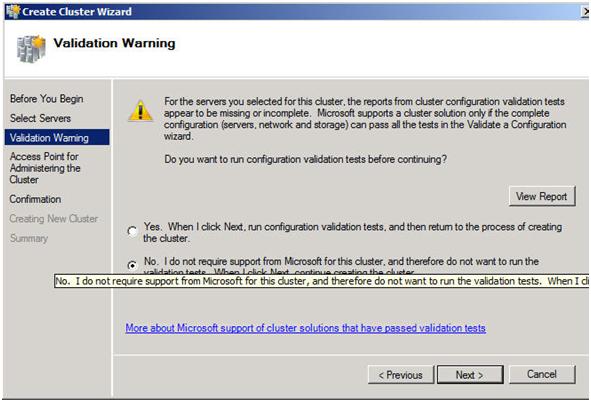
Figure 12 – Skip the validation test
The next step is that you must create a name for this cluster and IP for administering this cluster. This will be the name that you will use to administer the cluster, not the name of the SQL cluster resource which you will create later. Enter a unique name and IP address and click Next.
Note: This is also the computer name that will need permission to the File Share Witness as described later in this document.
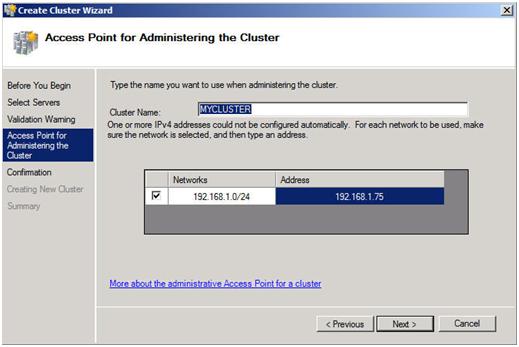
Figure 13 – Choose a unique name and IP address
Confirm your choices and click Next.
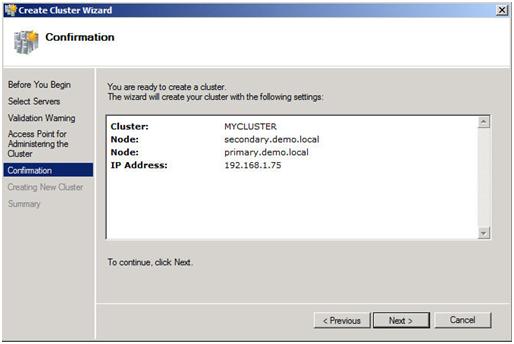
Figure 14 – Confirm your choices
Congratulation, if you have done everything right you will see the following Summary page. Notice the yellow exclamation point; obviously something is not perfect. Click on View Report to find out what the problem may be.
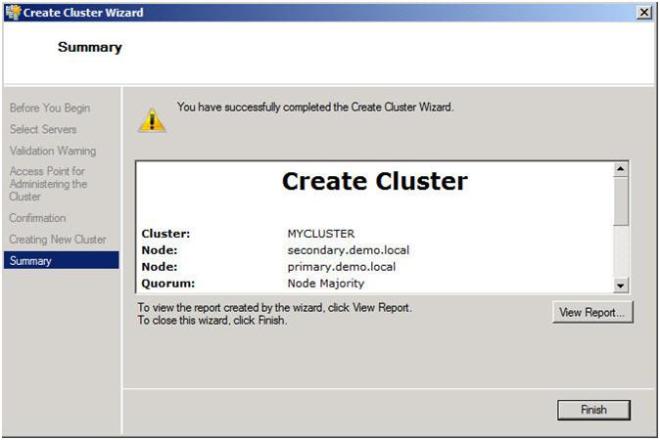
Figure 15 – View the report to find out what the warning is all about
If you view the report, you should see a few lines that look like this.

Figure 16 – Error report
Don’t fret; this is to be expected in a multi-site cluster. Remember we said earlier that we will be implementing a Node and File Share Majority quorum. We will change the quorum type from the current Node Majority Cluster (not a good idea in a two node cluster) to a Node and File Share Majority quorum.
Implementing a Node and File Share Majority quorum
First, we need to identify the server that will hold our File Share witness. Remember, as we discussed earlier, this File Share witness should be located in a 3rd location, accessible by both nodes of the cluster. Once you have identified the server, share a folder as you normally would share a folder. In my case, I create a share called MYCLUSTER on a server named DEMODC.
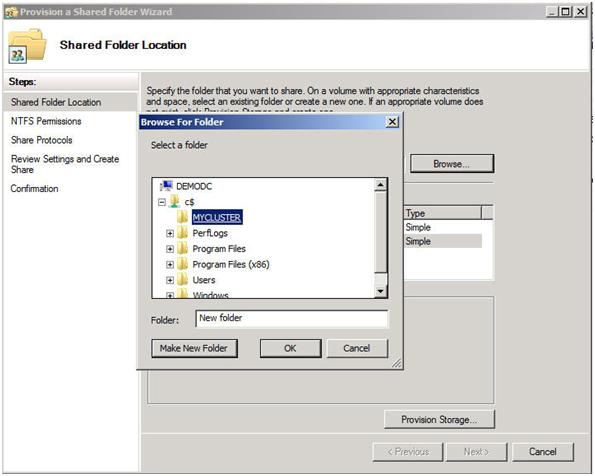
The key thing to remember about this share is that you must give the cluster computer name read/write permissions to the share at both the Share level and NTFS level permissions. If you recall back at Figure 13, I created my cluster and gave it the name “MYCLUSTER”. You will need to make sure you give the cluster computer account read/write permissions as shown in the following screen shots.

Figure 17 – Make sure you search for Computers
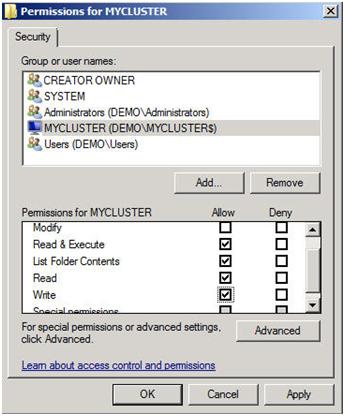
Figure 18 – Give the cluster computer account NTFS permissions
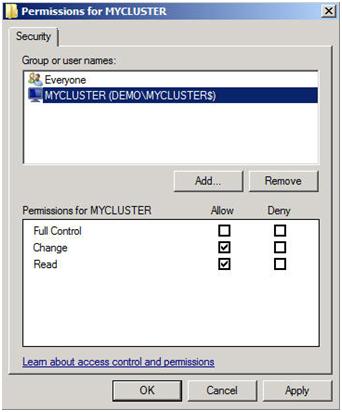
Figure 19 – Give the cluster computer account share level permissions
Now with the shared folder in place and the appropriate permissions assigned, you are ready to change your quorum type. From Failover Cluster Manager, right-click on your cluster, choose More Actions and Configure Cluster Quorum Settings.

Figure 20 – Change your quorum type
On the next screen choose Node and File Share Majority and click Next.
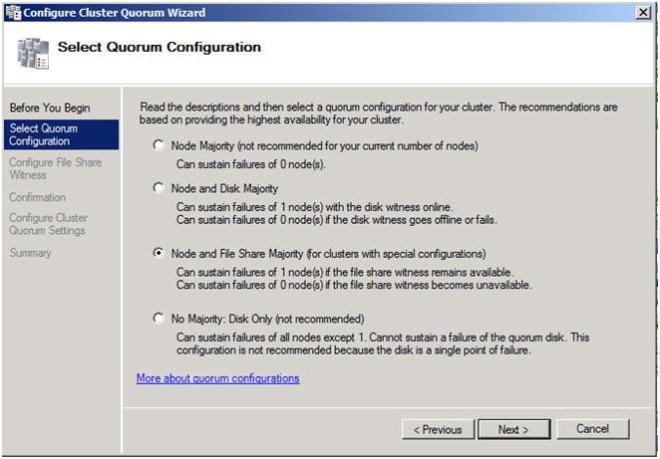
Figure 21 – Choose Node and File Share Majority
In this screen, enter the path to the file share you previously created and click Next.
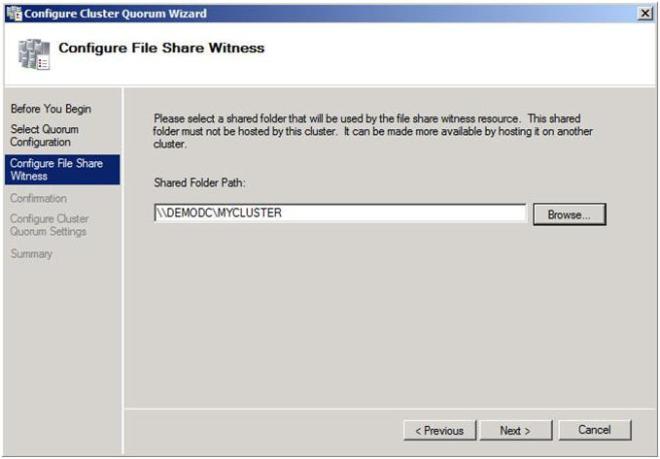
Figure 22 – Choose your file share witness
Confirm that the information is correct and click Next.
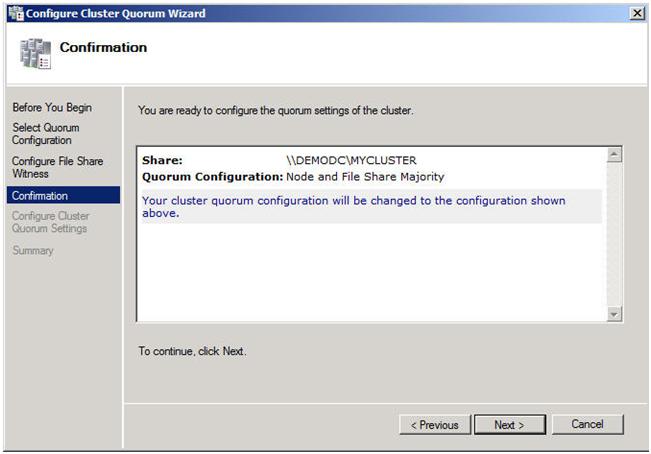
Figure 23 – Click Next to confirm your quorum change to Node and File Share Majority
Assuming you did everything right, you should see the following Summary page.
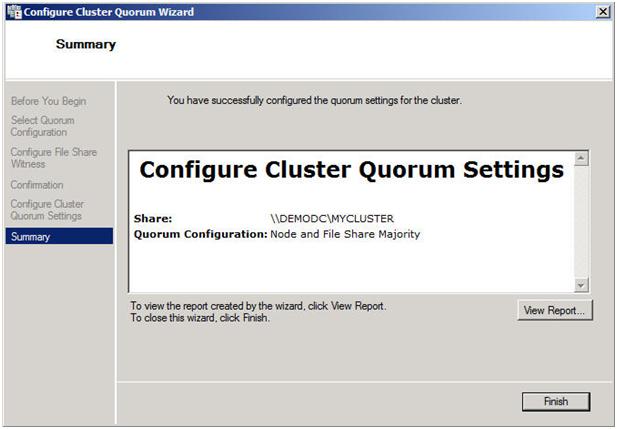
Figure 24 – A successful quorum change
Now when you view your cluster, the Quorum Configuration should say “Node and File Share Majority” as shown below.
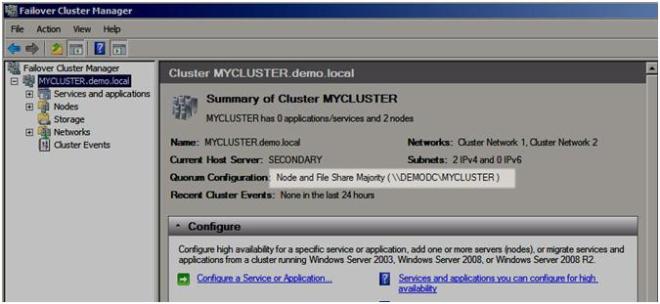
Figure 25 – You now have a Node and File Share Majority quorum
The steps I have outlined up until this point apply to any multi-site cluster, whether it is a SQL, Exchange, File Server or other type of failover cluster. The next step in creating a multi-site cluster involves integrating your storage and replication solution into the failover cluster. This step will vary from depending upon your replication solution, so you really need to be in close contact with your replication vendor to get it right. In Part 2 of my series, I will illustrate how SteelEye DataKeeper Cluster Edition integrates with Windows Server Failover Clustering to give you an idea of how one of the replication vendor’s solutions works.
Other parts of this series will describe in detail how to install SQL, File Servers and Hyper-V in multi-site clusters. I will also have a post on considerations for multi-node clusters of three or more nodes.
