This article is the first in a series of articles on Clustering Windows Server 2012. This first article covers the basics first steps of any cluster, regardless of whether you are clustering Hyper-V, SQL Server Failover Clusters, File Servers, iSCSI Target Server or others. Future articles will cover more detailed instructions for each cluster resource type, but the following information is applicable to ALL clusters.
I’m assuming you know a little bit about clusters and why you would want to build one, so I won’t go into those details in this particular post. I also assume you are familiar with Windows Server 2012 and basic things like DNS, AD, etc. It is also worth noting that in Windows Server 2012 failover clustering comes with every edition, unlike Windows Server 2008 R2 and earlier where failover clustering was only included in Enterprise Edition and above.
This particular series will focus on a basic 2-node cluster, where we have two servers (named PRIMARY and SECONDARY) running Windows Server 2012 in a Windows Server 2012 Domain (domain controller named DC). It also assumes that PRIMARY and SECONDARY can communicate with each other over two network connections I have labeled PUBLIC and PRIVATE. In production scenarios these network connections should run through entirely different network gear (switches, routers, etc) to eliminate any single point of failure.
This series will be written in a very basic, step-by-step style that walks you through the process in an ordered list with basic instructions and plenty of screen shots to help illustrate the procedure where needed. So let’s begin at the beginning…
-
Add the Failover Clustering Feature on all of the servers you want to add to the cluster
- Open the Server Manager Dashboard (this 1st step will need to be completed on both PRIMARY and SECONDARY)
- Click on Add roles and features

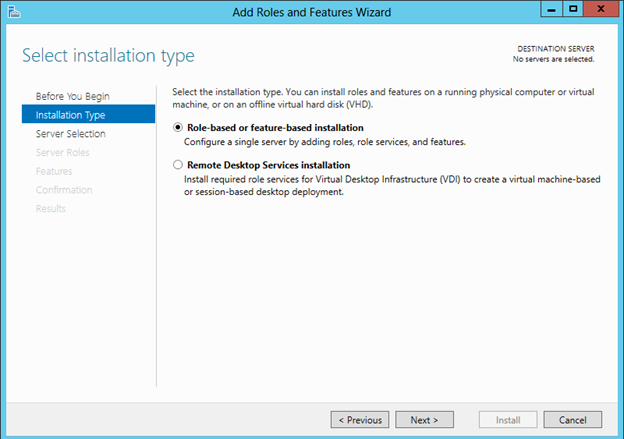
Choose Role-based or feature-based installation
Choose the server on which you wish to enable the failover cluster feature

- Skip over the Server Roles page
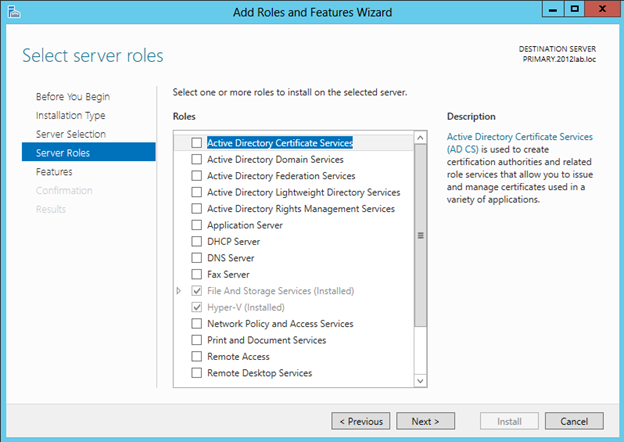
- On the Features page select Failover Clustering and click Next and then confirm the installation

- Before we start configuring the cluster, we need to consider what kind of storage the cluster will use. Traditionally clusters will use some sort of SAN, but with Windows 2012 not all clusters will use a SAN. For instance, if you are building a cluster to support SQL Server AlwaysOn Availability Groups your storage will be replicated by SQL Server, eliminating the need for a SAN. Also, with SMB 3.0 being support as cluster storage for Hyper-V and SQL Server you may not have a traditional SAN for storage. And let’s not forget clustered Storage Spaces with shared SAS drives is also a possibility in Windows Server 2012. In addition to the options mentioned above, you also can use local disks and 3rd party host based replication solutions like DataKeeper Cluster Edition which is an excellent alternative which I blog about pretty frequently.
For the purposes of this post, I am going to assume you have no shared storage. However, if you do have shared storage at this point you should configure you storage such that you have LUN(s) carved out and shared with each of the cluster nodes with one LUN being used as a disk witness and the remaining LUNs can be used for the application which you want to cluster. In lieu of a disk witness for our quorum, I am going to use a node and file share witness quorum type which I will explain later.
- Now that Failover Clustering is enabled on each server, you can open the Failover Cluster Manager on your PRIMARY server. The first thing we will want to do is to run “Validate Configuration” so we can identify any potential issues before we begin. Click on Validate Cluster

-
Step through the Validate a Configuration Wizard as shown in the following steps.
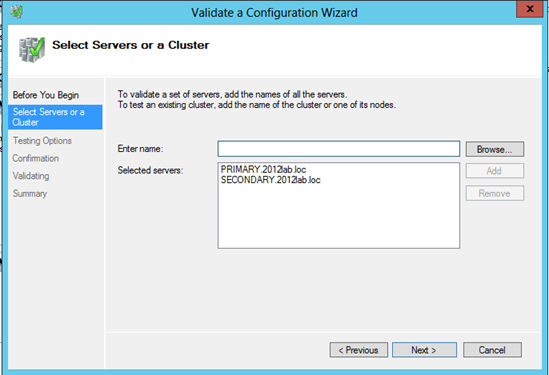
- Select the servers you want to cluster
- Run all tests (depending on what roles you have installed on the servers you may get more or less tests. For instance, if Hyper-V is enabled there are new Hyper-V specific tests for clusters)

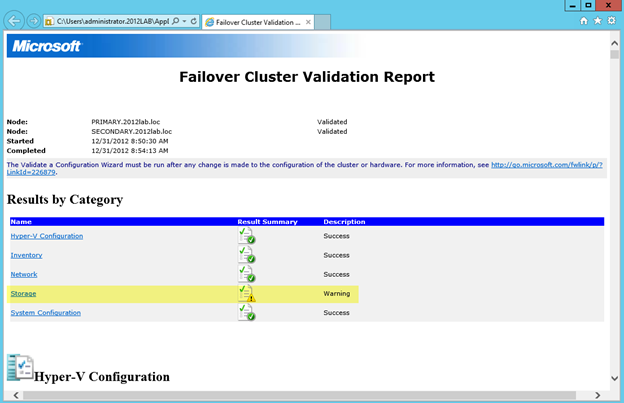
- Assuming you cluster “passed” validation you should have a report that looks similar to mine. You will notice that my report contains “warnings” but no errors. It is important for you to view the report and understand what warnings might be present, but you as long as you understand the warnings and they make sense for your particular environment you can move on. If you validation “failed”, you MUST fix the failures before moving on. Click View Report to view the report

- You will see all of my warnings are related to storage, so I am not concerned since I have not configured any shared storage, so I would expect some of these thests to produce warnings.
- Select the servers you want to cluster
-
Once Validation completes without any errors, you will automatically be thrown into the Create Cluster Wizard. Walk through this wizard as shown below to create your basic cluster.
- In this first screen you will choose a name for your cluster and pick an IP address that will be associated with this name in DNS. This name is just the name used to manage your cluster – this is NOT the name that your clients will use to connect to the clustered resource(s) you will eventually create. Once you create this access point a new computer object will be created in AD with this name and a DNS A record will be created with this name and IP address.

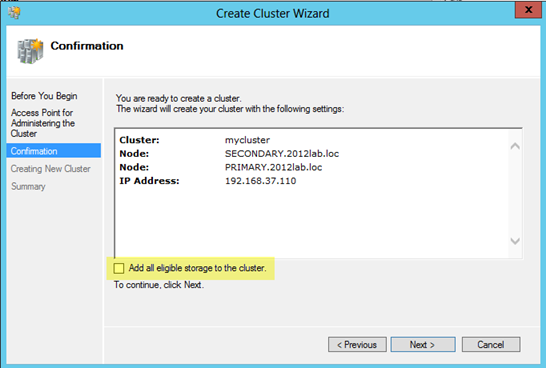
- On the confirmation screen you will see the name and IP address you selected. You will also see an option which is new with Windows Server 2012 failover clustering…”Add all eligible storage to the cluster”. Personally I’m not sure why this is selected by default, as this option can really confuse things. By default, this selection will add all shared storage (if you have it configured) to the cluster, but I have also seen it add just local, non-shared disks, to the cluster as well. I suppose they want to make it easy to support symmetric storage, but generally any host based or array based replication solutions are going to have some pretty specific instructions on how to add symmetric storage to the cluster and generally this option to add all disks to the cluster is more of a hindrance than a help when it comes to asymmetric storage. For our case, since I have no shared storage configured and I don’t want the cluster adding any local disks to the cluster for me automatically I have unchecked the Add all eligible storage to the cluster option.
- After you click next you will see that the cluster has finished the creation process, but there may be some warnings. In our case the warnings are probably related to the quorum configuration which we will take care of in the next step. Click View Report to check out any warnings.

You see that the warning is telling use to change the quorum type.
- In this first screen you will choose a name for your cluster and pick an IP address that will be associated with this name in DNS. This name is just the name used to manage your cluster – this is NOT the name that your clients will use to connect to the clustered resource(s) you will eventually create. Once you create this access point a new computer object will be created in AD with this name and a DNS A record will be created with this name and IP address.
-
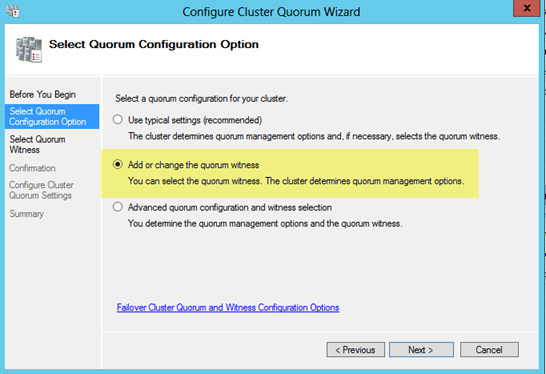
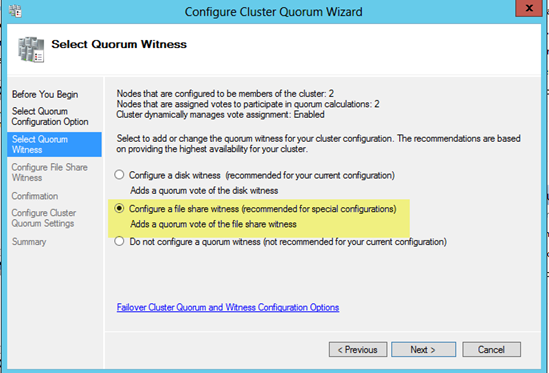
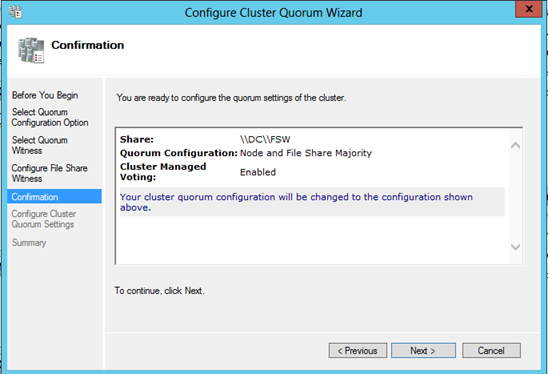
Because we have no shared storage, we will not be using a Node and Disk Majority quorum as suggested. Instead, we will use and Node and File Share Majority quorum. The following steps will help us configure the Node and File Majority Quorum
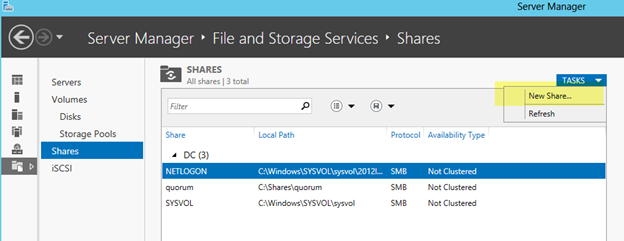
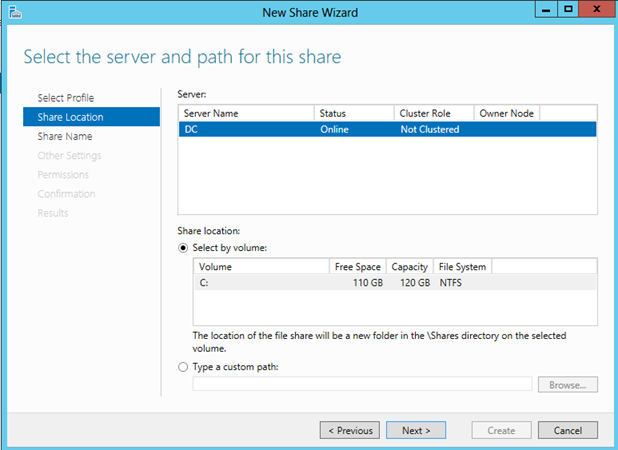
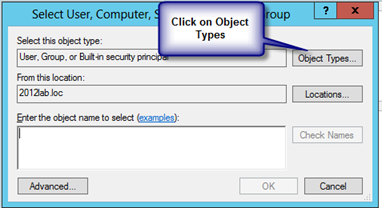
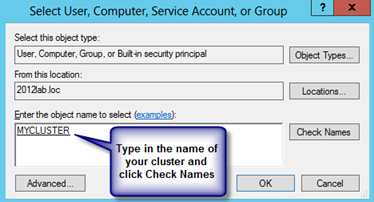
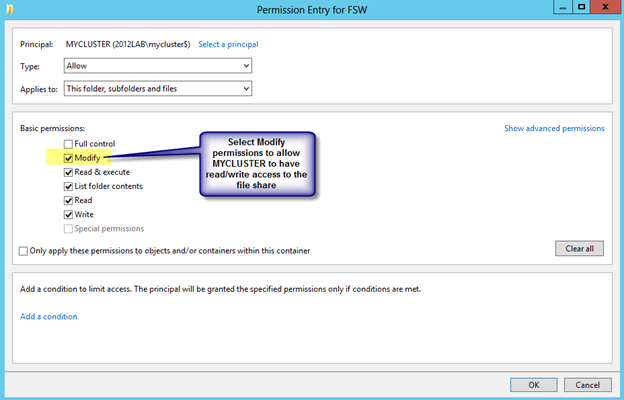
- A File Share Witness needs to be configured on a server that is not part of the cluster. A file share witness is a basic file share that the cluster computer name (MYCLUSTER in our case) has read/write access. The first step involves creating this file share. In our example, we are going to create a file share on our DC and give MYCLUSTER read/write access to it.
-
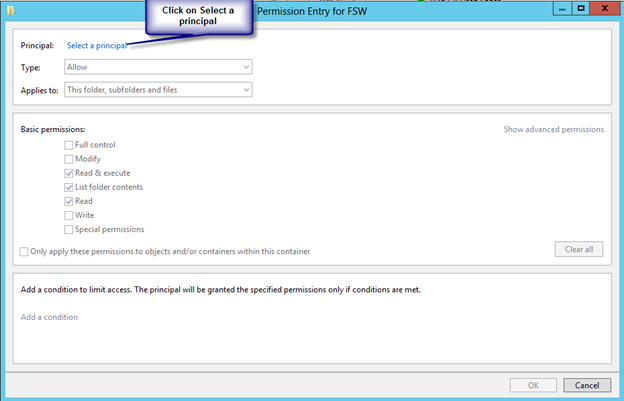
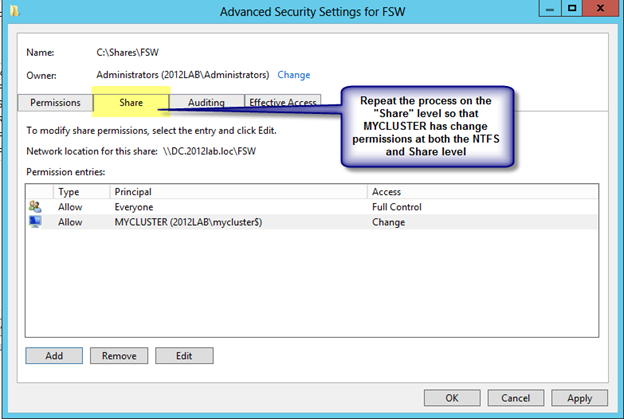
The file share does not need to reside on a Windows 2012 server, but it does need to be on a Windows Server in the same domain as the cluster. The important thing to remember is that the cluster computer name that we created needs read/write access at both the share level and NTFS level. The following are some screen shots that walk you through this process on the DC server which is running Windows Server 2012 in my lab.


- Now that we have the file share created on DC, we will go back to PRIMARY and use the Failover Cluster Manager to change the quorum type as shown in the following steps.


If by chance this wizard fails, it is most likely related to the permissions on the file share. Make sure you give the cluster computer name read/write permissions at BOTH the file share and security (NTFS) level and try again.
-
You now have a basic 2-node cluster and are ready to move on to the next step…creating your cluster resources. I will be publishing a series of articles on how to cluster different resources, starting with SQL 2012 in my next post.

[…] my previous post I walked through the process of building a 2-node cluster up to the point where we are ready to […]
[…] (NTFS) level. If you are not familiar with creating a file share witness, you may want to review my previous post for more […]
[…] Building a SANLess cluster with DataKeeper Cluster Edition is easy. If you know anything about Windows Server Failover Clustering than you already know 99% of the solution. Even if you have never built a Windows Server Failover Cluster before, don’t worry; Microsoft has made it easy and painless. For the beginners, I have written a step-by-step article that tells you how to build a Windows Server 2012 #SANLess cluster in my blog post here: https://clusteringformeremortals.com/2012/12/31/windows-server-2012-clustering-step-by-step/ […]
[…] Clustering SQL Server 2012 on Windows Server 2012 Step-by-Step, Part I […]
[…] (WS 2012 R2 にも適用可能) については、次の URL を参照してください。 https://clusteringformeremortals.com/2012/12/31/windows-server-2012-clustering-step-by-step/ (英語) […]
I am not able to understand, from where this IP address comes at the time of myclsuter.
This is IP of primary or secondary machine.It is confusing me.
I’m not sure what you are asking.
@Abhishek – The logically build cluster out of the 2 nodes should have a unique IP address so that it can be seen and managed as one entity. Hence, comes into role the unique IP address representing the cluster as a whole. I hope this will clear out your doubt.
The IP keyed during create Cluster Wizard, is it a new IP for the cluster?
Yes, the cluster needs a unique IP address.
how to add a physical disk to cluster
i have two physical server both has 5 scsi hdd / 2X300= raid 1(c) , 600X3= raid 5 , how i add d drive to cluster ?
thanks for this wonderful post. I am trying to setup sql always on in aws but wsfc shows one node online and the other node is offline. is this normal ? i get the same results when i use the cloud formation template too. one node comes online and the other stays offline. please help. thank you
Yes, clustering is active/passive. The passive node will be offline until a failover occurs.
Dave, thank you for this. It’s my first time running through this on server 2012 and your instructions are spot on. I did run into a snag on Step 1 during the new cluster creation wizard. It was throwing this error:
Error in Validation. The argument is null or empty string.
Parameter name: domainName
It took me about 45 mins of digging around to find out that the DNS Suffix for my domain was empty.(this is a lab that I didn’t create..) So once I added that and rebooted, I was able to create the cluster.
Have you seen any issues for a Windows 2012 Cluster in a DMZ accessing the file share witness through a firewall? We see our file share witness go offline about once a week and we are thinking it may have something to do with the firewall that resides between our sql server cluster and the file share witness.
Any update on this? I haven’t seen that before.
Hi, this is a really good tutorial, but the think that I don’t quite fully understand is how the two node cluster works if you only have two computers. It appears that the domain has three, the DC, Primary and Secondary. Did you visualise the DC so that the two nodes can act only as member servers?
Yes, you will need a 3rd server for the DC.
Dave, I have been following your blog, its really great, thank you for that.
I am stuck at one place, When I try to give rights to a folder, and type the name of my cluster it could not find the name of my cluster, although, When I verify from local server from server manager, it shows the name of cluster. so why the name of cluster does not appear at the time of Folder Rights.
You have to change the object types to look for computers, not just people. You then should see the cluster name.
I have select the object Computer but it shows Node names ie: SystemNode1 but according to your steps, we have to mention the Cluster name , is it?
You should see the cluster name. Are you searching in the right directory? Do you see the cluster name in AD as a computer object?
Daveberm,
After installing the WSFC without the shared disks successfully.
Do we install SQL Server individually on each node ? If Yes, how ?
No, you have to install DataKeeper and create the DataKeeper Volume Resources first. Then you install SQL Server as a clustered instance on the first node, then on the second node you run the SQL installer and say Add Node to Existing cluster.
It is all covered in the articles. Let me know if you have any questions.
so is the fileshare on the DC the only storage? if so, isn’t that a single point of failure? How do you add disks that are not used on each file server?
The FIle Share Witness does not contain the application data, that is only used by the cluster to help maintain quorum and does not represent a single point of failure as it is simply 1 vote out of 3 votes in this configuration. Check out my blog post on MSDN Press on Understanding the CLuster Quorum for a review https://blogs.msdn.microsoft.com/microsoft_press/2014/04/28/from-the-mvps-understanding-the-windows-server-failover-cluster-quorum-in-windows-server-2012-r2/
The application data resides locally on each cluster node and DataKeeper keeps it replicated between all the cluster nodes to ensure each node has a local copy of the data. Failover clustering controls which node is the source, so when a failover happens all the writes occur locally and are automatically replicated to all of the remaining nodes.
If you have a need for this type of configuration let me know and we can schedule a WebEx to answer any of your questions.
Thanks!
Dave