Today, we’re unpacking a real-world tech drama that unfolded in Singapore, offering a stark reminder about the vital role of Disaster Recovery (DR) planning and the often overlooked, yet crucial element of regular testing.
In the heart of Singapore’s digital infrastructure, a datacenter critical to the operations of DBS and Citibank began to overheat. This wasn’t just a minor glitch; it was a serious problem, the kind that High Availability (HA) setups usually manage to shrug off. But here’s where things went sideways.
Both banks had DR sites in place – a tick in the box for preparedness, right? Not so fast. When the time came to switch to these DR sites, DBS faced a network misconfiguration issue, while Citibank ran into connectivity troubles. These aren’t just minor hiccups; they’re the kind of problems that turn a safety net into a tightrope.
The key takeaway here isn’t just about having a DR site; it’s about ensuring it works when you need it most. This brings us to the crux of today’s lesson – the absolute necessity of regular, thorough testing of your DR plans.
Think of it like this: having a DR plan without testing it is like having a fire escape that you’ve never walked down. You don’t know if it’s clear, if there’s a locked gate at the end, or if it even leads to safety.
Regular testing of DR plans is what separates a smooth transition during a crisis from a chaotic scramble. It’s the difference between a well-rehearsed evacuation and a panicked stampede. For DBS and Citibank, the lack of effective testing meant that when disaster struck, their theoretically robust DR plans couldn’t deliver.
This incident in Singapore shines a spotlight on a common oversight: the gap between having a DR plan and having a tested, reliable DR strategy. It’s a wake-up call for all organizations to not just invest in DR but to rigorously and routinely test these systems. After all, the best DR plan in the world is only as good as its last successful drill.
So, as we wrap up this tale of tech woes, let’s take it as a lesson in the importance of not just planning for disaster, but actively preparing for it. Test, retest, and then test some more. Your future self will thank you when the heat is on.
Today, we’re diving into the world of cross-site scripting (XSS) attacks, breaking them down into three categories: Reflected XSS, Stored XSS, and DOM XSS. Let’s explore these digital threats and learn how they can impact everyday users like you and me.
Reflected XSS – The Click-Trap: Imagine you receive a seemingly innocent link through email, chat, or social media. You click on it, unaware that it contains a hidden script. This script bounces from the website to your browser, where it runs and wreaks havoc. It could steal your sensitive information or carry out actions as if it were you. The key to avoiding this trap? Be cautious and think twice before clicking on any unfamiliar links!
Stored XSS – The Web Page Booby Trap: In a stored XSS attack, a devious attacker plants a script into a website’s database or storage. The script blends in with the site’s regular content and lies in wait. When you visit the affected page, the script springs into action, running in your browser and potentially putting your information at risk. The attacker may even perform actions on your behalf. The scariest part? Stored XSS can target multiple users over time, without anyone needing to click a specific link.
DOM XSS – The Sneaky Browser Attack: Let’s talk about DOM XSS, a crafty attack that targets the user’s browser itself. When a web application’s client-side code (such as JavaScript) processes user input and updates the page content without proper sanitization, the attacker spies an opportunity. They inject malicious scripts that execute when the page is updated. While DOM XSS may share similarities with reflected and stored XSS attacks, the difference lies in the manipulation of client-side code rather than server-side code.
Stay Safe, Mere Mortals: To protect yourself and your web applications from these XSS threats, remember the golden rule: use proper input validation and output encoding. By doing so, you’ll ensure that user-generated content can’t be weaponized as a vehicle for executing malicious scripts. Surf safely, fellow mortals!
This article describes the steps you take to prepare the VMware infrastructure for installing and configuring a high-availability SAP ASCS/SCS instance on a Windows failover cluster by using SIOS DataKeeper as the replicated cluster storage.
Create the ASCS VMs
For SAP ASCS / SCS cluster, deploy two VMs on different ESXi Servers.
Based on your deployment type, the host names and the IP addresses of the scenario would be like:
SAP deployment
Host name role
Host name
Static IP address
1st cluster node ASCS/SCS cluster
pr1-ascs-10
10.0.0.4
2nd cluster node ASCS/SCS cluster
pr1-ascs-11
10.0.0.5
Cluster Network Name
pr1clust
10.0.0.42
ASCS cluster network name
pr1-ascscl
10.0.0.43
ERS cluster network name (only for ERS2)
pr1-erscl
10.0.0.44
On each VM add an additional virtual disk. We will later mirror these disks with DataKeeper and use them as part of our cluster.
Add the Windows VMs to the domain
After you assign static IP addresses to the virtual machines, add the virtual machines to the domain.
Install and configure Windows failover cluster
Install the Windows failover cluster feature
Run this command on one of the cluster nodes:
PowerShell
Copy
# Hostnames of the Win cluster for SAP ASCS/SCS
$SAPSID = “PR1”
$ClusterNodes = (“pr1-ascs-10″,”pr1-ascs-11”)
$ClusterName = $SAPSID.ToLower() + “clust”
# Install Windows features.
# After the feature installs, manually reboot both nodes
Alternatively you can use a File Share Witness on a 3rd server in your environment. This server should be running on an 3rd ESXi host for redundancy.
SIOS DataKeeper Cluster Edition for the SAP ASCS/SCS cluster share disk
Now, you have a working Windows Server failover clustering configuration. To install an SAP ASCS/SCS instance, you need a shared disk resource. One of the options is to use SIOS DataKeeper Cluster Edition.
Installing SIOS DataKeeper Cluster Edition for the SAP ASCS/SCS cluster share disk involves these tasks:
Install SIOS DataKeeper
Configure SIOS DataKeeper
Install SIOS DataKeeper
Install SIOS DataKeeper Cluster Edition on each node in the cluster. To create virtual shared storage with SIOS DataKeeper, create a synced mirror and then simulate cluster shared storage.
Before you install the SIOS software, create the DataKeeperSvc domain user.
Add the DataKeeperSvc domain user to the Local Administrator group on both cluster nodes.
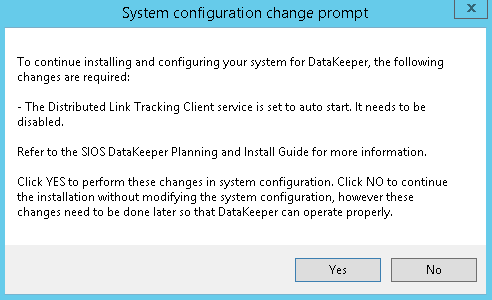
Install the SIOS software on both cluster nodes. First page of the SIOS DataKeeper installation
In the dialog box, select Yes. DataKeeper informs you that a service will be disabled
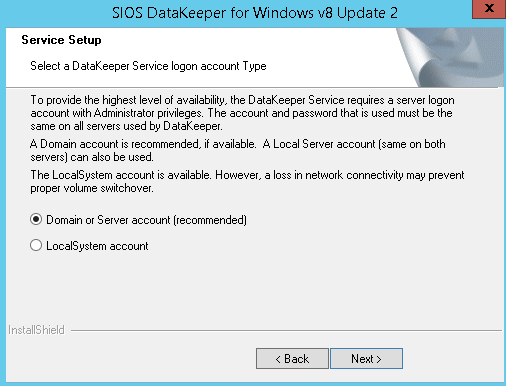
In the dialog box, we recommend that you select Domain or Server account. User selection for SIOS DataKeeper
Enter the domain account username and password that you created for SIOS DataKeeper. Enter the domain user name and password for the SIOS DataKeeper installation
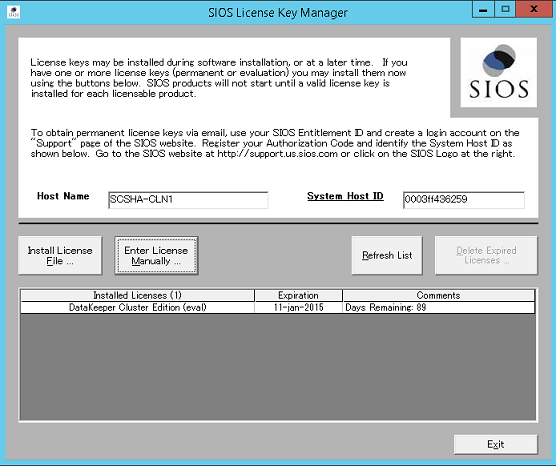
Install the license key for your SIOS DataKeeper instance. Enter your SIOS DataKeeper license key
When prompted, restart the virtual machine.
Configure SIOS DataKeeper
After you install SIOS DataKeeper on both nodes, start the configuration. The goal of the configuration is to have synchronous data replication between the additional disks that are attached to each of the virtual machines.
Start the DataKeeper Management and Configuration tool, and then select Connect Server. SIOS DataKeeper Management and Configuration tool
Enter the name or TCP/IP address of the first node the Management and Configuration tool should connect to, and, in a second step, the second node. Insert the name or TCP/IP address of the first node the Management and Configuration tool should connect to, and in a second step, the second node
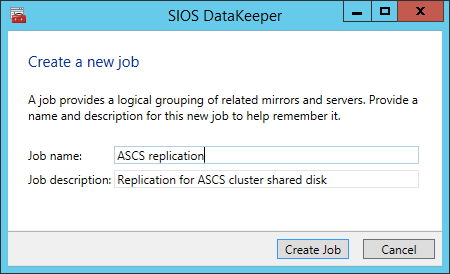
Create the replication job between the two nodes. Create a replication job A wizard guides you through the process of creating a replication job.
Define the name of the replication job. Define the name of the replication job Define the base data for the node, which should be the current source node
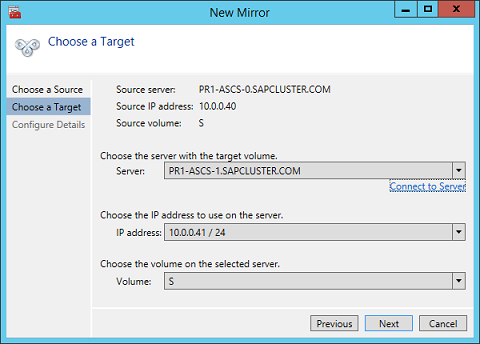
Define the name, TCP/IP address, and disk volume of the target node. Define the name, TCP/IP address, and disk volume of the current target node
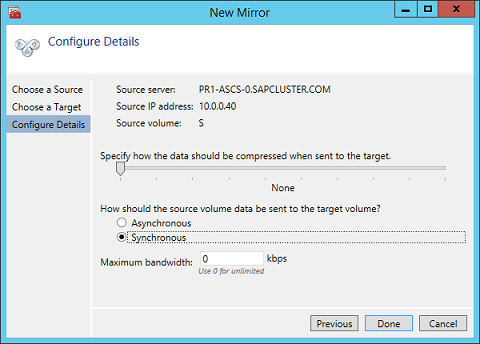
Define the compression algorithms. In our example, we recommend that you compress the replication stream. Especially in resynchronization situations, the compression of the replication stream dramatically reduces resynchronization time. Compression uses the CPU and RAM resources of a virtual machine. As the compression rate increases, so does the volume of CPU resources that are used. You can adjust this setting later.
Another setting you need to check is whether the replication occurs asynchronously or synchronously. When you protect SAP ASCS/SCS configurations, you must use synchronous replication. Define replication details
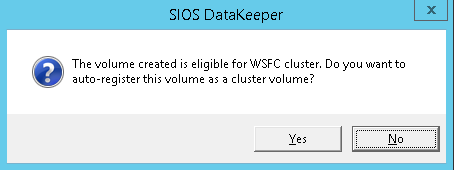
Define whether the volume that is replicated by the replication job should be represented to a Windows Server failover cluster configuration as a shared disk. For the SAP ASCS/SCS configuration, select Yes so that the Windows cluster sees the replicated volume as a shared disk that it can use as a cluster volume. Select Yes to set the replicated volume as a cluster volume After the volume is created, the DataKeeper Management and Configuration tool shows that the replication job is active. DataKeeper synchronous mirroring for the SAP ASCS/SCS share disk is active Failover Cluster Manager now shows the disk as a DataKeeper disk, as shown in Figure 45: Failover Cluster Manager shows the disk that DataKeeper replicated
We don’t describe the DBMS setup in this article because setups vary depending on the DBMS system you use. We assume that high-availability concerns with the DBMS are addressed with the functionalities that different DBMS vendors support
The installation procedures of SAP NetWeaver ABAP systems, Java systems, and ABAP+Java systems are almost identical. The most significant difference is that an SAP ABAP system has one ASCS instance. The SAP Java system has one SCS instance. The SAP ABAP+Java system has one ASCS instance and one SCS instance running in the same Microsoft failover cluster group. Any installation differences for each SAP NetWeaver installation stack are explicitly mentioned. You can assume that the rest of the steps are the same.
Install SAP with a high-availability ASCS/SCS instance
Important
If you use SIOS to present a shared disk, don’t place your page file on the SIOS DataKeeper mirrored volumes.
Installing SAP with a high-availability ASCS/SCS instance involves these tasks:
Create a virtual host name for the clustered SAP ASCS/SCS instance.
Install SAP on the first cluster node.
Modify the SAP profile of the ASCS/SCS instance.
Create a virtual host name for the clustered SAP ASCS/SCS instance
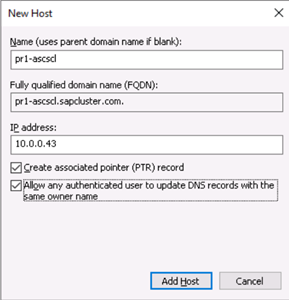
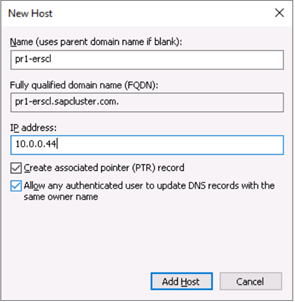
In the Windows DNS manager, create a DNS entry for the virtual host name of the ASCS/SCS instance. Important
Define the DNS entry for the SAP ASCS/SCS cluster virtual name and TCP/IP address
If you are using the new SAP Enqueue Replication Server 2, which is also a clustered instance, then you need to reserve in DNS a virtual host name for ERS2 as well.
Define the DNS entry for the SAP ERS2 cluster virtual name and TCP/IP address
To define the IP address that’s assigned to the virtual host name, select DNS Manager > Domain. New virtual name and TCP/IP address for SAP ASCS/SCS cluster configuration
Install the SAP first cluster node
Execute the first cluster node option on cluster node A. Select:
ABAP system: ASCS instance number 00
Java system: SCS instance number 01
ABAP+Java system: ASCS instance number 00 and SCS instance number 01
Follow the SAP described installation procedure. Make sure in the start installation option “First Cluster Node”, to choose “Cluster Shared Disk” as configuration option.
The SAP installation documentation describes how to install the first ASCS/SCS cluster node.
Modify the SAP profile of the ASCS/SCS instance
If you have Enqueue Replication Server 1, add SAP profile parameter enque/encni/set_so_keepalive as described below. The profile parameter prevents connections between SAP work processes and the enqueue server from closing when they are idle for too long. The SAP parameter is not required for ERS2.
Add this profile parameter to the SAP ASCS/SCS instance profile, if using ERS1.
Copy
enque/encni/set_so_keepalive = true
For both ERS1 and ERS2, make sure that the keepalive OS parameters are set as described in SAP note 1410736.
To apply the SAP profile parameter changes, restart the SAP ASCS/SCS instance.
Install the database instance
To install the database instance, follow the process that’s described in the SAP installation documentation.
Install the second cluster node
To install the second cluster, follow the steps that are described in the SAP installation guide.
Install the SAP Primary Application Server
Install the Primary Application Server (PAS) instance <SID>-di-0 on the virtual machine that you’ve designated to host the PAS.
Install the SAP Additional Application Server
Install an SAP Additional Application Server (AAS) on all the virtual machines that you’ve designated to host an SAP Application Server instance.
Test the SAP ASCS/SCS instance failover
For the outlined failover tests, we assume that SAP ASCS is active on node A.
Verify that the SAP system can successfully failover from node A to node B Choose one of these options to initiate a failover of the SAP cluster group from cluster node A to cluster node B:
Failover Cluster Manager
Failover Cluster PowerShell
PowerShell
Copy
$SAPSID = “PR1” # SAP <SID>
$SAPClusterGroup = “SAP $SAPSID”
Move-ClusterGroup -Name $SAPClusterGroup
Restart cluster node A within the Windows guest operating system. This initiates an automatic failover of the SAP <SID> cluster group from node A to node B.
Restart cluster node A from the vCenter. This initiates an automatic failover of the SAP <SID> cluster group from node A to node B.
After failover, verify that SIOS DataKeeper is replicating data from source volume drive S on cluster node B to target volume drive S on cluster node A. SIOS DataKeeper replicates the local volume from cluster node B to cluster node A
So you have built a SQL Server Failover Cluster Instance (FCI), or maybe an SAP ASCS/ERS cluster in Azure. Each node of the cluster resides in a different Availability Zone (AZ), or maybe you have strict latency requirements and are using Placement Proximity Groups (PPG) and your nodes all reside in the same Availability Set. Regardless of the scenario, you now have a much higher level of availability for your business critical application than if you were just running a single instance.
Now that you have high availability (HA) covered, what are you going to do for disaster recovery? Regional disasters that take out multiple AZs are rare, but as recent history has shown us, Mother Nature can really pack a punch. You want to be prepared should an entire region go offline.
Azure Site Recovery (ASR) is Microsoft’s disaster recovery-as-a-service (DRaaS) offering that allows you to replicate entire VMs from one region to another. It can also replicate virtual machines and physical servers from on-prem into Azure, but for the purpose of this blog post we will focus on the Azure Region-to-Region DR capabilities.
Setting up ASR
We are going to assume you have already built your cluster using SIOS DataKeeper. If not, here are some pointers to help get you started.
We are also going to assume you are familiar with Azure Site Recovery. Instead of yet another guide on setting up ASR, I suggest you read the latest documentation from Microsoft. This article will focus instead on some things you may not have considered and the specific steps required to fix your cluster after a failover to a different subnet.
Paired Regions
Before you start down the DR path, you should be aware of the concept of Azure Paired Regions. Every Region in Azure has a preferred DR Region. If you want to learn more about Paired Regions, the documentation provides a great background. There are some really good benefits of using your paired region, but it’s really up to you to decide on what region you want to use to host your DR site.
Cloud Witness Location
When you originally built your cluster you had to choose a witness type for your quorum. You may have selected a File Share Witness or a Cloud Witness. Typically either of those witness types should reside in an AZ that is separate from your cluster nodes.
However, when you consider that, in the event of a disaster, your entire cluster will be running in your DR region, there is a better option. You should use a cloud witness, and place it in your DR region. By placing your cloud witness in your DR region, you provide resiliency not only for local AZ failures, but it also protects you should the entire region fail and you have to use ASR to recover your cluster in the DR region. Through the magic of Dynamic Quorum and Dynamic Witness, you can be sure that even if your DR region goes offline temporarily, it will not impact your production cluster.
Multi-VM Consistency
When using ASR to replicate a cluster, it is important to enable Multi-VM Consistency to ensure that each cluster node’s recovery point is from the same point in time. That ensures that the DataKeeper block level replication occurring between the VMs will be able to continue after recovery without requiring a complete resync.
Crash Consistent Recovery Points
Application consistent recovery points are not supported in replicated clusters. When configuring the ASR replication options do not enable application consistent recovery points.
Keep IP Address After Failover?
When using ASR to replicate to your DR site there is a way to keep the IP address of the VMs the same. Microsoft described it in the article entitled Retain IP addresses during failover. If you can keep the IP address the same after failover it will simplify the recovery process since you won’t have to fix any cluster IP addresses or DataKeeper mirror endpoints, which are based on IP addresses.
However, in my experience, I have never seen anyone actually follow the guidance above, so recovering a cluster in a different subnet will require a few additional steps after recovery before you can bring the cluster online.
Your First Failover Attempt
Recovery Plan
Because you are using Multi-VM Consistency, you have to failover your VMs using a Recovery Plan. The documentation provides pretty straightforward guidance on how to do that. A Recovery Plan groups the VMs you want to recover together to ensure they all failover together. You can even add multiple groups of VMs to the same Recovery Plan to ensure that your entire infrastructure fails over in an orderly fashion.
A Recovery Plan can also launch post recovery scripts to help the failover complete the recovery successfully. The steps I describe below can all be scripted out as part of your Recovery Plan, thereby fully automating the complete recovery process. We will not be covering that process in this blog post, but Microsoft documents this process.
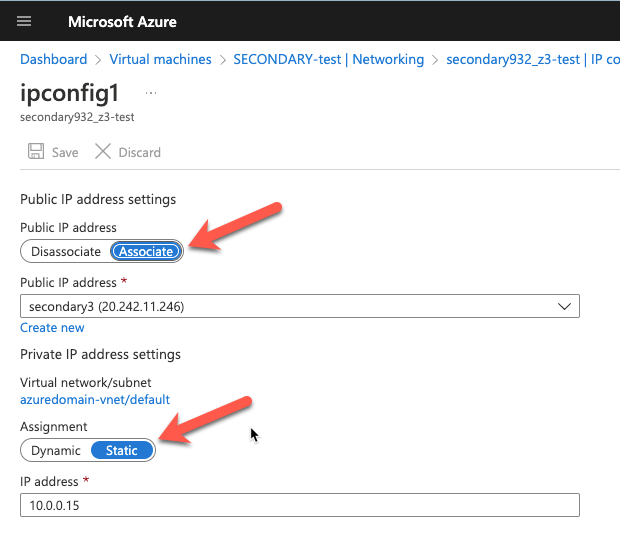
Static IP Addresses
As part of the recovery process you want to make sure the new VMs have static IP addresses. You will have to adjust the interface properties in the Azure Portal so that the VM always uses the same address. If you want to add a public IP address to the interface you should do so at this time as well.
Network Configuration
After the replicated VMs are successfully recovered in the DR site, the first thing you want to do is verify basic connectivity. Is the IP configuration correct? Are the instances using the right DNS server? Is name resolution functioning correctly? Can you ping the remote servers?
If there are any problems with network communications then the rest of the steps described below will be bound to fail. Don’t skip this step!
Load Balancer
As you probably know, clusters in Azure require you to configure a load balancer for client connectivity to work. The load balancer does not fail over as part of the Recovery Plan. You need to build a new load balancer based on the cluster that now resides in this new vNet. You can do this manually or script this as part of your Recovery Plan to happen automatically.
Network Security Groups
Running in this new subnet also means that you have to specify what Network Security Group you want to apply to these instances. You have to make sure the instances are able to communicate across the required ports. Again, you can do this manually, but it would be better to script this as part of your Recovery Plan.
Fix the IP Cluster Addresses
If you are unable to make the changes described earlier to recover your instances in the same subnet, you will have to complete the following steps to update your cluster IP addresses and the DataKeeper addresses for use in the new subnet.
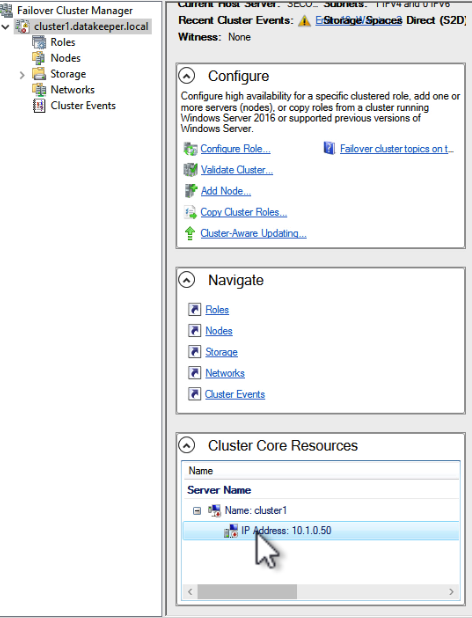
Every cluster has a core cluster IP address. What you will see if you launch the WSFC UI after a failover is that the cluster won’t be able to connect. This is because the IP address used by the cluster is not valid in the new subnet.
If you open the properties of that IP Address resource you can change the IP address to something that works in the new subnet. Make sure to update the Network and Subnet Mask as well.
Once you fix that IP Address you will have to do the same thing for any other cluster address that you use in your cluster resources.
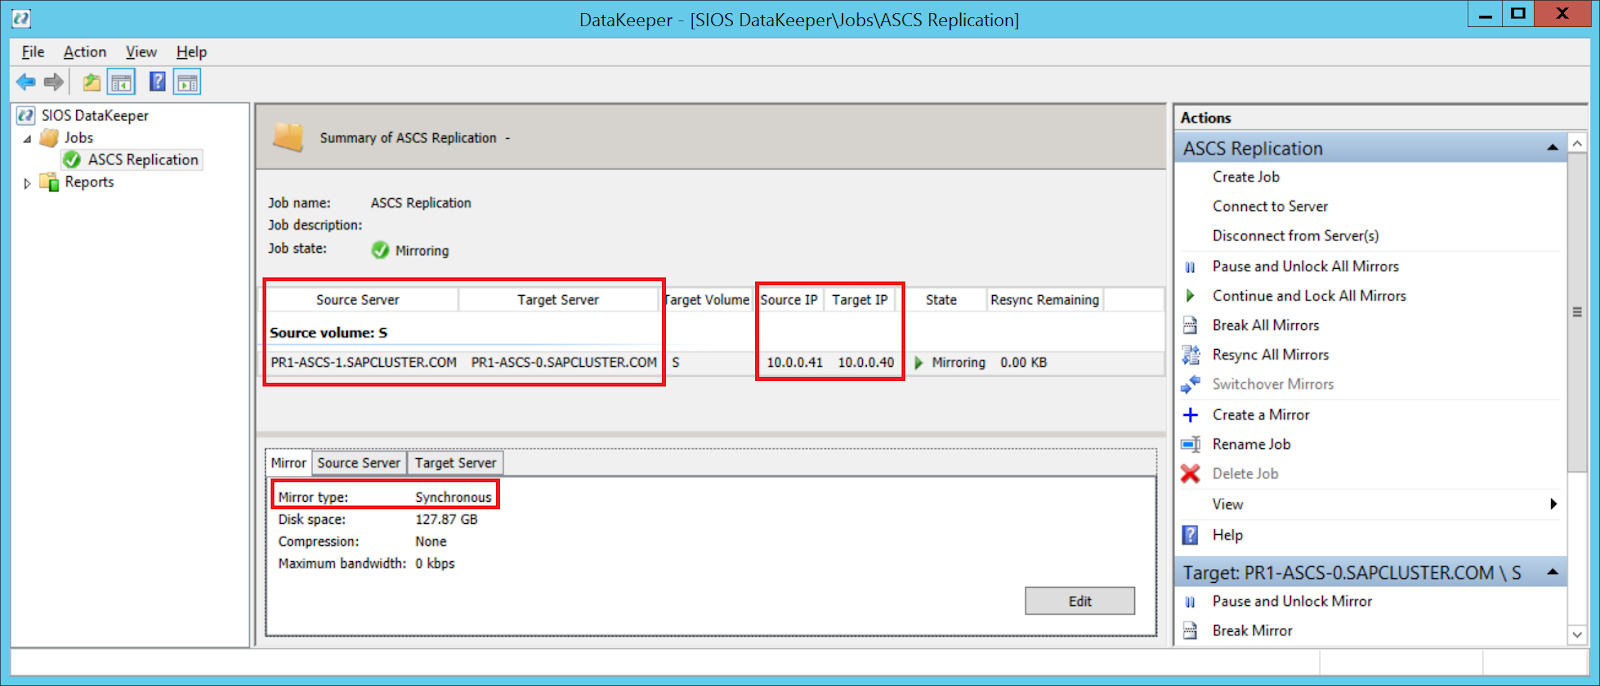
Fix the DataKeeper Mirror Addresses
SIOS DataKeeper mirrors use IP addresses as mirror endpoints. These are stored in the mirror and mirror job. If you recover a DataKeeper based cluster in a different subnet, you will see that the mirror comes up in a Resync Pending state. You will also notice that the Source IP and the Target IP reflect the original subnet, not the subnet of the DR site.
Fixing this issue involves running a command from SIOS called CHANGEMIRRORENDPOINTS. The usage for CHANGEMIRRORENDPOINTS is as follows.
In our example, the command and output looked like this.
After the command runs, the DataKeeper GUI will be updated to reflect the new IP addresses as shown below. The mirror will also go to a mirroring state.
Conclusions
You have now successfully configured and tested disaster recovery of your business critical applications using a combination of SIOS DataKeeper for high availability and Azure Site Recovery for disaster recovery. If you have questions please leave me a comment or reach out to me on Twitter @daveberm
Well, it’s long overdue that I left the comfort of my Windows GUI and ventured into the world of Linux. Mind you I have dabbled a very little bit over the years, watched some training videos about 18 years ago, and even installed Ubuntu on an old laptop at that time. I never ventured far past the GUI that was available as I recall. I think I muddled through an install of SQL Server on Linux once. I relied a lot on Google and help from co-workers.
This time it’s for real. I’ve signed up for some college classes and will be earning a Certificate in LInux/Unix Administration. I’ll be completing this journey with my oldest son, who is considering joining me in the field of information technology.
I’m going to try to document everything I learn along the way, so that it might help someone else in their journey, but mostly so I can remember what I did the next time I have to do it. Now keep in mind, I have NO IDEA if what I am doing is the right way, best way, or most secure way of doing things. So anything you read should be taken with a grain of salt, and if you are actually administering a production workload you probably should get advice from a more experienced Linux expert. And if you ARE a Linux expert, please feel free to add some comments and tell me what I am doing wrong or how I could do things better!
This will probably be the first in a series of articles if everything goes to plan.
Linux Day 1
I haven’t started class yet, but I bought the recommended book. The Linux Command Line, 2nd Edition: A Complete Introduction. I quickly learned that there are some assumptions being made that aren’t covered in the text. For instance, it assumes you know how to install and connect to some version of Linux. For me, the easiest thing to do was to use some of my Azure credits and spin up a Linux VM in the cloud. I won’t go through all the details of what I did in Azure, but basically I spun up a Red Hat Enterprise Linux 8.2 VM and opened up SSH port 22 so I could connect remotely. I also used an SSH public key for connectivity.
So great, my VM is running. Now how do I connect?
Connecting from a Mac
My main PC is a Macbook Pro. After a little searching around, I decided I would use the Terminal program on my first attempt at connecting to my instance. I discovered that you could create a “New Remote Connection”. If I recall, when I used Windows I used a program called PuTTY.
Through some trial and error and some Google searches, I finally found the magic combination which allowed me to connect.
CHMOD
CHMOD is one of the things I do recall from my very limited experience with Linux. It basically is the way to change file permissions. I don’t know all the ins and outs of CHMOD yet, but what I found out is that before I could connect to my instance, I had to lock down the permissions on the private key that I downloaded when I created the Linux image. This was the error message I received.
I discovered that I needed to run the following command to lock down the permissions on the private key so that only the owner of the file has full read/write access.
To register this system, run: insights-client –register
Last login: Sun Aug 28 21:19:38 2022 from 98.110.69.71
[azureuser@Linux1 ~]$
Now What?
Now that I have what appears to be a working terminal into my Linux VM, I can move on in Chapter 1 in my book. But before I do that, I’m already thinking about how I could use my iPad Pro to open a terminal over SSH to my cloud instance. I think I much rather drag that to class than my whole laptop. A quick search tells me that there are apps that make that entirely possible, so I’ll be looking into that as well.
Finishing chapter 1, I learned what the following commands do: date, cal, df, free, exit.
Try them out on your own. I’m moving on to Chapter 2.
Chapter 2: Navigation
In the first few paragraphs of Chapter 2 I learned something that clears up years of confusion on my part. Much like Windows, Linux has a hierarchical directory structure. However, there is only ever one Root directory and single file system tree. If you attach other disks these disks will be mounted in the directory structure wherever the system administrator decides to mount the disks.
Here are some random commands introduced in Chapter 2. They are pretty self explanatory.
pwd – Print Working Directory
pwd will show you the current directory you are working in.
[azureuser@Linux1 ~]$ pwd
/home/azureuser
[azureuser@Linux1 ~]$
ls – List Contents of Directory
Fun fact, filenames that begin with a period are hidden. In order to see hidden files you need to use ls -a
cd – Change Directory
Absolute Path Names
Relative Path Names
Specifies the directory relative to the current directory
. (dot), .. (dot, dot)
“cd” changes to home directory
“cd -” changes to previous working directory
“cd ~username” changes to that user home directory
Some Fun Facts
Filenames and Commands are case sensitive in Linux
Do not use spaces in filenames. You can use period, dash or underscore. Best to use underscore to represent space in a filename
Linux operating system has no concept of file extensions, but some applications do.
That’s what I learned on day one. I got through the first two chapters and I feel like I’ll be going into class a little ahead of the game. Now I have to get my son to crack his book and show him what I learned.
What makes this interesting is that you can now build shared storage based failover cluster instances that span Availability Zones (AZ). With cluster nodes residing in different AZs, users can now qualify for the 99.99% availability SLA. Prior to support for ZRS, Azure Shared Disks only supported Locally Redundant Storage (LRS), limiting cluster deployments to a single AZ, leaving users susceptible to outages should an AZ go offline.
There are however a few limitations to be aware of when deploying an Azure Shared Disk with ZRS.
Only supported with premium solid-state drives (SSD) and standard SSDs. Azure Ultra Disks are not supported.
Azure Shared Disks with ZRS are currently only available in West US 2, West Europe, North Europe, and France Central regions
Disk Caching, both read and write, are not supported with Premium SSD Azure Shared Disks
Disk bursting is not available for premium SSD
Azure Site Recovery support is not yet available.
Azure Backup is available through Azure Disk Backup only.
Only server-side encryption is supported, Azure Disk Encryption is not currently supported.
I also found an interesting note in the documentation.
“Except for more write latency, disks using ZRS are identical to disks using LRS, they have the same scale targets. Benchmark your disks to simulate the workload of your application and compare the latency between LRS and ZRS disks.”
While the documentation indicates that ZRS will incur some additional write latency, it is up to the user to determine just how much additional latency they can expect. A link to a disk benchmark document is provided to help guide you in your performance testing.
Following the guidance in the document, I used DiskSpd to measure the additional write latency you might experience. Of course results will vary with workload, disk type, instance size, etc.,but here are my results.
Locally Redundant Storage (LRS)
Zone Redundant Storage (ZRS)
Write IOPS
5099.82
4994.63
Average Latency
7.830
7.998
The DiskSpd test that I ran used the following parameters.
I wrote to a P30 disk with ZRS and a P30 with LRS attached to a Standard DS3 v2 (4 vcpus, 14 GiB memory) instance type. The shared ZRS P30 was also attached to an identical instance in a different AZ and added as shared storage to an empty cluster application.
A 2% overhead seems like a reasonable price to pay to have your data distributed synchronously across two AZs. However, I did wonder what would happen if you moved the clustered application to the remote node, effectively putting your disk in one AZ and your instance in a different AZ.
Here are the results.
Locally Redundant Storage (LRS)
Zone Redundant Storage (ZRS)
ZRS when writing from the remote AZ
Write IOPS
5099.82
4994.63
4079.72
Average Latency
7.830
7.998
9.800
In that scenario I measured a 25% write latency increase. If you experience a complete failure of an AZ, both the storage and the instance will failover to the secondary AZ and you shouldn’t experience this increase in latency at all. However, other failure scenarios that aren’t AZ wide could very well have your clustered application running in one AZ with your Azure Shared Disk running in a different AZ. In those scenarios you will want to move your clustered workload back to a node that resides in the same AZ as your storage as soon as possible to avoid the additional overhead.
Microsoft documents how to initiate a storage account failover to a different region when using GRS, but there is no way to manually initiate the failover of a storage account to a different AZ when using ZRS. You should monitor your failover cluster instance to ensure you are alerted any time a cluster workload moves to a different server and plan to move it back just as soon as it is safe to do so.
You can find yourself in this situation unexpectedly, but it will also certainly happen during planned maintenance of the clustered application servers when you do a rolling update. Awareness is the key to help you minimize the amount of time your storage is performing in a degraded state.
I hope in the future Microsoft allows users to initiate a manual failover of a ZRS disk the same as they do with GRS. The reason they added the feature to GRS was to put the power in the hands of the users in case automatic failover did not happen as expected. In the case of ZRS I could see people wanting to try to tie together storage and application, ensuring they are always running in the same AZ, similar to how host based replication solutions like SIOS DataKeeper do it.
It’s the end of the work day here on the east coast and I see that the Facebook is still unavailable. Facebook acknowledged the problem in the following two Tweets.
I can pinpoint the time that Facebook went offline for me. I was trying to post a comment on a post and my comment was not posting. I was a little annoyed, and almost thought the poster had blocked me, or was deleting my comment. This was at 11:45 am EDT. 5+ hours Facebook for me is still down.
While we don’t know the exact cause of the downtime, and whether it was user error, some nefarious assault, or just an unexpected calamity of errors, we can learn a few things about this outage at this point.
Downtime is expensive
While we may never know the exact cost of the downtime experienced today, there are a few costs that can already measured. As of this writing, Facebook stock went down 4.89% today. That’s on top of an already brutal September for Facebook and other tech stocks.
The correction may have been inevitable, but the outage today certainly didn’t help matters.
But what was the real cost to the company? With many brands leveraging social media as an important part of their marketing outreach, how will this outage impact future advertising spends? Minimally I anticipate advertisers to investigate other social media platforms if they have not done so already. Only time will tell, but even before this outage we have seen more competition for marketing spend from other platforms such as TickTock.
Plan for the worst-case scenario
Things happen, we know that and plan for that. Business Continuity Plans (BCP) should be written to address any possible disaster. Again, we don’t know the exact cause of this particular disaster, but I would have to imaging that an RTO of 5+ hours is not written into any BCP that sits on the shelf at Facebook, Instagram or WhatsApp.
What’s in your your BCP? Have you imagined any possible disaster? Have your measured the impact of downtime and defined adequate recovery time objective (RTO) and recovery point objective (RPO) for each component of your business? I would venture to say that it’s impossible to plan for every possible thing that can go wrong. However, I would advise everyone to revisit your BCP on a regular basis and update it to include disasters that maybe weren’t on the radar the last time you reviewed your BCP. Did you have global pandemic in your BCP? If not, you may have been left scrambling to accomodate a “work from home” workforce. The point is, plan for the worst and hope for the best.
Communications in a disaster
Communications in the event of a disaster should be its own chapter in your BCP.
One Facebook employee told Reuters that all internal tools were down. Facebook’s response was made much more difficult because employees lost access to some of their own tools in the shutdown, people tracking the matter said.
Multiple employees said they had not been told what had gone wrong.
A truly robust BCP must include multiple fallback means of communication. This becomes much more important as your business spreads out across multiple building, regions or countries. Just think about how your team communicates today. Phone, text, email, Slack might be your top four. But what if they are all unavailable, how would you reach your team? If you don’t know you may want to start investigating other options. You may not need a shortwave radio and a flock of carrier pigeons, but I’m sure there is a government agency that keeps both of those on hand for a “break glass in case of emergency” situation.
Summary
You have a responsibility to yourself, your customers and your investors to make sure you take every precaution concerning the availability of your business. Make sure you invest adequate resources in creating your BCP and that the teams responsible for business continuity have the tools they need to ensure they can do their part in meeting the RTO and RPO defined in your BCP.
They are multiple options to implement HADR solution for SQL Server in AWS public cloud. The easiest way to do that is to use AWS Database as a Service (DBaaS) product known as AWS RDS and enable Multi-AZ option using your AWS Control Panel (Fig #1).
Fig #1
That is all it takes to roll out or add it to an existing instance. AWS will take care of the rest under the hood (depending on your SQL Server version, it might use Mirroring or Always On Availability Groups). It will provision all the necessary things for an automatic failover (witness, network, storage, etc…), so when a primary node will go down, it will be replaced with a secondary node. No ifs and no buts. This blog post is going to discuss how to build your own HADR solution using multiple AWS EC2s (BYOC) instead of a managed AWS…
When ensuring high availability for SAP ASCS and ERS running on WIndows Server, the primary cluster solution you will want to use is Windows Server Failover Clustering. However, when doing this in AWS you will quickly discover that there are a few obstacles you need to know how to overcome when deploying this in AWS.
I recently wrote this Step-by-Step guide that was published on the SAP blog that walks you through the entire process. If you have any questions, please leave a comment.
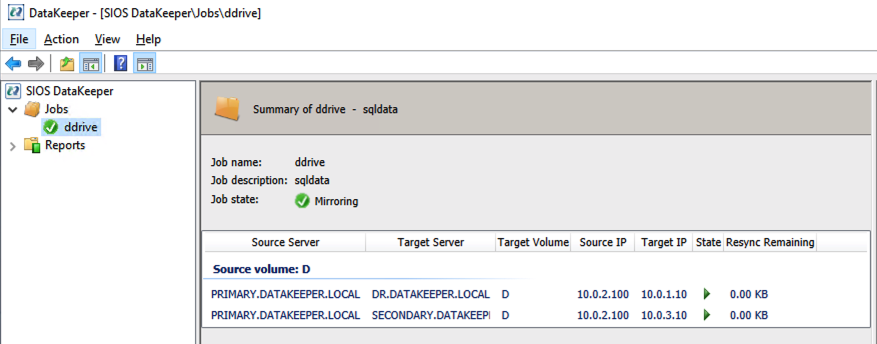
I often help people automate the configuration of their infrastructure so they can build 3-node clusters that span Availability Zones and Regions. The CLI for creating a DataKeeper Job and associated mirrors that contain more than one target can be a little confusing, so I’m documenting it here in case you find yourself looking for this information. The DataKeeper documentation describes this as a Mirror with Multiple Targets.
The environment in this example looks like this:
PRIMARY (10.0.2.100) – in AZ1 SECONDARY (10.0.3.100) – in AZ2 DR (10.0.1.10) – in a different Region
I want to create a synchronous mirror from PRIMARY to SECONDARY and an asynchronous mirror from PRIMARY to DR. I also have to make sure the DataKeeper Job knows how to create a mirror from SECONDARY to DR in case the SECONDARY or DR server ever become the source of the mirror. EMCMD will be used to create this multiple target mirror.
We need to first create the Job that contains all this possible endpoints and define whether the mirror will be Sync (S) or Async (A) between those endpoints.
emcmd . createjob ddrive sqldata
primary.datakeeper.local D 10.0.2.100 secondary.datakeeper.local D 10.0.3.100 S
primary.datakeeper.local D 10.0.2.100 dr.datakeeper.local D 10.0.1.10 A
secondary.datakeeper.local D 10.0.3.100 dr.datakeeper.local D 10.0.1.10 A
That single “createjob” command creates the Job. It might be a little easier to look at that command like this:
emcmd . createjob ddrive sqldata
primary.datakeeper.local D 10.0.2.100 secondary.datakeeper.local D 10.0.3.100 S
primary.datakeeper.local D 10.0.2.100 dr.datakeeper.local D 10.0.1.10 A
secondary.datakeeper.local D 10.0.3.100 dr.datakeeper.local D 10.0.1.10 A
Next we need to create the mirrors.
emcmd 10.0.2.100 createmirror D 10.0.1.10 A
emcmd 10.0.2.100 createmirror D 10.0.3.100 S
Our DataKeeper Job should now look like this in the DataKeeper UI
One-to-many DataKeeper Replicated Volume
And then finally we can register the DataKeeper Volume Resource in the cluster Available Storage with this command.
emcmd . registerclustervolume D
The DataKeeper Volume Resource will now appear in Available Storage as shown below.
DataKeeper Volume in Available Storage
You are now ready to install SQL Server, SAP, File Server or any other clustered resource you normally protect with Windows Server Failover Clustering.