In preparation for my talk at PASS Summit this Friday, I’d figure I document something that I finally got working that I want to talk about during my session on highly available SQL Server in Azure. Now I just need to update my slide deck and my demo environment.
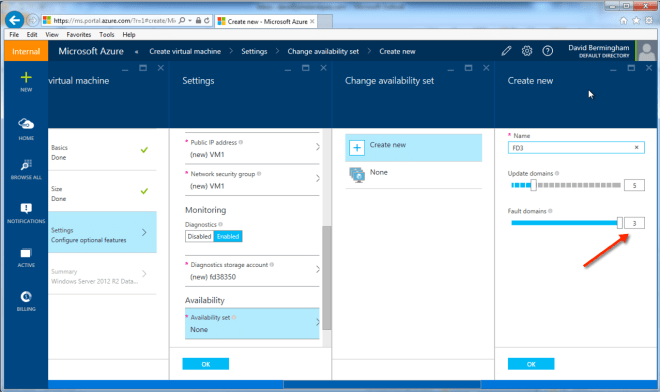
In case you didn’t know, Azure has two deployment models: Resource Manager (ARM) and Classic Deployment. Classic deployment is the “old” way of doing things and ARM is the new way of doing things. There are numerous benefits to using ARM as described in the Azure article Understanding Resource Manager deployment and classic deployment . However, one of my favorite new features of ARM is the ability to have three Fault Domains per Availability Set rather than just the two Fault Domains you get with the Classic deployment model. This is a critical feature for SQL High Availability.
With three fault domains you can ensure that each cluster node in a two node cluster and the file share witness all reside in different fault domains. This eliminates the possibility that the failure of a single Fault Domain would impact more than one quorum vote in your cluster. In the Classic deployment model with two fault domains you could only put two cluster nodes in an availability set. For maximum availability you really needed to put your file share witness in a different geographic location as there was no guarantee that it wouldn’t wind up in the same fault domain as one of your cluster nodes if you kept it in the same geographic location, meaning that the failure of a single fault domain could impact 2 out of your 3 quorum votes, bringing down your entire cluster. ARM’s three Fault Domains eliminates that possibility.
ARM is definitely the way to go as new Azure features are only being introduced in ARM. However, the documentation is light and some features are not quite there yet, including such things as documented support for ExpressRoute. Both of these problems get better almost daily, but early adopters really have to work extra hard until Azure catches up. One other issue is that you can’t mix Classic and ARM deployments, so if you started down the road with Classic deployments you are basically going to have to start from the ground up with Resource Manager when you make the switch. If you can manage it a little pain now will help you avoid a larger headache next year when you find that you want some new feature only available in ARM.
I hope this article helps you in at least one of aspect of your ARM deployment – getting highly available SQL Server deployed. As I have documented in earlier articles, deploying both AlwaysOn Availability Groups and AlwaysOn Failover Cluster Instances in Azure “Classic” requires the use of an Azure Load Balancer (internal or external) for client redirection. Getting that configured in Classic Azure is not exactly straight forward, but it is documented well enough that any administrator reasonably familiar with Azure, Failover Clustering, SQL Server and PowerShell can get it to work.
AlwaysOn Availability Groups and AlwaysOn Failover Cluster Instances using the ARM deployment model still requires the use of an Azure Load Balancer for client redirection, however the steps on creating and configuring that load balancer are completely different and as of today not exactly documented very well. In this article I’m going to highlight the steps required to configure the ILB and update the SQL cluster IP Resource. In the next article I will walk you through the entire process step by step from the ground up from creating the vNet to installing SQL and creating the cluster.
Before we begin, I’m making the following assumptions:
- You have created a vNet using ARM
- You have provisioned 3 ARM based VMs (DC, SQL1, SQL2)
- You put DC, SQL1 and SQL2 in the same Availability Set and Resource Group
- You have created a cluster with SQL1 and SQL2 and used the DC for the file share witness
- You have either created an AlwaysOn Availability Group or AlwaysOn Failover Cluster instance with SIOS DataKeeper Cluster Edition. In either case you will wind up with a client listener, consisting of a name resource and IP resource. The AlwaysOn AG and FCI configuration up to the point of creating the load balancer is exactly the same as it is in the Azure Classic deployment model and documented on the web in many places including my own blog post
Now that you have a fully configured AlwaysOn AG or FCI, you probably notice that you can’t connect to the cluster name from any server other than the node that currently hosts the SQL cluster name resource. I’ve been told that this is because Azure networking does not support gratuitous ARPS so clients can’t communicate directly with the cluster IP address. Instead the clients need to communicate with the ILB and the ILB will redirect traffic to the active node. So step 1 is to create the ILB. As of now this can’t be done through the Azure Portal so we will use the following Azure PowerShell command.
[1/6/2016 Update – The directions below assume you are using Azure PowerShell pre-version 1. The script if you are using Azure PowerShell Version 1 or later is detailed in my blog post here.]
Switch-AzureMode -Name AzureResourceManager
Select-AzureSubscription -SubscriptionName "MSDN Azure"
# name whichever subscription you used to create your vNet and VMs
#Declare your variables using values relevant to your deployment
$ResourceGroupName ='SIOS-EAST-RG'
# Resource Group Name in which the SQL nodes are deployed
$FrontEndConfigurationName ='FE'
#Call it whatever you like
$BackendConfiguratioName ='BE'
#Call it whatever you like
$LoadBalancerName ='ILB'
#Provide a Name for the Internal Local balance object
$Location ='eastus2'
# Input the data center location of your SQL VMs
$subname ='PUBLIC'
# Provide the Subnet name in which the SQL Nodes are placed
$ILBIP = '10.0.0.201'
# Provide the IP address for the Listener or Load Balancer
$subnet = Get-AzureVirtualNetwork -ResourceGroupName $ResourceGroupName|Get-AzureVirtualNetworkSubnetConfig –name $subname
$FEConfig = New-AzureLoadBalancerFrontendIpConfig -Name $FrontEndConfigurationName -PrivateIpAddress $ILBIP -SubnetId $subnet.Id
$BackendConfig = New-AzureLoadBalancerBackendAddressPoolConfig -Name $BackendConfiguratioName
#create the ILB
New-AzureLoadBalancer -Name $LoadBalancerName -ResourceGroupName $ResourceGroupName -Location $Location
-FrontendIpConfiguration $FEConfig -BackendAddressPool $BackendConfig
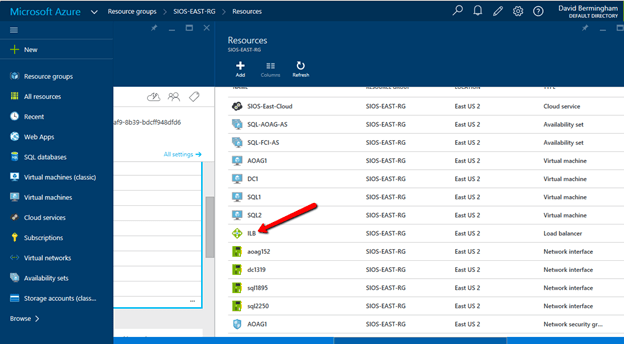
Now that the ILB is created, we should see it in the Azure Portal if we list all the objects in our Resource Group as shown below.
The rest of the configuration I’m sure can also be done through PowerShell, but I’m going to use the GUI in my example. If you want to use PowerShell you could probably piece together the script by looking at the article Get started configuring internal load balancer using Azure Resource Manager but honestly that article gives me a headache. I’ll figure it out some day and try to document it in a user friendly format, but for now I think the GUI is fine for the next steps.
Follow along with the screen shots below. If you get lost, follow the navigation hints at the top of the Azure Portal to figure out where we are.
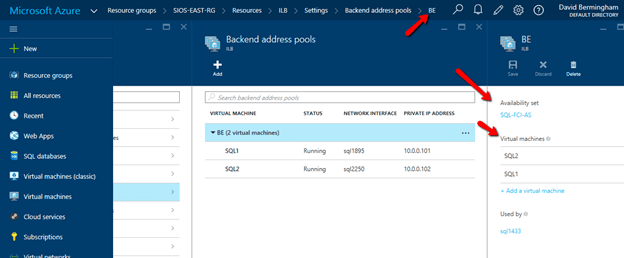
Click Backend Pool setting tab and selects the backend pool to update the Availability Set and Virtual Machines. Save your changes.
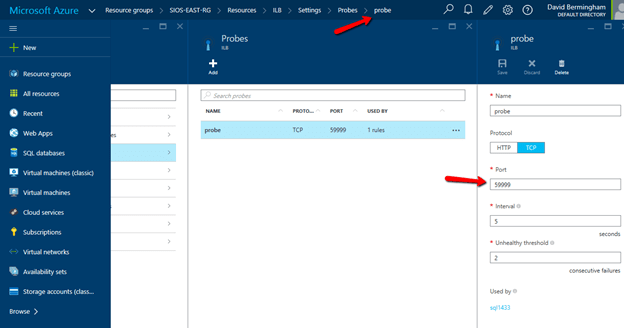
Configure Load Balancer’s Probe by clicking Add on the Probe tab. Give the probe a name and configure it to use TCP Port 59999. I have left the probe interval and the unhealthy threshold set to the default settings, which means it will take 10 seconds before the ILB removes the passive node from the list of active nodes after a failover, meaning your clients may take up to 10 seconds to be redirected to the new active node. Be sure to save your changes.
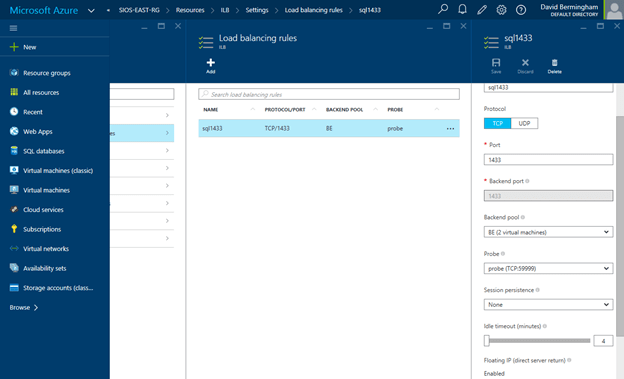
Navigate to the Load Balancing Rule Tab and add a new rule. Give the rule a sensible name (SQL1433 or something) and choose TCP protocol port 1433 (assuming you are using the default instance of SQL Server). Choose 1433 for the Backend port as well. For the Backend Pool we will choose the Backend Pool we created earlier (BE) and for the Probe we will also choose the Probe we created earlier. We do not want to enable Session persistence but we do want to enable Floating IP (Direct Server Return). I have left the idle timeout set to the default setting, but you might want to consider increasing that to the maximum value as I have seen some applications such as SAP log error messages each time the connection is dropped and needs to be re-established.
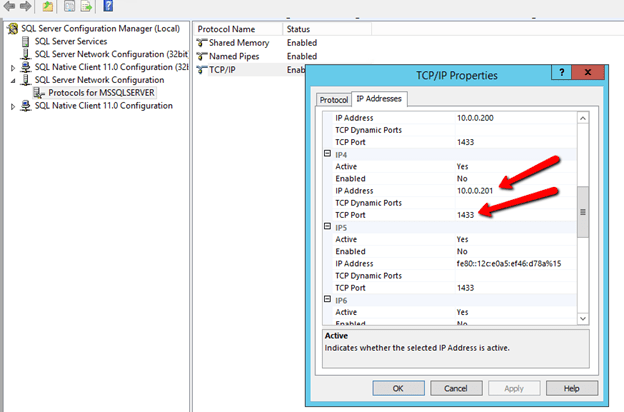
At this point the ILB is configured and there is only one final step that needs to take place. We need to update the SQL IP Cluster Resource just the exact same way we had to in the Classic deployment model. To do that you will need to run the following PowerShell script on just one of the cluster nodes. And make note, SubnetMask=“255.255.255.255” is not a mistake, use the 32 bit mask regardless of what your actual subnet mask is.
# This script should be run on the primary cluster node after the internal load balancer is created
# Define variables
$ClusterNetworkName = "Cluster Network 1"
# the cluster network name
$IPResourceName = "SQL IP Address 1 (SQLCluster1)"
# the IP Address resource name
$CloudServiceIP = "10.0.0.201"
# IP address of your Internal Load Balancer
Import-Module FailoverClusters
# If you are using Windows 2012 or higher, use the Get-Cluster Resource command. If you are using Windows 2008 R2, use the cluster res command which is commented out.
Get-ClusterResource $IPResourceName
Set-ClusterParameter -Multiple @{"Address"="$CloudServiceIP";"ProbePort"="59999";SubnetMask="255.255.255.255";"Network"="$ClusterNetworkName";"OverrideAddressMatch"=1;"EnableDhcp"=0}
# cluster res $IPResourceName /priv enabledhcp=0 overrideaddressmatch=1 address=$CloudServiceIP probeport=59999 subnetmask=255.255.255.255
I have just one final note. In my initial test I still was not able to connect to the SQL Resource name even after I completed all of the above steps. After banging my head against the wall for a few hours I discovered that for some reason the SQL Cluster Name Resource was not registered in DNS. I'm not sure how that happened or whether it will happen consistently, but if you are having trouble connecting I would definitely check DNS and add the SQL cluster name and IP address as a new A record if it is not already in there.
And of course don't forget the good ole Windows Firewall. You will have to make exceptions for 1433 and 59999 or just turn it off until you get everything configured properly like I did. You probably want to leverage Azure Network Security Groups anyway instead of the local Windows Firewall for a more unified experience across all your Azure resources.
Good luck and let me know how you make out.
 As you can see, while this particular job did not push the upper limits of the theoretical maximum of any of these storage solutions, the latency had a significant impact on the overall performance of this particular test. The test used 8k blocks in a mix of 30% writes and 70% reads to simulate a typical SQL Server OLTP workload.